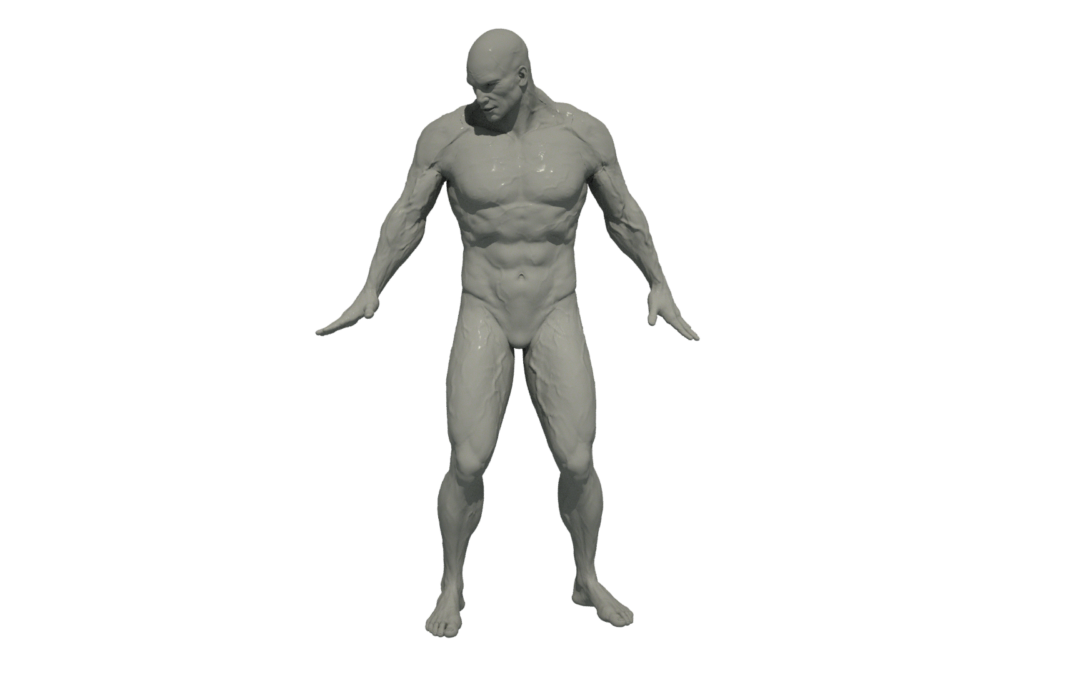
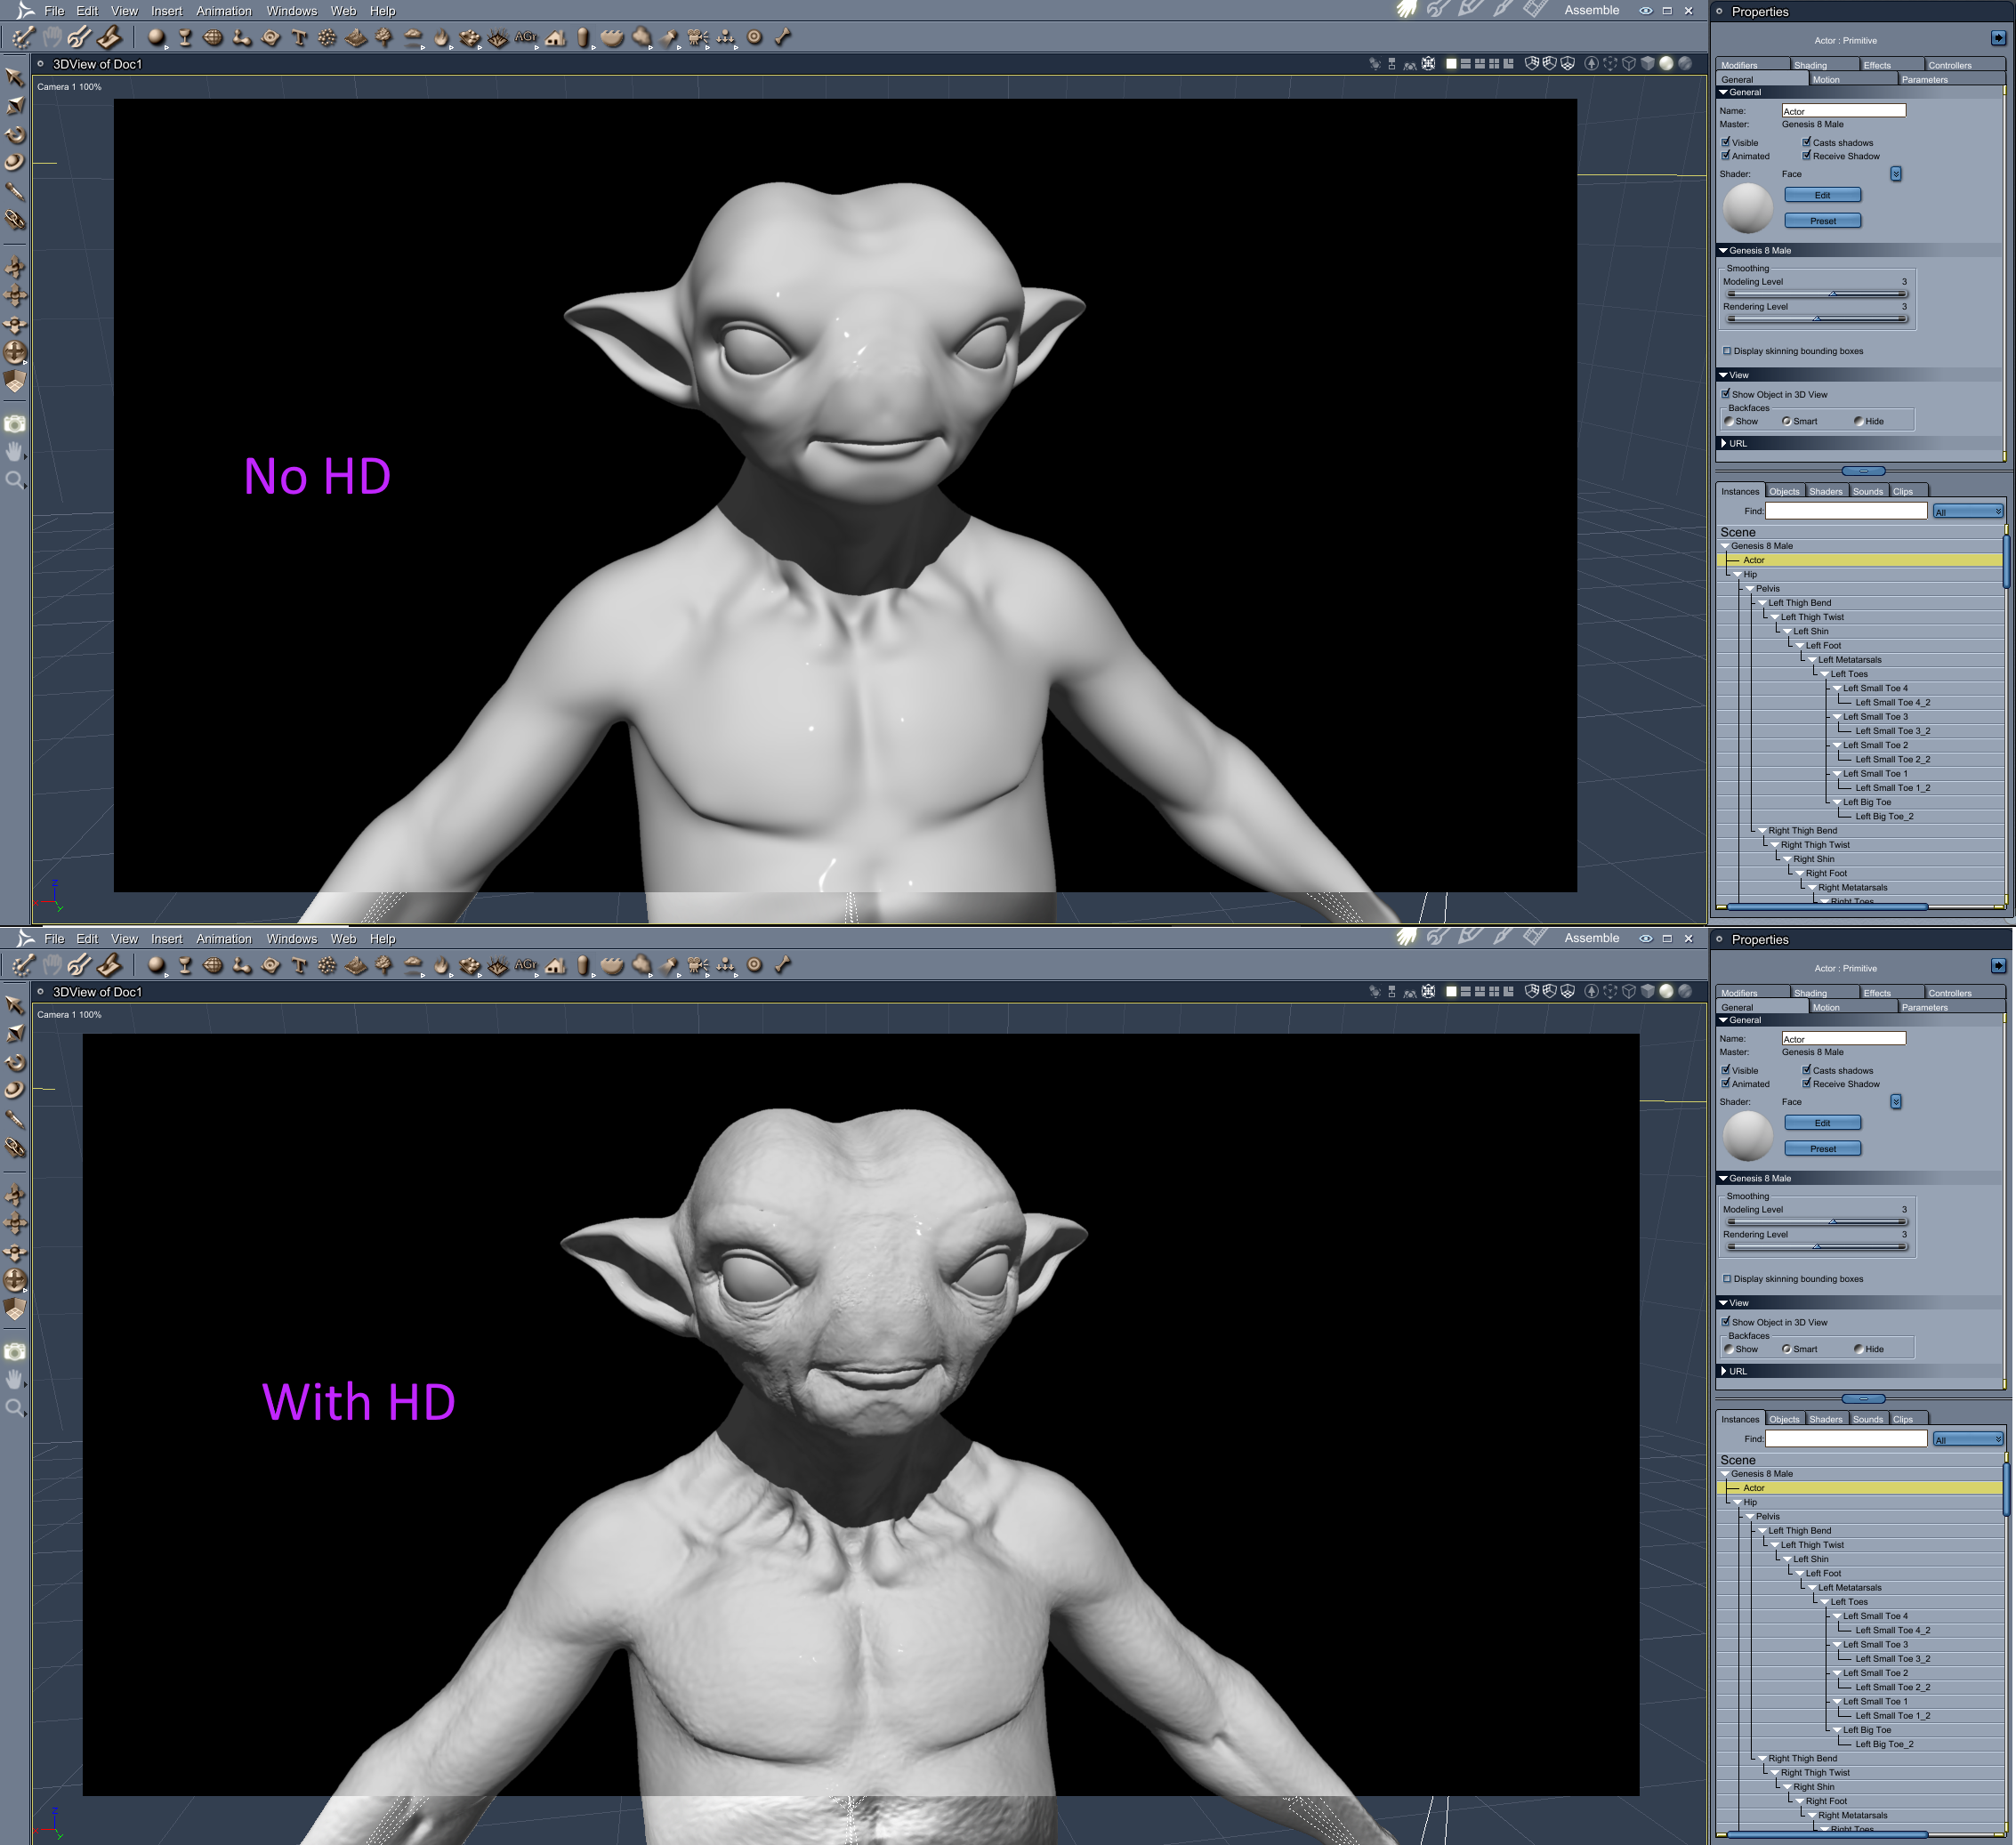
Philemo released another Carrara plugin at the end of April in 2019, the HD Morph plugin for Carrara, that supports high resolutions characters import into Carrara or even making your own HD content inside Carrara. Here is an early test render from Bunyip of Marvin the alien for G8M: https://www.daz3d.com/mervin-the-alien-hd-for-genesis-8-male
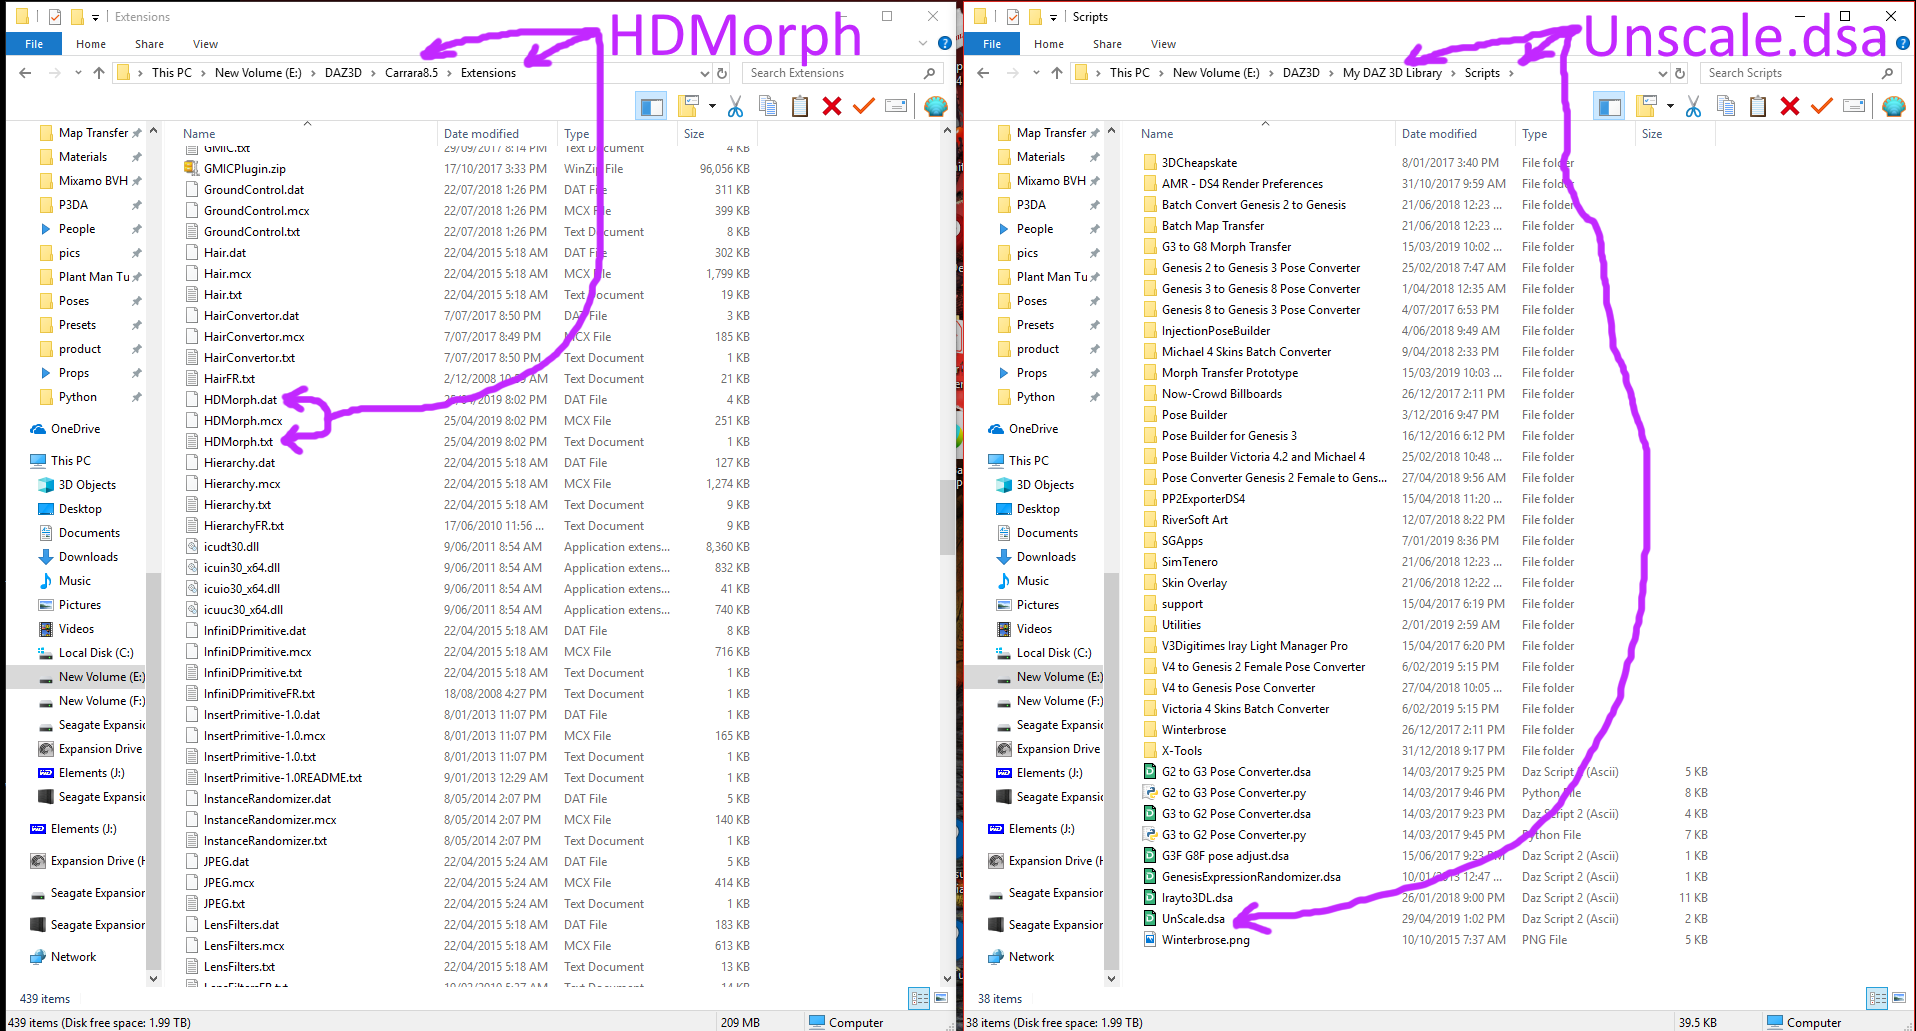
The Carrara files should be copied as usual to the Carrara Extensions folder, a bit new for Carrara users, is the Daz Studio scaling script that must be copied to the Daz Studio folder, to solve issues with some characters, here is a screnenshot showing the folders:
Dartanbeck more detailed step by step guide clearifies some of the steps, using the Gianni 6 HD character as an example:
“And just to clarify, in Step 4 and Step 5 of the tutorial, he is first (step 4) importing the exported (from DS) HD morphed figure as an OBJ with his import notes applied, and then in step 5, he’s loading in the figure that we would otherwise use the morph on into the same scene, with the obj from step 4.” An example: If we’re going to use a Gianni 6 HD morph,
Step 1 – in Daz Studio we’d load in Gianni 6 HD character preset
Step 2 – since this is a Character Preset, this step should already be done (but check his notes just to see what it means)
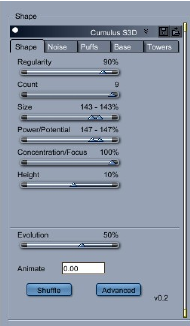
Sparrowhawke3D introduced a new plug-in called Cumulus S3D
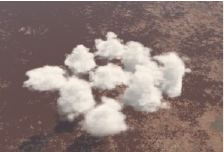
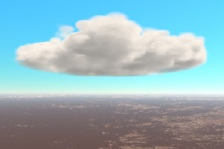
Cumulus S3D is a volumetric cloud shape plugin that creates up to 9 puffy animatable clouds in rows. The clouds grow and fade over time and puffs circulate within the clouds.
With many settings and options the clouds can be arranged in neat rows or be randomly spread. Towers can rise and fall above the base of the cloud which can be flat, rounded or undulating.
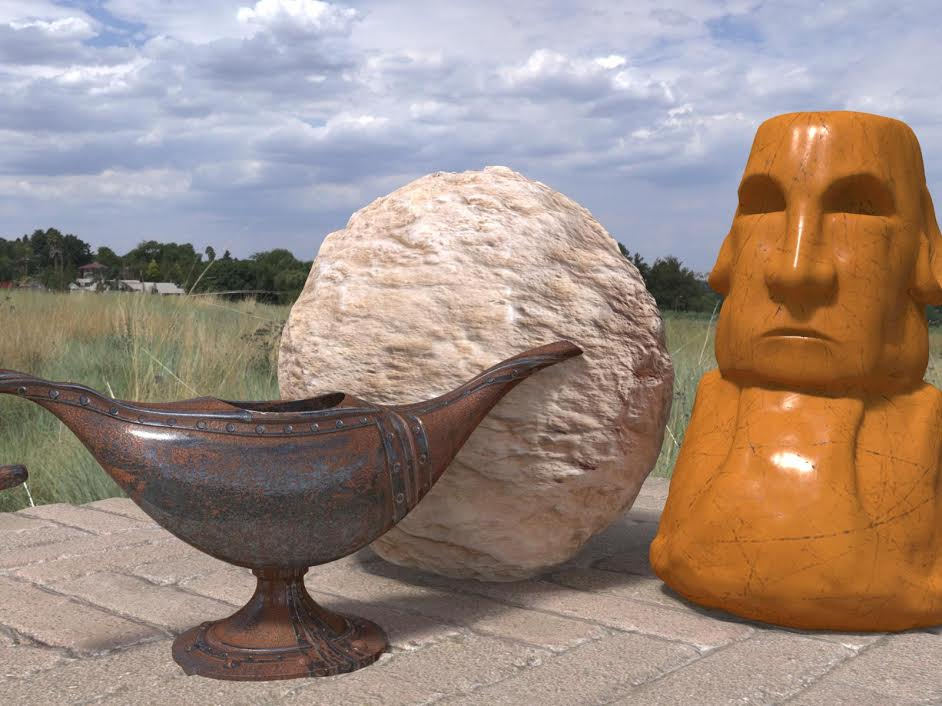
Carrara has 2 kinds of lighting, direct and indirect.
Direct lighting comprise all kind of lights (directional, sun, bulb, spot, anything glows, shape lights…).
Indirect lighting are ambient, sky light and indirect light.
The main difference between direct and indirect is that all the features of the lighting model (highlight, shadows, SSS, translucency) are used only with direct lighting. Indirect lighting considers all materials as mate, with no SSS, shadowless. If your materials follow this description, then no problem. Otherwise, renders using indirect lights often seem dull and whitish.
The goal is to add a true environment lighting in Carrara, as seen in all modern renderers.
To come back to this plugin, the idea is to create a dome of direct lights (here directional lights) with value extracted from an HDRI map. This is supposed to give the best of both world.
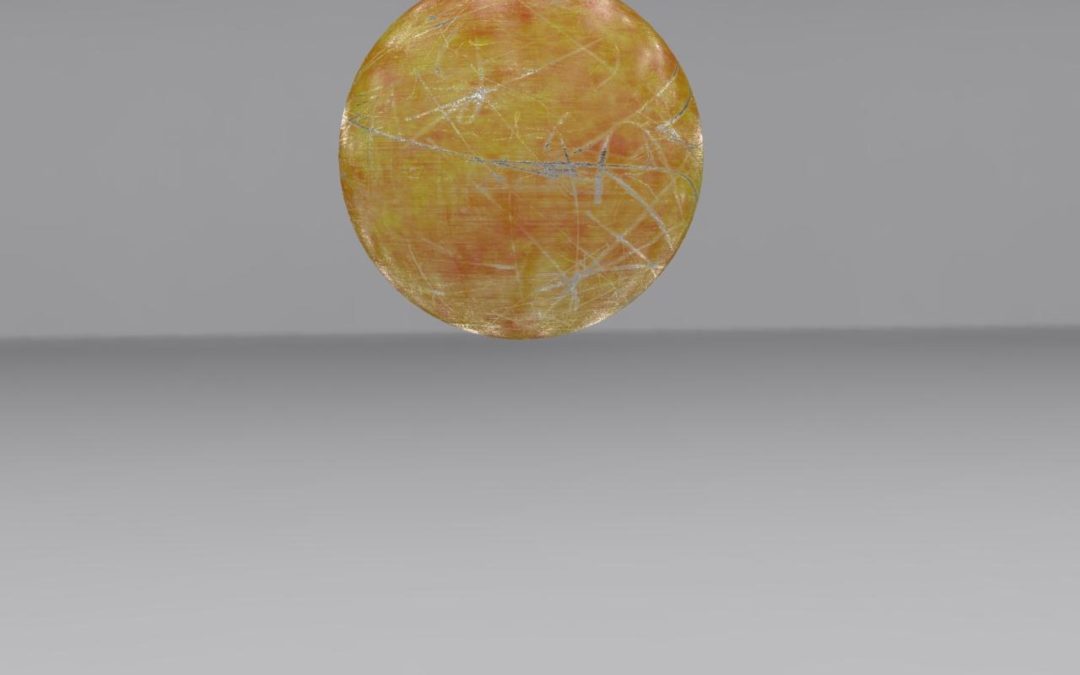
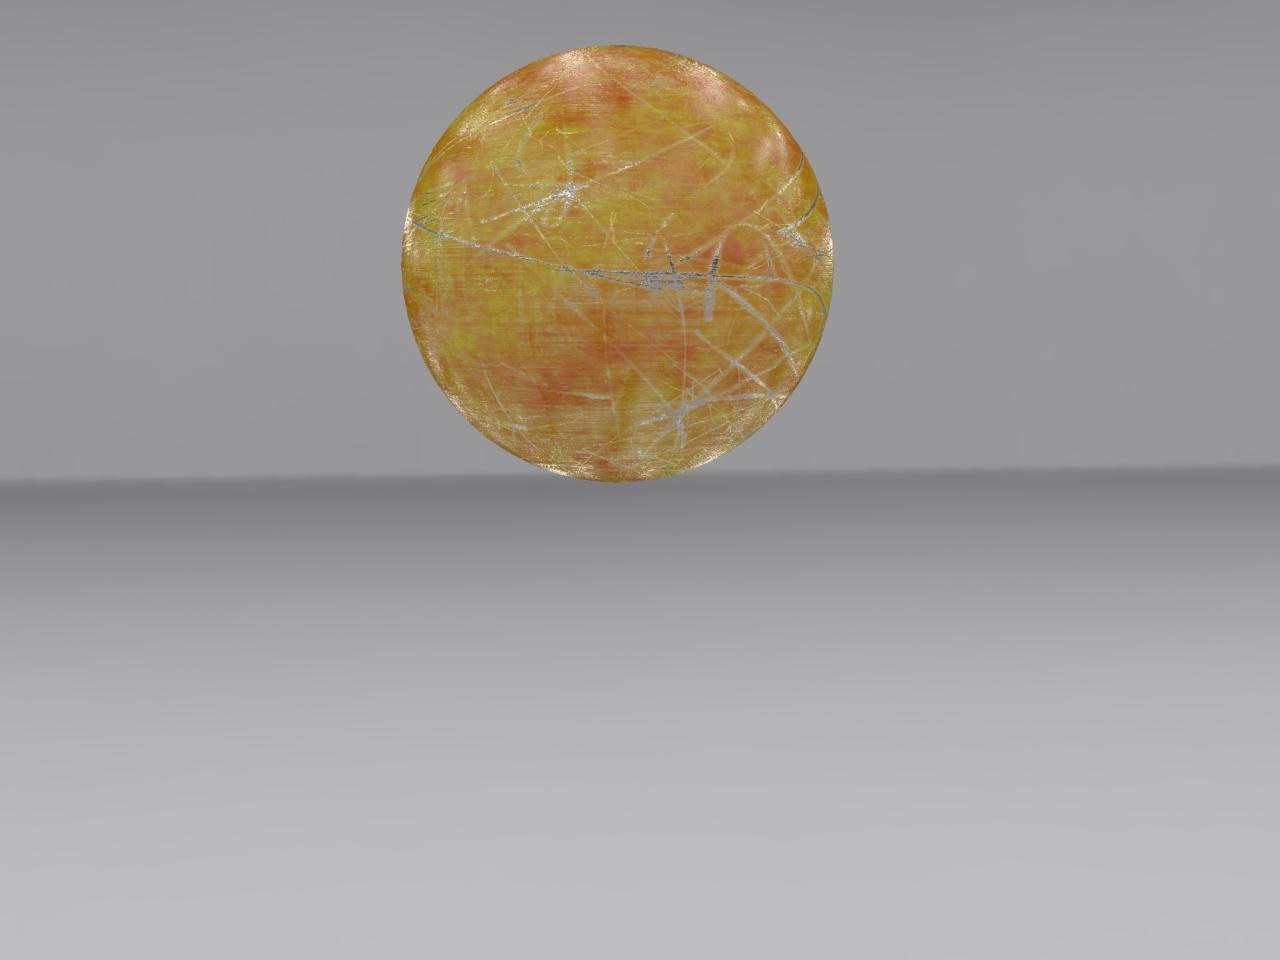
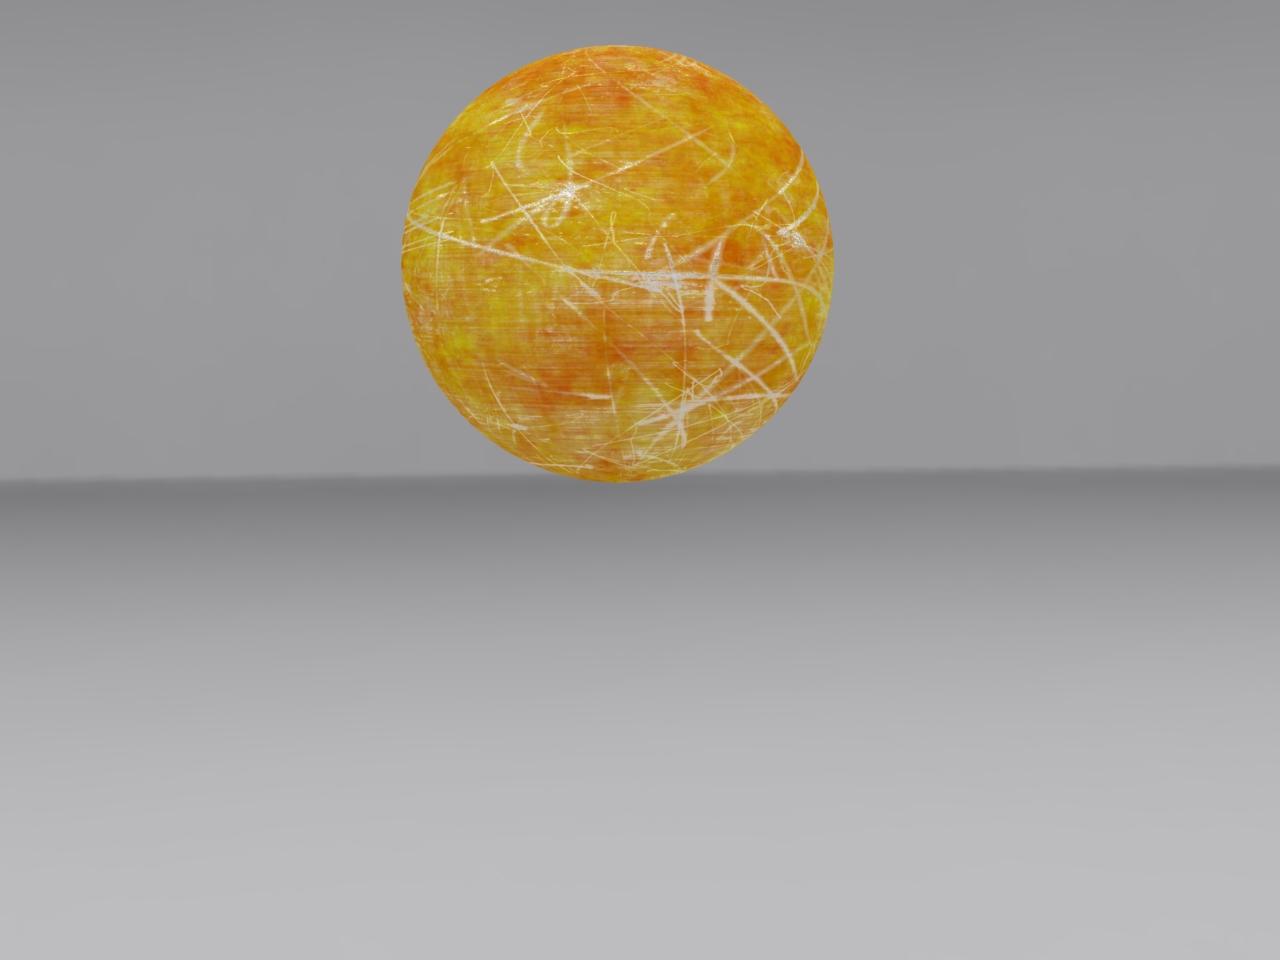
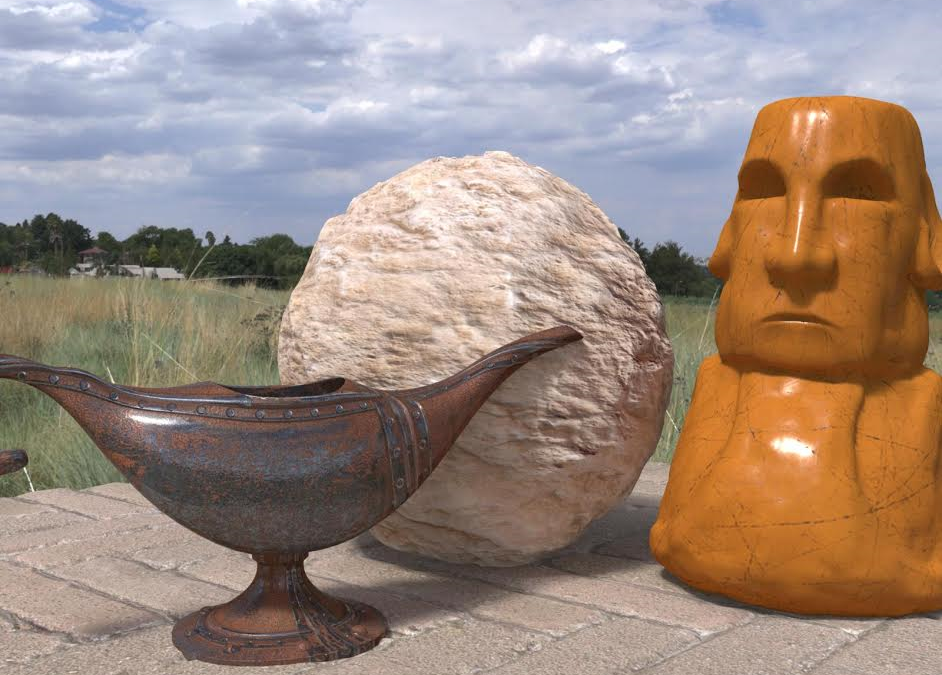
A side by side comparison of rendering a shiny object using sky light and dome light
Sky light
Dome light
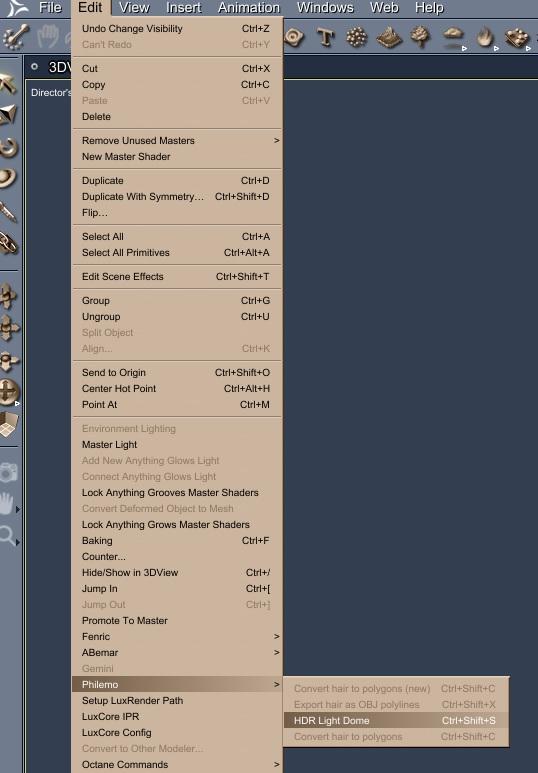
How to use it
First, there must be an HDR Background set for the scene
The command to create is in menu EDIT/Philemo/HDR Light Dome.
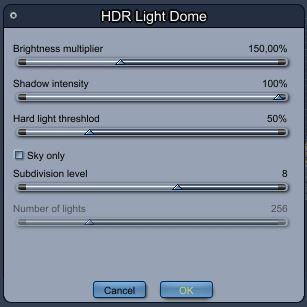
It open a window with 5 parameters:
Brightness multiplier. It’s similar to the sky light intensity slider in the render room. It’s related to the shadow you’ll use (hard light threshold slider a bit below). The more shadow, the more brightness you need
Shadow intensity. Same as in lights.
Hard light threshold. It’s the threshold below which a light will be considered a hard light (ie cast shadow). A 5% value leave only the sun as hard light in a bright sky. A 200% value has all the lights as hard light.
Sky only : Will generate a half dome and no light from the ground.
Subdivision level : drives the number of lights generated by a power of 2. 5 is 32 lights, 6 is 64, 7 is 128, 8 is 256…
Optimal is often found with 256 lights, 200% threshold. It may be a bit long to render, more if you have transmaps, so you can lower some setting. That’s why the default is 50% threshold
Of course, when rendering, sky light option should be unselected.
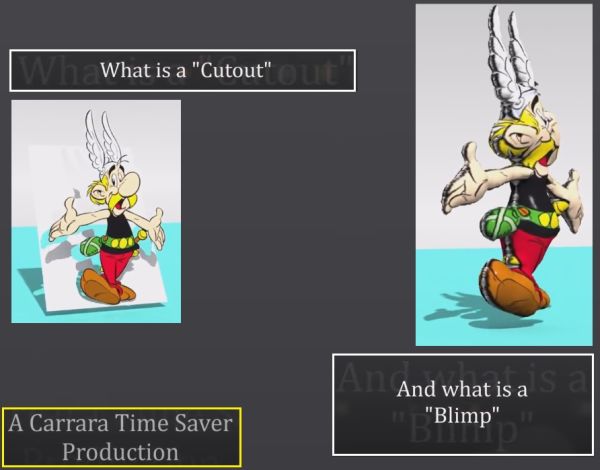
Philemo: “A cutout is a plane on which an image is mapped and the transparent parts removed. Why would you say ? Just because because the renderer doesn’t like transparency. So trading polygons for transparency is usually a good bargain. For instance, a tree where leaves have no transparency renders 10 times faster than a tree where leaves are a rectangle with transparency.
A blimp is an inflated cutout, similar to the “organic” operator in the vertex room. It’s useful when you want to use cutouts to populate background (a common practice) and you want a better response to light. You can see the difference in this post I made in back in February.
You can also use it as a starting point for modeling from a drawing, given that UV mapping will be Box front and back. You can also use it for titling with round, cartoon like fonts.”
UPDATED 2018-06-12 New versions for Windows and OSX online now.
Now supports DAZ Studio shaders importing, see the following video for more info:
UPDATED 20180409 Philemo is hard at work with the third beta version of the PBR plugin for Carrara: “Starting to experiment how to convert Studio shaders to PBR…”
UPDATED 20180408
A new beta is available. It adds the metallic workflow and an importer. New version is available here
More info here in the DAZ3D forums.
Updated PDF manual: PBRmanual02
Original article 20180328
Philemo has just released an early beta version of a new plugin for Carrara, PBR Lighting Model.
“I’ve started a new plugin that allows import “as-is” of PBR textures (albedo, roughness/glossiness, Ambient occlusion and metallic) such as the ones produced by Substance.
So far, it’s done for non-metallic materials (dielectric in PBR jargon).
To do that, I have implemented the Disney Principle BSDR as a lighting model. I’ve choosen it because it (or a modified version of it) is widely implemented (Blender/cycle, Appleseed, Renderman and many other included countless game engines). So, it was just time Carrara got itsown version :-). You can see here the Renderman documentation on this model (it’s the best one I’ve found so far). On top of PBR, Disney Principle add (a not convincing) subsurface, anisotropy, sheen for cloth, glossy clearcoat.”
The updated manual is available as a PDF is here (Does not include info about the latest version DS import yet): PBRmanual02
Release note 20180328: Beta version is out here (Windows 64 only, sorry for Mac user, I’ll try to provide an OSX version later this week). You can find a basic documentation in this post This is only the specular workflow. Metallic map are ignored for now. Next version will have it.
Release note 20180408 A new beta is available. It adds the metallic workflow and an importer. New version is available here.
More info here in the DAZ3D forums.
Release note 20180612
The idea behind this new feature is to exploit as much data as possible from Studio material, including Iray or other shaders type. The result may be better, equivalent or worst, depending on the quality of the material itself, the lighting in the scene and lighting model used is Studio. In the other hand, as all data will be in the shader (specular map, reflection map, normal map…), it will be easier to tweak if need be.
the DUF file is to be applied to the imported par containing vertex data (usually the “model part”).
In the effect tab of primitives, the is a new widget allowing drag & drop of DUF files. All shaders included in the Duf file will be imported, even if not used on this particular model (it’s particularly true for scene Preset shading many primitives). It’s still in Beta Stage. Please be sure to report any issue.
Example Carrara render from the new version with metallic support, using an HDRI background:
Thanks to JoeMamma2000 for a detailed yet easy-to-follow guide on how to adapt Blender, for a Carrara user. Besides the basics like the Graphical-User-Interface differences and tips and tricks, there are detailed descriptions of the different features and methods. Original Forum post by JoeMamma2000 here: https://www.daz3d.com/forums/discussion/58735/ot-carrara-izing-blender/p1 Small modifications by 3drendero.
Changelog:
20180123: First release, based on forum thread
20180128: Final version, moving new info to a separate Part 2 article
Introduction
First I want to make a disclaimer: this thread is completely off topic, and is a discussion of other, non-Carrara software. I only post this because it relates to Carrara for those who might use other software like Blender together with Carrara for certain functions and features that Carrara might not have.
If you tend to dislike discussions of other software, especially if comparison to Carrara are mentioned, please stop reading this thread.
For others, I will try to make enough negative comments about Blender in this discussion so nobody feels like I’m saying Blender is the best software and Carrara isn’t. No software is perfect, and there’s no need to take offense at discussions of inanimate software. And no, I am not trying to “sell” Blender to anyone, just providing a service for those who might enjoy having another set of features at their disposal.
For those who are unfamiliar with Blender, it is a free and full-featured software that has some very well-implemented and high level features that aren’t available in Carrara. It provides an opportunity to integrate your Carrara character work with stuff like fluids and smoke and fire and a whole range of other “professional” features.
Now, on occasion someone here mentions Blender and how difficult the interface is compared to Carrara. I tend to agree, at least in certain areas. When a new, Carrara-based user opens Blender, IMO, it doesn’t respond intuitively in some very basic aspects.
However, you can do a lot to customize Blender, and with a few fairly simple steps make it more intuitive and Carrara-like. This thread is intended to give some ideas on some ways I have customized Blender to make it more intuitive…at least for me. Forgive me if I miss some stuff. I did a lot of this customization years ago, so I’m real rusty on what’s native Blender and what’s customized.
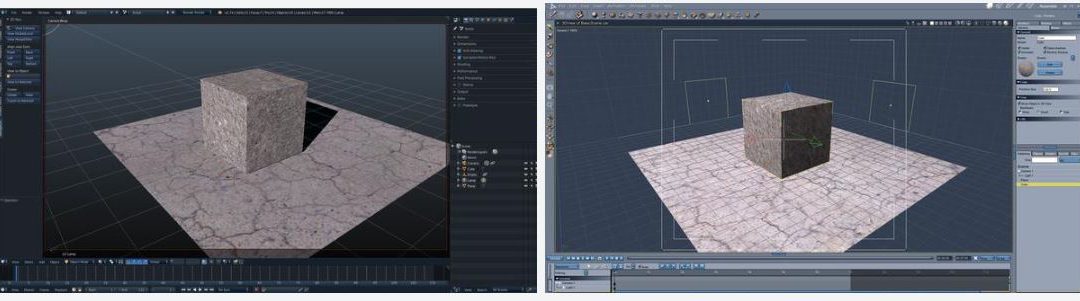
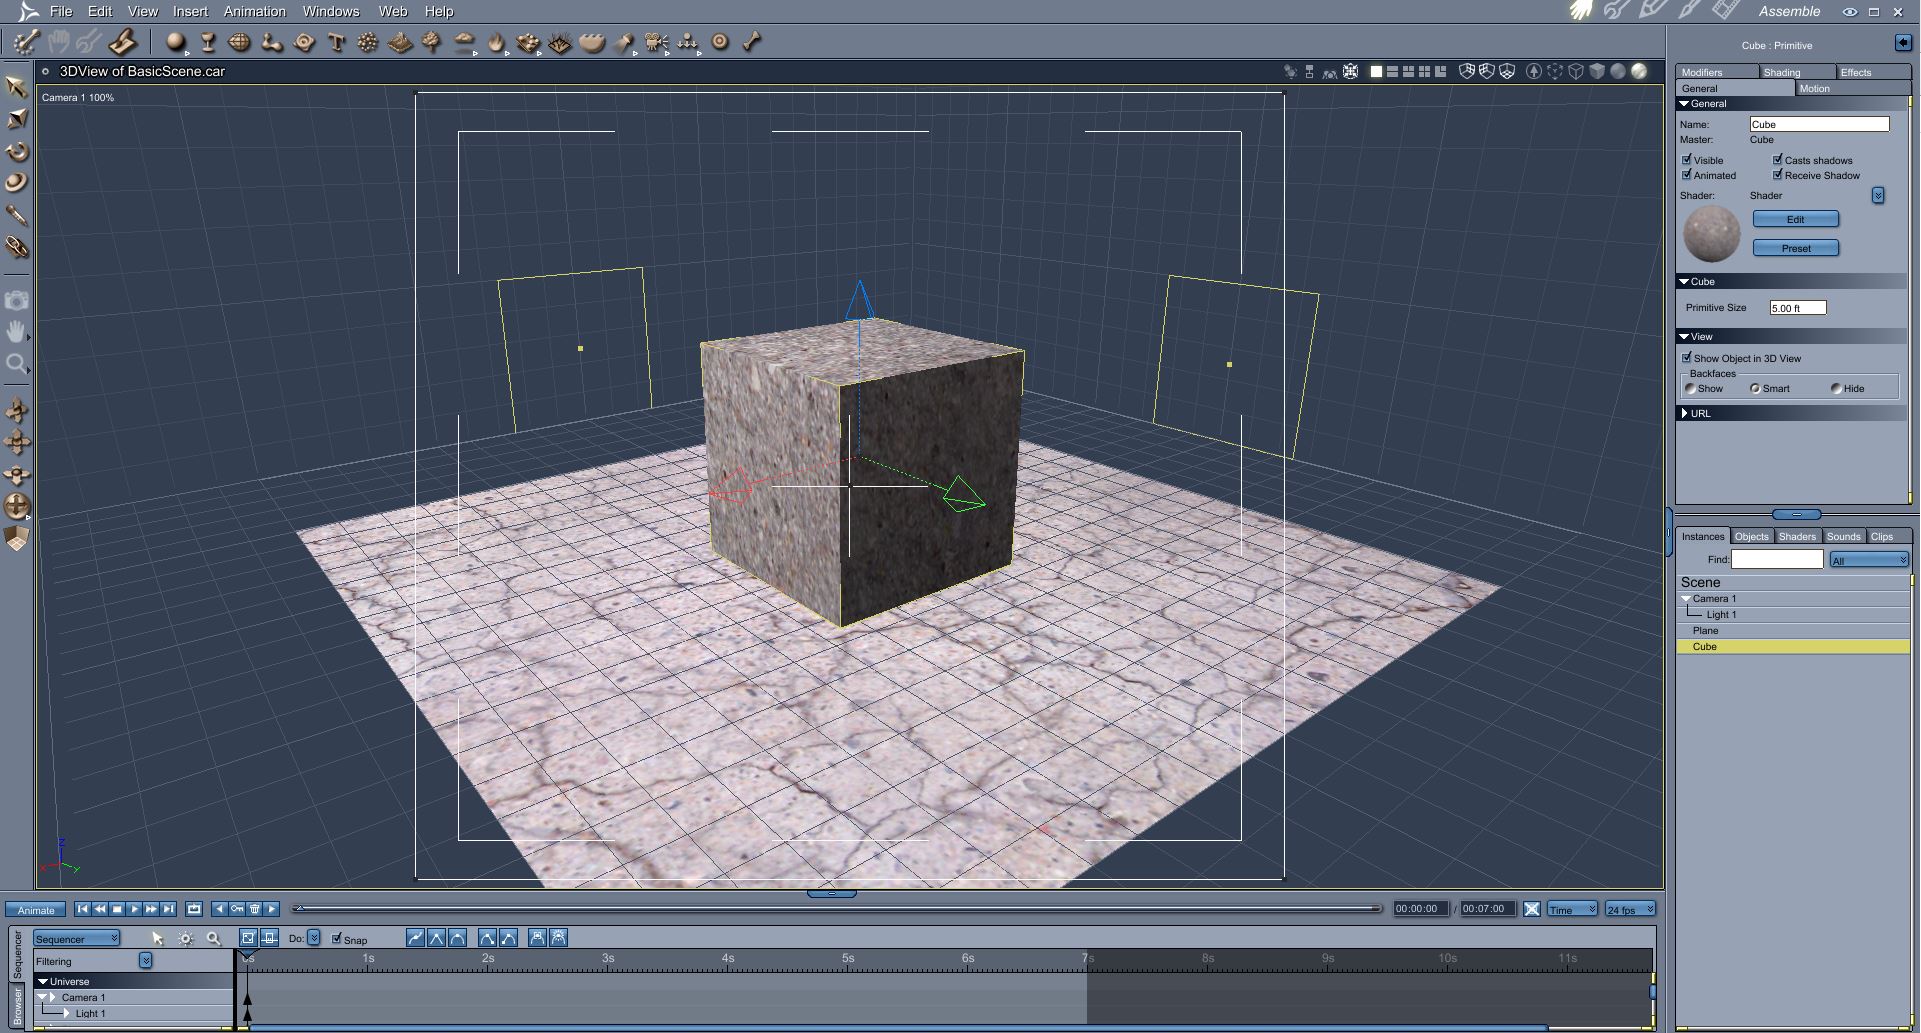
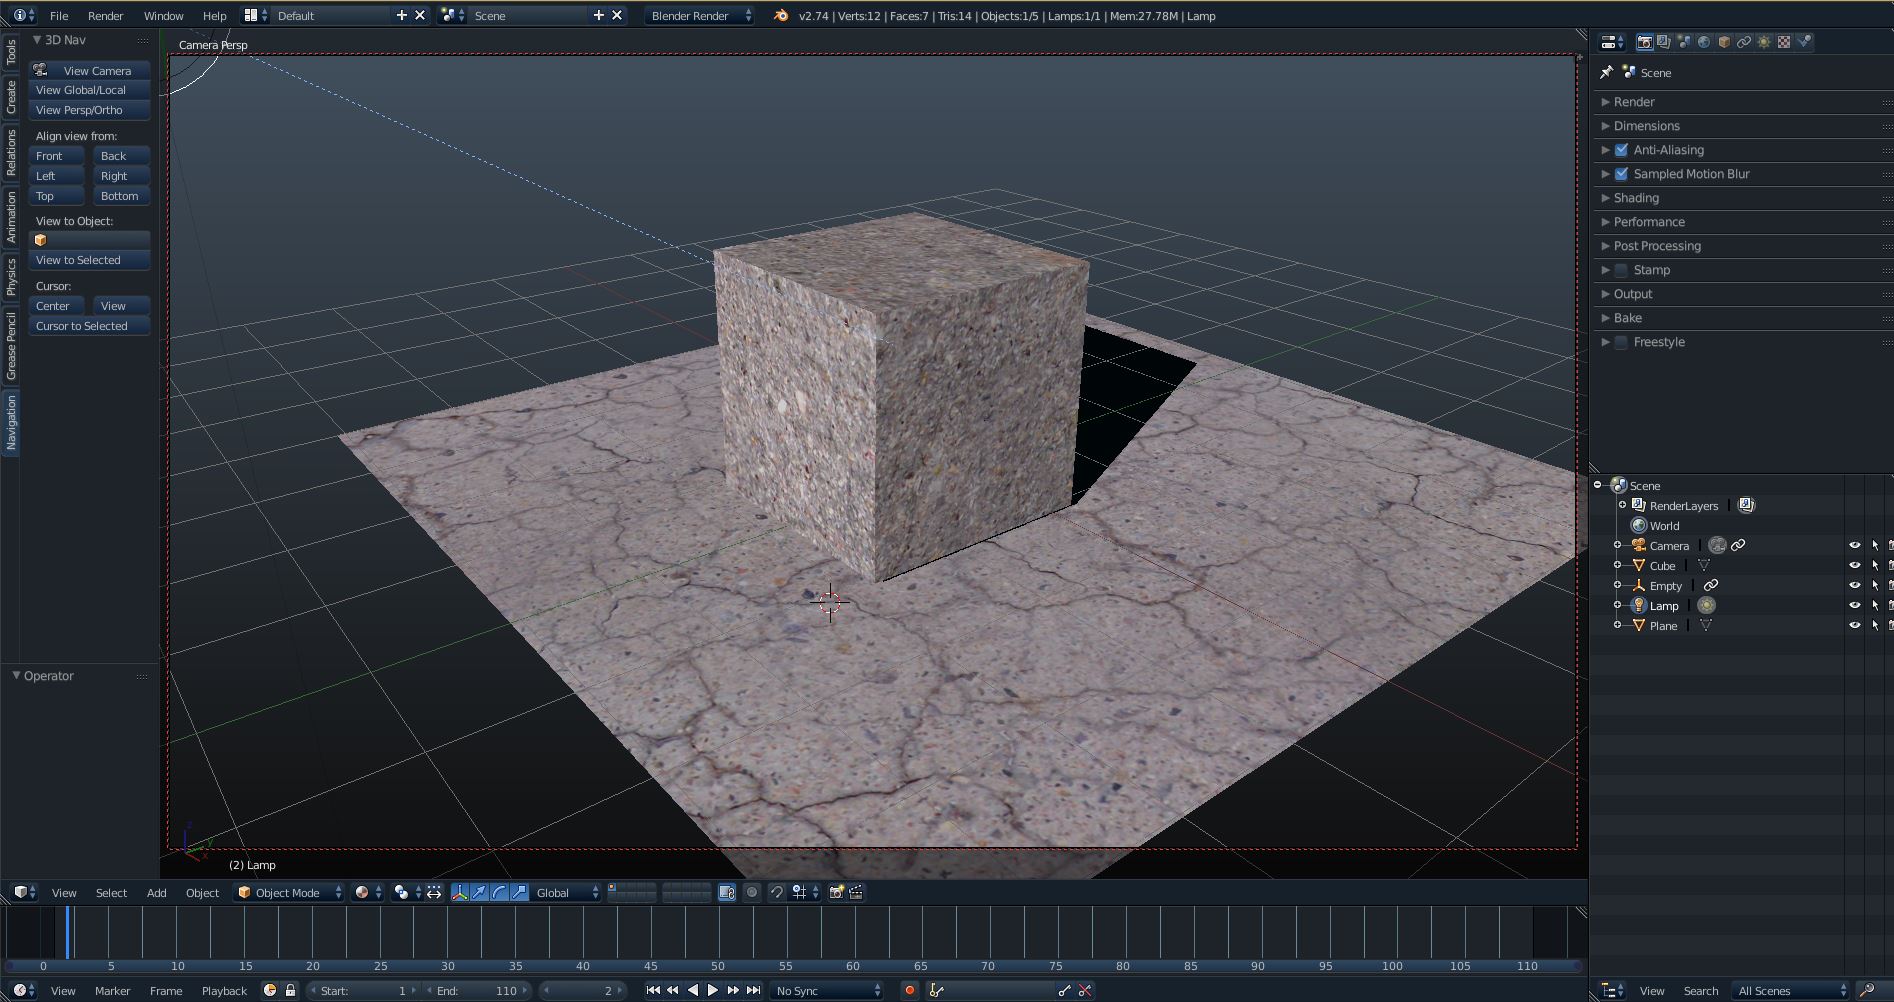
Basic Similarities
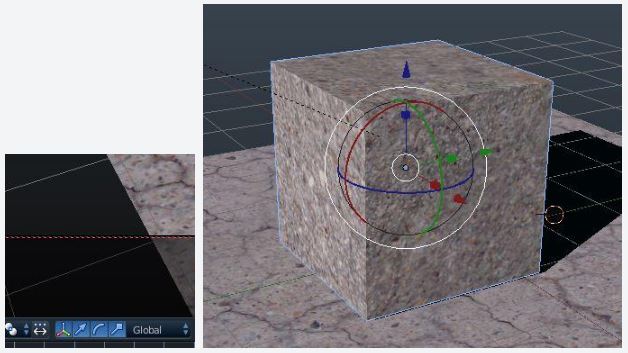
First, there really are a lot of similarities between the two apps, at least in the default layouts. Here are two images of both apps with a simple scene. Note that both apps have some sort of toolbars along the left side, as well as the familiar text menus across the top. Also both have the typical 3D View, and a sequencer along the bottom. And on the right hand side, both have an Instances (aka, “Outliner” in Blender) panel, and a “Properties” panel (same title in both apps). Visually, they look very much alike. And keep in mind that, for the most part, all 3D apps do pretty much the same thing, so you can expect Blender to have most of the same basic features as Carrara. The only challenge is finding how and where they are located and used. But really, with just a little familiarizing and tweaking, you should feel fairly comfortable with the Blender basics.
Carrara
Blender
Basic Differences
One of the problems is that Blender relies heavily on keyboard shortcuts. And that’s fine if Blender is your main software and you use it regularly. However, for someone who jumps around multiple apps on a regular basis, trying to remember keyboard shortcuts and different mouse operations is a huge pain in the butt. It annoys the heck out of me. So there are some limitations in how Carrara-like you can make it, since you need to use SOME keyboard shortcuts for common operations, but there are also ways around some of that. That being said, you can make Blender very similar to Carrara with just a few tweaks.
View Manipulation
Now, IMO, the biggest difficulty that a new user will face when opening Blender is that there seems to be no easy way to pan/zoom/rotate the view. With Carrara there are those nifty icons on the left side toolbar. No matter what view you’re in, you just click on one of those buttons and you can easily move the view. With Blender there are no pan/zoom/rotate buttons. You need to use the mouse MMB and the shift/CTRL keys. To me that is the biggest counter-intuitive annoyance with Blender. But as far as I know, there is no way around it. So you’ll need to remember that you rotate by click/drag the MMB, pan with shift/MMB, and zoom by scrolling the mouse wheel. There is also a “fly” mode for navigating the scene, and I might discuss that later.
Selections
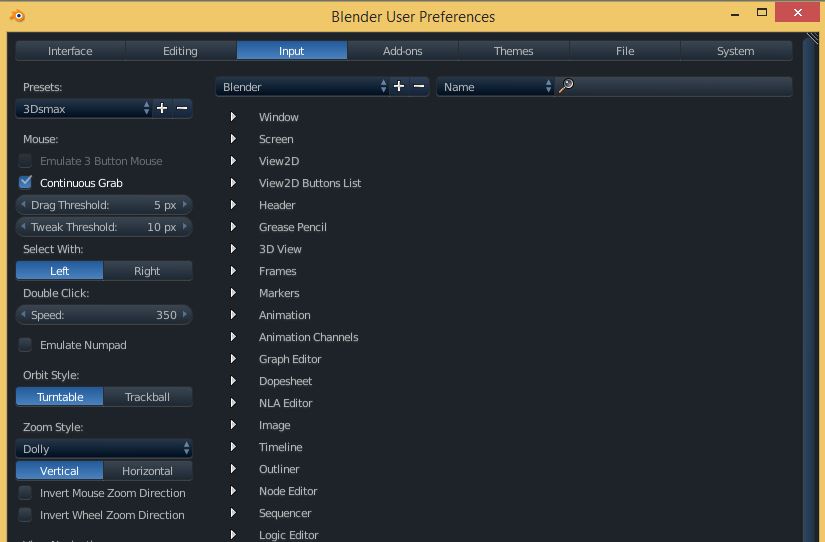
Now, the next big annoyance in Blender is that you select stuff with the RMB. And as we all know, the rest of the world selects stuff with the LMB. Luckily, there’s a way to change that. You can select a Maya or 3DSMax input preset. To do that, just go to File/User Preferences/Input, and the very first option is “Presets”. Just select 3DSMax (or Maya) from the dropdown. Personally, I use the 3DSMax preset because it also defaults the rotation to “turntable” (similar to Carrara) instead of the super annoying “trackball”.
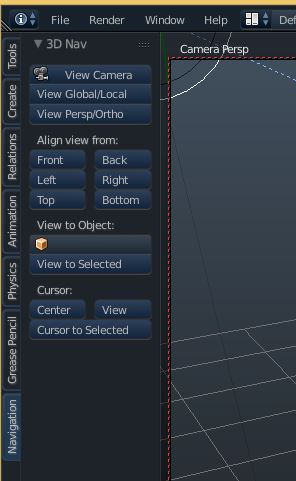
View to Selection Another Carrara feature I use constantly is the “View to Selection”, (shortcut: 0 key). Select an object, hit the “0” key, and no matter what view you’re in, it instantly centers your view on the object. I can’t survive without it. However, if you hit “0” in Blender you jump into Camera view. The correct key for “View to Selection” in Blender is the period key. So you have a couple of choices. Either you can re-map those shortcut keys to match Carrara (File/User Preferences/Input) or do what I do, which is use the vertical Navigation tab along the left side of the 3D view. There’s a button for “View to Selected”, as well as some other quick navigation buttons (including jumping to Camera View). Personally, I try to avoid re-mapping shortcut keys because it can get kind of confusing, especially when viewing others’ tutorials and stuff. And that brings up another point…
Shortcut keys
Blender is extremely customizable, so if you need to re-map any shortcut keys to be more like Carrara, you can probably do it (File/User Preferences/Input). In fact it would be cool if someone could sit down sometime and build a Carrara shortcut key preset file.
Camera View
Blender’s default is a rather insane notion that camera view manipulation is somehow different from other views. As an example, if you are in camera view mode and try to manipulate the camera’s view (rotate, translate, etc.), the view instantly jumps out of camera view and into User Perspective (similar to Director’s Camera) view. Which implies you can only manipulate the camera and its view by awkwardly manipulating the camera from an external view (by looking AT the camera, not THRU its lens), then jumping back to camera view to see if you got it right. Crazy. But thankfully, that was fixed a few years ago. Now all you have to do is select the camera, hit the “n” key, and under the “View” dropdown select the “Lock Camera to View” option.
Manipulators
One thing I love most about Carrara and others is they had implemented the idea of object manipulators long before other apps. And I LOVE manipulators. You know, the translate/rotate/scale thingies that show up when you select an object. Blender now has those, like Carrara Universal Manipulator. You can choose to have all three manipulators appear simultaneously in Blender, like Carrara Universal Manipulator.
Just shift-select the manipulator buttons as shown below.
Summary so far
So, to summarize so far, here are my suggestions for Blender tweaks:
1. REMEMBER: Rotate view by click/drag the MMB, pan with shift/MMB, and zoom by scrolling the mouse wheel.
2. Select 3DSMax input preset
3. Use Navigation tab, “View to Selection”
4. Select each camera, hit the “n” key, and under the “View” dropdown select the “Lock Camera to View” option
5. Shift-select the manipulator buttons to have all manipulators appear simultaneously
Those suggestions should put you a lot closer to making your Blender interface more “Carrara-like”.
I’d also suggest you consider using another nice Blender feature, and that is saving a default scene. Once you have a simple scene set up as you like it, you can define that as the default scene that opens every time you start Blender. Set it up as a “Carrara-like” scene, maybe also with the types of lights and objects you use very often, and save that as default. You’ll feel a lot more comfortable next time you start Blender.
Carrara Shaders vs Blender Materials
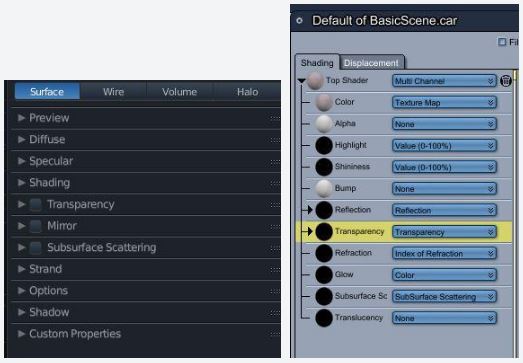
Another area that might appear confusing to Carrara users when trying out Blender is with “shaders”. Here are images of the Carrara Shaders tab and the Blender Materials tab.
Note that they are very very similar if you realize that the major difference is only with terminology.
Keep in mind:
Color is the same as Diffuse
Highlight/Shininess are the same as Specular
Reflection is the same as Mirror
Glow/Translucency are the same as Shading
and so on…
So when you select the Materials button in Blender’s Properties tab, its virtually identical to Carrara’s Shader tab. Well, except for some details regarding features, etc.
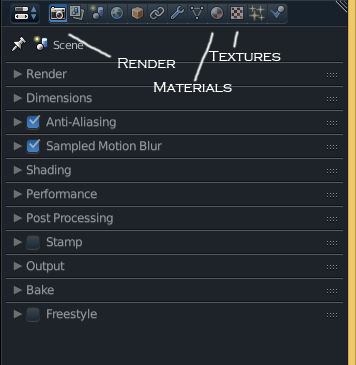
Textures
And a related area that might lead to some confusion is Blender’s “Textures” tab. This is very similar to the dropdown selections in Carrara’s shaders tab, such as to select external images or procedurals to map, or types of mapping (UV, etc.), and so on.
So Carrara shaders tab is kind of a composite setting area for all surface settings, while in Blender they are somewhat segregated by shading and texturing. But it’s all the same stuff.
Rooms I suppose the next area for consideration are Carrara’s “Rooms”.
There’s Assemble, Model, Storyboard, Texture, and Render.
Blender doesn’t have rooms, but it has icons and windows which do similar things. They’re just located in a different area, not along the top toolbar like in Carrara.
Let’s first take the Model room. Some may recall years ago when DAZ added the ability to directly edit objects in the 3D View, instead of in the Model room. Which was nice because you were editing the model as it was, not a non-scaled, etc., representation of the object in a separate room.
Blender’s modeller is similar, where you model directly in the 3D View. Just go to the toolbar at the bottom of the 3D View and select “Edit Mode” from the dropdown/dropup menu.
And once you enter Edit mode, the Tools tab on the left side contains a whole list of modelling/editing tools.
Carrara’s Render and Texture Rooms are similar to Blender’s Render and Materials/Texture panels. Those are accessed from the Properties panel on the right hand side of the screen.
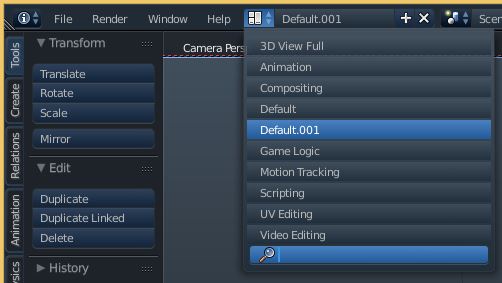
Screen Layouts in Blender
Now Blender does have its own form of Rooms, called “Screen Layouts”, and these are extremely useful and helpful things to be familiar with.
Basically, since Blender can have all of its windows customized, you can configure a screen layout based upon what function you’re performing at the time.
The default layouts are as shown in the image below: Animation, Compositing, Default, Game Logic, Motion Tracking, Scripting, UV Editing, and Video Editing.
So if, for example, you’re in the default startup screen, and decide you want to do some UV editing, just select the UV Editing screen layout and you’ll jump to a window layout that is pre-configured to do UV editing. Extremely useful, especially for new users who don’t know how to get to the tools you need for compositing, or video editing, etc.
I also highly recommend that if you have a screen layout you like and want to return to that you save it using the “+” button to the right of the dropdown list of screen layouts (see image above).
ESPECIALLY before you start experimenting with configuring your windows and screens. If you have a default 3D view that you like, hit the “+” key and it will be saved. Then you can start tweaking your windows. Keep in mind that it is VERY easy to get lost in a maze of window configurations with Blender, and suddenly you have a bunch of windows you can’t get rid of. Just jump back to the saved default layout and you’ll be fine.
Nodes (Blender)
Now that you have the basics of how to navigate and configure Blender to make it very Carrara-like, I’ll take a short side trip to discuss one area that is very important to consider when jumping to another app like Blender.
And that is NODES…
A node-based application can be extremely intuitive and flexible and efficient. I think it’s safe to say that once you’ve become familiar with nodes you’ll never go back… 🙂 🙂
And Blender makes use of nodes in a wide range of features, including
1. Configuring materials and textures
2. It’s internal node-based compositor
3. Working with render passes
4. etc…
Blender actually uses a node-based approach for configuring materials/shaders and textures. And personally, I find it FAR more intuitive and efficient than Carrara’s shader room. Honestly, I never quite figured out how to do more than just simple shaders in Carrara’s shader room. To me the “shader tree” concept is very confusing when you start to get layered shaders…
I don’t think I’ll go into much detail on nodes, I’ll leave it up to anyone interested to pursue on their own. My only recommendation for those jumping over to Blender from Carrara is to keep in mind that if you’re not sure how to do something, nodes might be the answer. Especially with materials and the stuff I mentioned above.
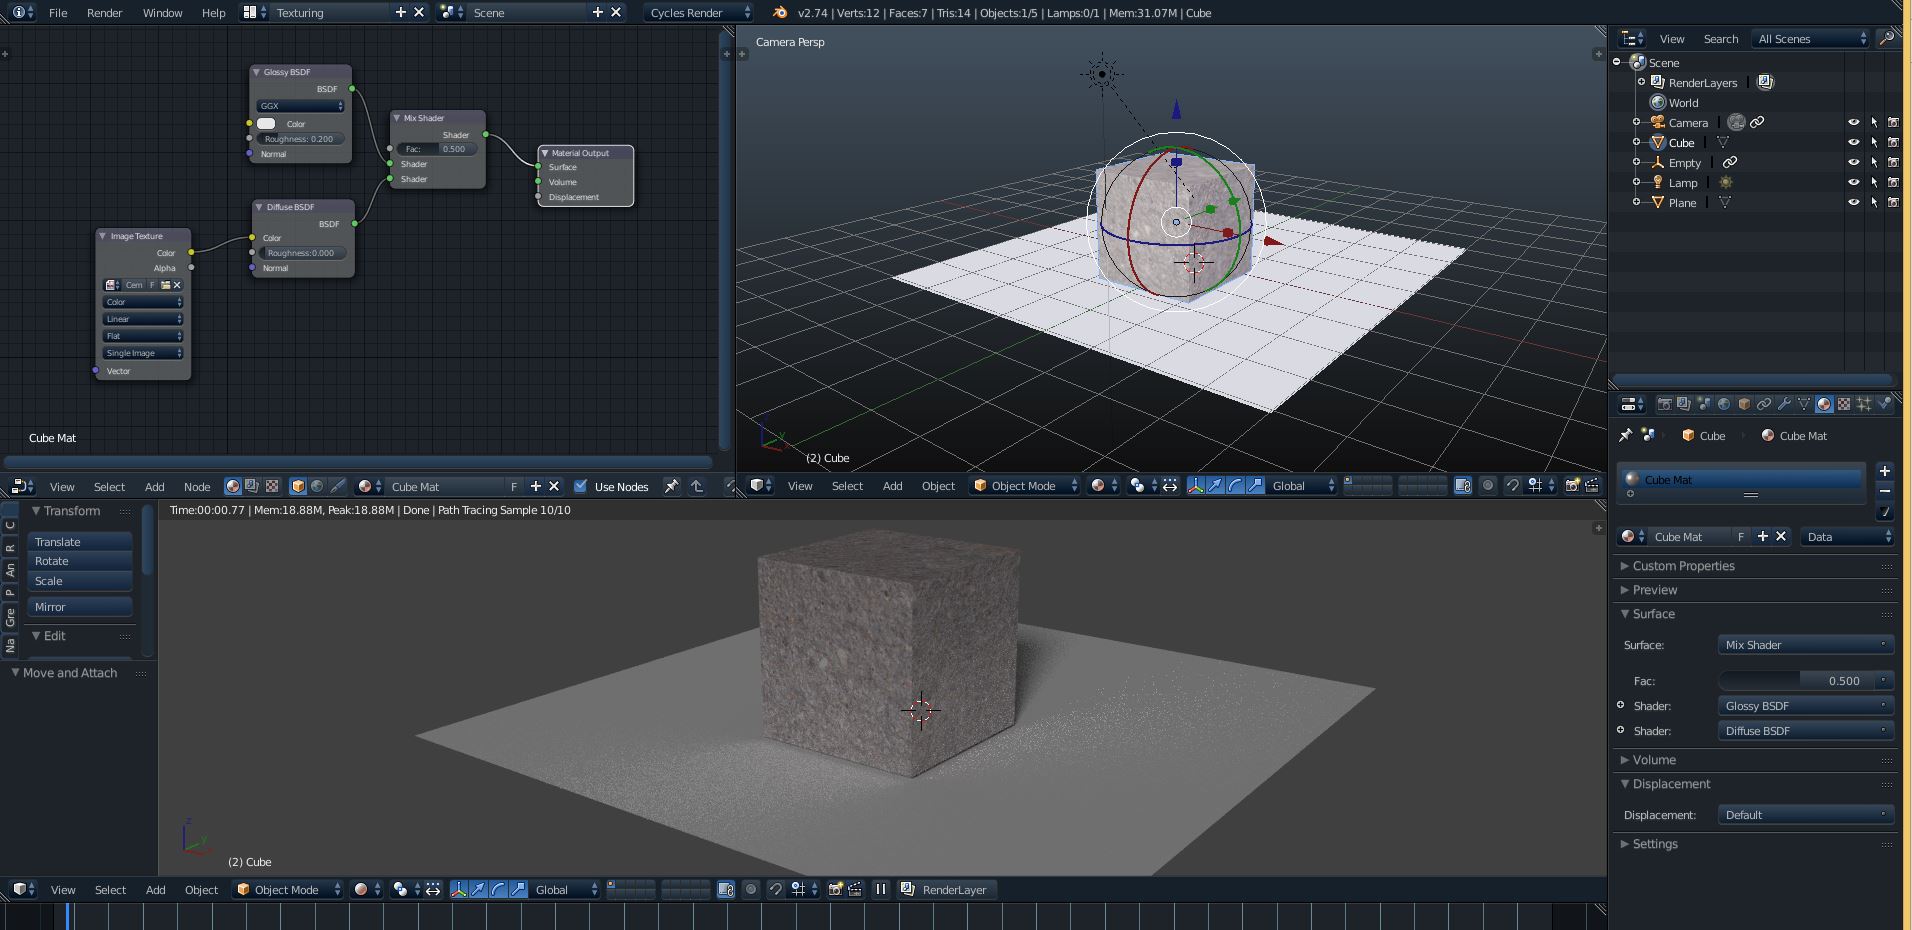
Shader room in Carrara vs Blender Screen Layout
And to give you an idea of how awesomely nice the nodal material/texture features are, along with the physically based and realtime rendering of the Cycles renderer, together with the user-configurable “rooms” are, here is just one example of making a nodal texturing “room” (Screen Layout) that combines the node editor, a 3D View, and a realtime rendered view. Much much nicer than the shader preview in Carrara that always gives me fits and frustration…
So next time I want to apply nodal textures I just jump to my pre-configured Texture screen layout and I’m all set.
Loading files trick
Oh, and I almost forgot…
One user preference you MUST set is under “File”….make sure the “Show Thumbnails” is checked, so when you load a file you see the thumbnail image instead of the default list… 🙂
Blender features
For me, the exciting things about Blender are the following: Flames Smoke Fluids Soft Body/Cloth Dynamic Paint (eg., waves) Node based compositor Unbiased rendering Physically accurate materials Animation/rigging tools (expressions, etc.) Modelling/sculpting tools Camera tracking Video editing For the most part, with minor exceptions, none of those features exist in Carrara. And what is more surprising to me is how easy some of the more high-end features, such as smoke, flames, fluids, dynamic paint, etc., are to use.
Blender/Carrara integration
So I suppose the next step is to consider why you would want to integrate an app like Blender with your Carrara work, and how would you do it?
Well, I just gave a long list of “high-end” features that Blender provides but are not available in Carrara. Personally, I feel that Carrara’s strengths are in two areas: characters and content. But for the most part, I tend to generate my own content, so for me at least the big strength is characters.
So how do you integrate characters with all that other stuff you can get from Blender (or other apps)?
Well, one way is to do what the professionals do: film your actors in front of a green screen, then composite them later into the environment. The idea is to do your character work in Carrara, then using various techniques, export those results into a compositing app, and integrate those other elements which you generated in Blender.
In the other thread I generated on Compositing I give a number of ways you can do that using various techniques.
Blender/Carrara libraries
In thinking about where next to take this discussion or if I should even bother, I realized I overlooked a key strength of Carrara that is a relative weakness in Blender. And that is the extremely useful shader/object/etc. libraries, where you can just drag and drop saved stuff you’ve made before.
Blender doesn’t have that directly, but that functionality certainly does exist.
The concept in Blender is that you can easily pull stuff from other existing “scene” files (aka “.blend” files in Blender) via what’s called the “append” function. So one option is to save your materials in a “library” (.blend) file of materials, and append that library file to whatever scene you’re working on and just pull those pre-made materials as needed.
And since your materials are generally each going to be a group of nodes you’ve configured, you can save that group and place it in the library file.
And the same concept applies to anything else you want to save in a library.
Now there are some plugins out there that can help a bit with that process if you want, as well as some existing materials libraries that are available so you can start your collection. But for those interested in making Blender as easy to use as Carrara I’d strongly suggest you consider making a library of materials/shaders, objects, etc.
Nodes, in-depth (advanced users)
Okay, well I said I wouldn’t go into detail about nodes, but I’m bored, and I’m sure there are folks who haven’t yet jumped into node-based applications, so I’ll try to explain the differences and relative benefits. And Blender has a very nice nodal system, used for many different things, so if you’re going to use Blender as part of your workflow with Carrara, you’ll probably want to start understanding nodes and using them. It will make your Blender experience a whole lot easier and more flexible, IMO.
BTW it’s been a long time since I’ve used layer-based apps other than for some quick image modifications, so forgive me if I miss some stuff.
Let’s take an example, and compare say Photoshop (which is “layers and history based”) to a nodal compositing app which is, well, node-based.
Let’s assume you want to perform the following operations on an image:
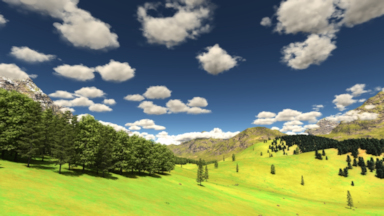
Open a background image (a photo of a mountain range)
Blur that image for use as a background
Open a foreground image of a tree, which has an alpha channel so only the tree is visible
Apply a color correction to the tree
Save the image
Now, in Photoshop you open the image, then apply a blur filter, then make another layer and load the tree image, then apply a color correction layer, and save the image.
That’s a “layer-based” application. You stack image elements and operators as layers. And every operation you perform is listed in the “history”. It’s a bit like making lasagna. Just stack stuff in layers. And if you’re ready to put the lasagna in the oven, then decide you forgot to add ricotta cheese in the middle of the stack of lasagna, how do you fix that? Well, you unstack the layers of pasta, add the cheese in the middle, and re-stack them. A layer-based approach is kinda-sorta like that. But not quite.
Now, lets say you don’t like the blur you did in step 2. How do you undo it? Well, you step back in your History to step 2, which is the Blur step. However, that undoes all of the steps after that (like loading and color correcting the tree).
Of course, you can get around that, but the basic concept of a layer-based approach is for relatively simple modifications on individual images. It’s not real flexible.
Now, let’s look at a node-based app. How would you do the same operations?
Well, a key concept to understand is that every operation you can perform on your image (or sequence) is an individual, modifiable block, also known as a “node”. And you can connect each node/operation to any other node just by dragging a connecting line from the output of one to the input of another. The “flow” of operations is defined not by a rigid, step-by-step history, but by an easily modifiable and flexible diagram showing the connections of all the nodes. And it’s very easy to modify how the operations “flow”…you just reconnect the nodes to perform the way you want.
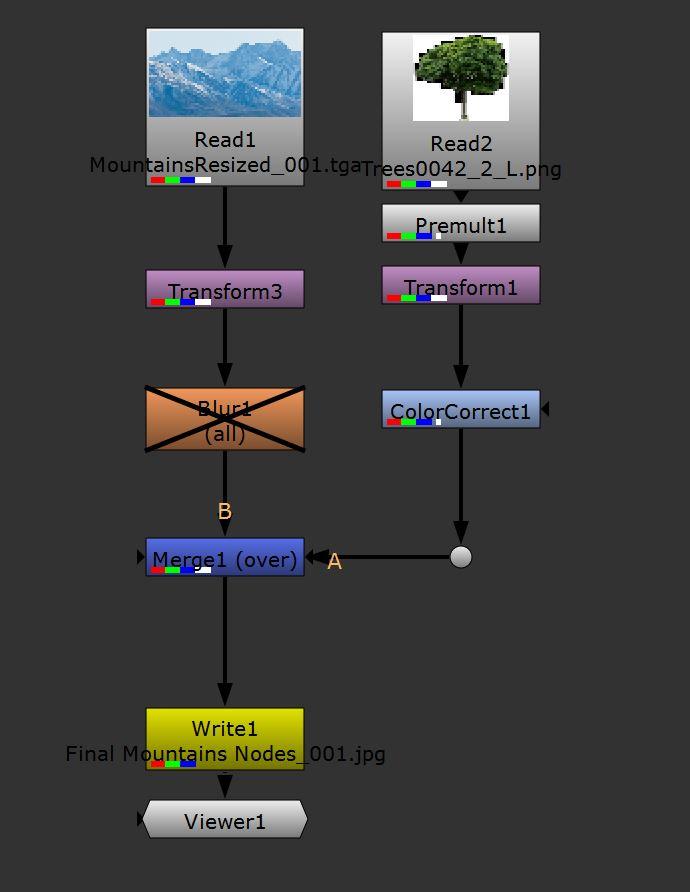
So how would you do the same thing with nodes?
Place a Read node, and tell it to read your background image
Place a blur node and connect the Read node to the blur node so that the blur operates on that image
Place another Read node, and tell it to load your tree image
Place a color correction node, and connect the tree Read node to the color correction node
Place a Mix (or Merge) node, and connect the blurred background to one input, and the corrected tree to the other, and tell the node how to merge the two images
Place a Write node, connect the results from the Mix node, and tell it to write the final results to a file
Now, while both processes might seem fairly similar so far, let’s now say we want to get rid of the blur on the background. With the layers based approach you have to step back in History to before the blur, and thereby you lose all operations after the blur. But with a node-based approach, all you do is select the blur node and disable it with a single keystroke.
Or let’s say you want the same color correction to apply to both the foreground tree AND the background mountain range? With the node-based approach you merely connect both images to the color correction node by dragging a line from one node to the other.
Using our lasagna analogy, a node-based approach is a bit like having an “add ricotta cheese” node placed inside your stack of lasagna. You don’t have to unstack those messy layers of cheese and pasta and meat sauce, you just access the “add ricotta cheese” node and it does it for you.
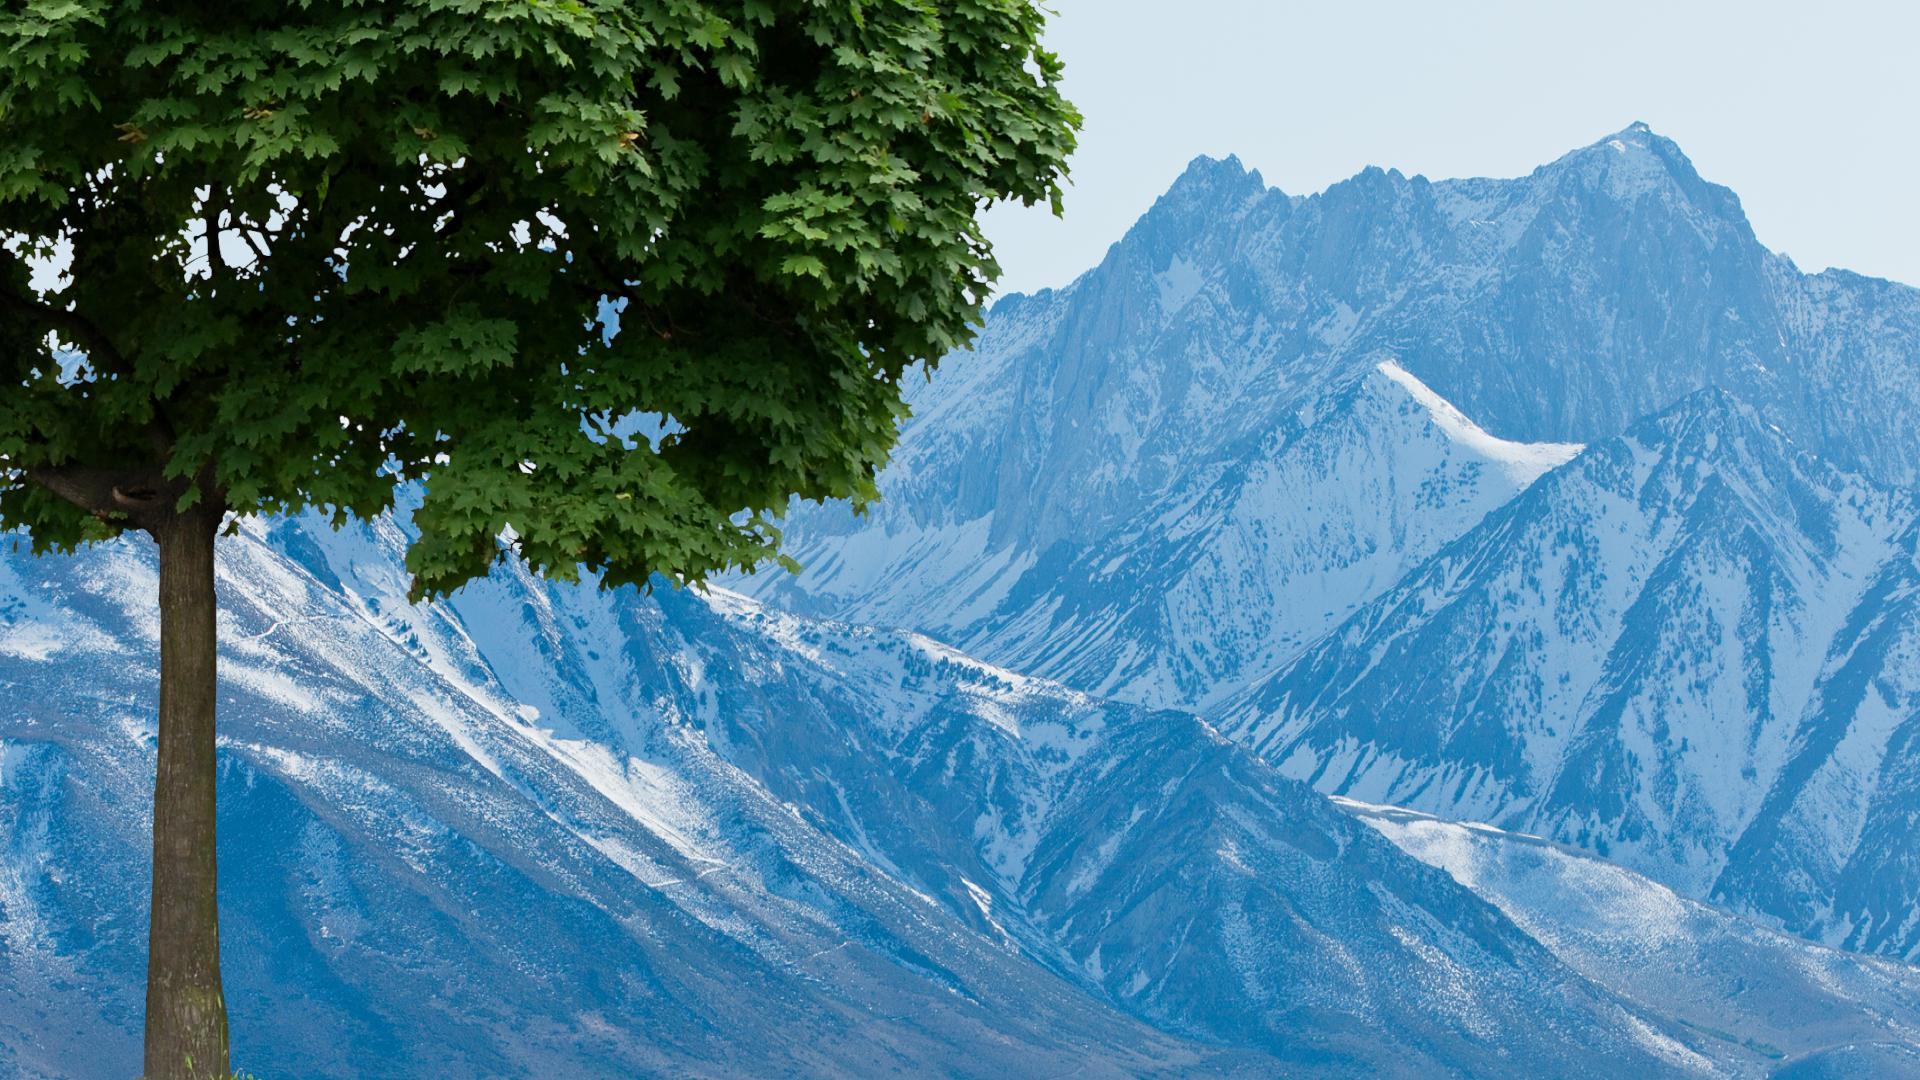
Here are the final image, and the nodes used to obtain the final image. You can ignore the “premult” and “transform” nodes if you want…they are just there to allow me to move and resize each image for composition purposes, and the premult is to, well, premult the image.
Nodes principle
As with many things in 3D, the difference between apps may not necessarily be in how much better your final image looks with some apps compared to other apps. Often, the difference in features is more about how quickly and efficiently and intuitively you can perform the tasks you need to perform. And for the most part, that’s the difference between a layer based and node based approach.
When doing complex stuff that requires many operations and many images, you want an app that makes that stuff quick and easy to perform.
So is a node based approach “better” than a layer based approach? Well, for some the answer is definitely YES. For others, a layer based approach is fine for the work they do.
But in any case, like I said, with Blender a node based approach is used for a number of tasks, so it’s probably a good idea to at least become familiar with the approach so you can be competent in both.
The fluid simulation plugin for Carrara, FLUIDOS 1.4, is released now for both Windows 32&64bit and Mac since v1.4.
A free christmas present by Alvin Bémar at ShareCG: https://www.sharecg.com/v/90155/view/9/Plug-in/Fluidos.
Includes a detailed and updated manual, several test scenes and support for some AMD or NVIDIA graphics cards for acceleration.
Version 1.00 was released 2017-12-24.
Version 1.01 was released 2017-12-26, update if you got FLUIDOS early due to a bug.
Version 1.1 was released 2018-01-24 with the following change log: -Now, the depth in hierarchy is unlimited. Anything can be parented inside the Fluid Domain at any level. -Fluid Domain can be scaled using Overall (or its equivalent in Scale tool). -FluidS now can resize the diffuse particles (the default is 1.0) -A Range force slider allows to “thicken” the extent of the surface forces to one or two cells away the solid (default is one). -The user could now turn off OpenCL. -It was implemented three more GridFluidSim3d diffuse particles features: maximum lifetime, wavecrest emission rate, turbulence emission rate. The default values are the current ones in Fluidos 1.01 -The manual is updated. -Some bugs fixed.
Version 1.2 was released 2018-04-27 with the following change log: -Viscous fluids simulation available.
-Some advanced features are now available.
-FluidS modifier is faster.
-The triangle diffuse particles geometry is fixed.
-Triangle particles can be oriented to camera now.
-A memory leak in FluidS was fixed.
-And some other bugs was fixed.
-The updated manual explain details. I add two scenes in the files. In addition, there is a template for texture maps in shaders for the diffuse particles triangles.
-The version is for Windows 64 and 32 bits too.
Version 1.3 was released 2018-07-21 with the following change log:
-Faster and less memory needed for objects only partially inside the Fluid Domain
-Added an adjust factor for high precision viscosity simulations.
-The smoothing is better in the interfaces liquid-solid when there are curved obstacles (smooth the “stairs”).
-Expanded the limits of particle emission rates sliders and Smoothing iterations.
-Reduced the limits of Particle jitter factor to avoid crashes,
-Reorganized the Fluid Domain parameters tab.
-Added functionality for animated solids (they can push fluid now).
-Added functionality for spatially variable viscosity Bugs fixed:
-Flow force didn’t work in many scenes.
-Point force didn’t work properly as square inverse (this was a subtle bug).
-If an obstacle with a surface force was initially outside the domain, the plugin stops with an error when the obstacle reaches the domain.
-Every second frame, the body forces (gravity) were applied two times.
-If the chosen preferred device was CPU and the simulation was stopped and resumed, the device automatically was changed to GPU.
-Diffuse particles simulation sometimes could crash the plugin.
-CFL condition number didn’t work properly
Version 1.4 was released 2019-01-08 with the following change log:
New Features:
Anything is source: any object can be a source (or a sink).
Cuboid source and Anything is source can be spatially discontinous.
The OpenCL simulations are around 30 % faster.
The simulations can use presets.
Line forces.
Spatially variable viscosity now with viscosity controls.
New options for objects parented to Fluidos Domain (viscosity control and ignored).
Support also for MacOS 64 bits.
Fixed these bugs:
Some graphics cards were incompatible with the plugin.
Diffuse particles quantity sometimes decreases during simulation and, then, suddenly increases to limit in one frame.
Positive surface forces were insensible to intensity.
Simulations with moving obstacles enabled, sometimes are unstable (disproportionate turbulence, explosions, etc.)