by booksbydavid | Jan 11, 2014 | Cafe Articles, Tutorials
A Carrara/Marvelous Designer Walk through
by David Collins/booksbydavid
Marvelous Designer is a clothing design program that allows you to create and drape simple as well as very complex dynamic clothing. It translates 2D patterns into 3D cloth ready to fit any imported avatar. It takes a bit of time to learn how Marvelous Designer does things, but after you’ve passed that hurdle dynamic clothing creation is simple.
While Carrara doesn’t have built in dynamic cloth functions, dynamic clothing can be used to good effect in Carrara via Marvelous Designer. This short walk through is how I get dynamic clothing from Marvelous Designer to Carrara.
For this walk through, I’m using Carrara 8.1 Pro and Marvelous Designer 2. There are newer versions of both programs, but the upgrade cost for both programs is out of my reach. As far as I can tell, however, this walk through should work for the newer versions of each program as well.
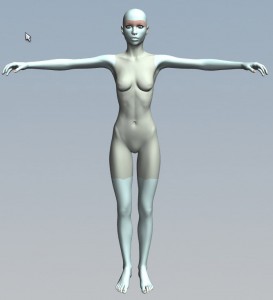
First, in Carrara load the figure you plan to dress. I’m using Victoria 4 for this example. It is also a good idea to load whatever morphs you will need and morph the character now before you move it into Marvelous Designer. This saves time and aggravation later.
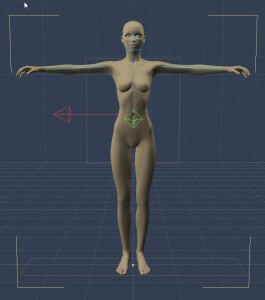
Once you’ve got the figure you want, you will need to export your figure as a .obj file. Marvelous Designer will import Collada as well, but I have not had good results going that route. To export the figure in Carrara, choose File/Export. A dialogue box will appear.
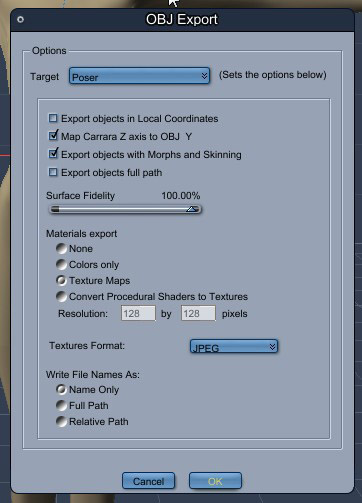
You will have several different Target choices. It doesn’t really matter which one you choose as Marvelous Designer will automatically scale the model when it’s imported. If you choose the default target make sure you check Export objects with Morphs and Skinning, so your figure will import with its morphs intact. To avoid confusion, I always choose the Poser target.
Next, pose your figure as you will want it in your final render and export this figure using the same process as above. Save your posed character in Carrara, so you can use it later.

After the figure is exported, you will then import the figure into Marvelous Designer. When Marvelous Designer opens, you will see the default avatar already loaded. You need to delete this avatar and her dress. To delete the avatar, chose Avatar/Clear. Then go to File/New to clear the scene.

Next, you will import your figure. Go to File/Import/Obj and locate your figure. A dialogue box will appear.
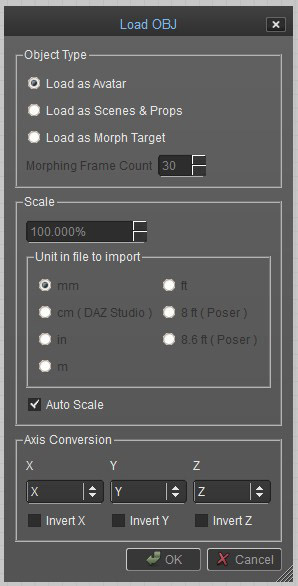
You will need to make sure ‘Load as Avatar’ is ticked and ‘Auto Scale’ is checked. Then hit ‘OK’. Your figure will load into Marvelous Designer properly scaled and with morphs intact.
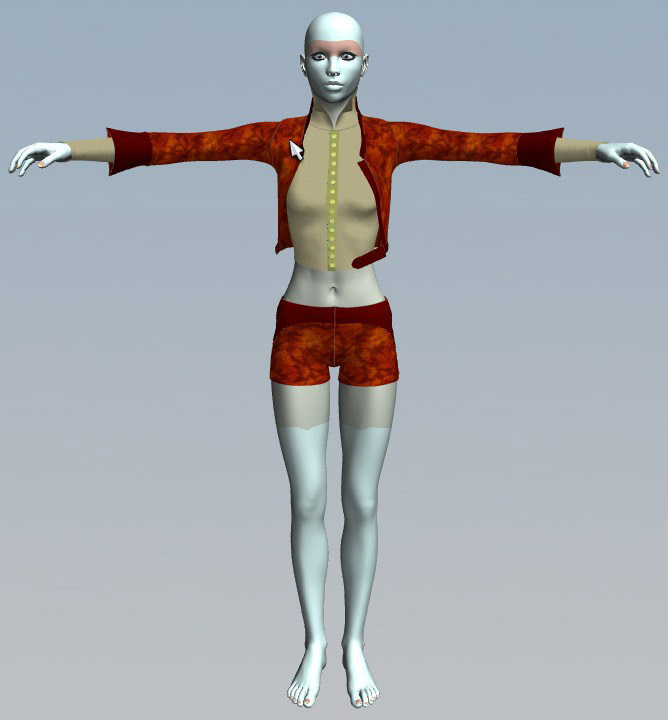
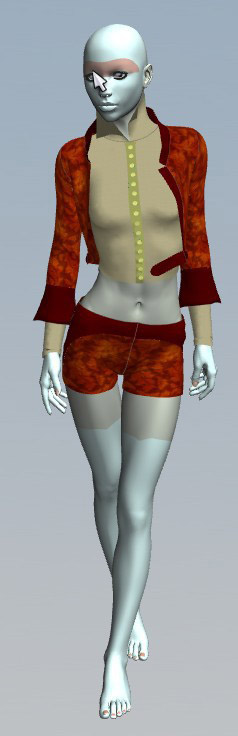
You can now proceed to create your clothing pattern. Here is an outfit I created for V4.
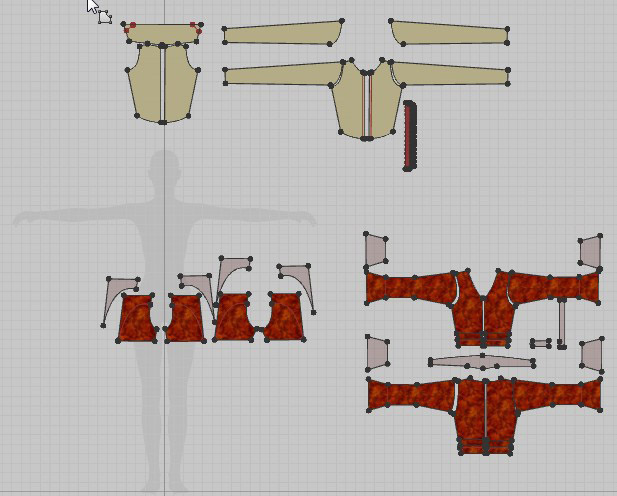
Once you have created your clothing, you will need to fit the clothing to the figure.

Now, we want to fit the clothing to our posed avatar. Choose File/Import/Obj again. This time select the .obj of the posed figure you created at the beginning. A dialogue box will appear.
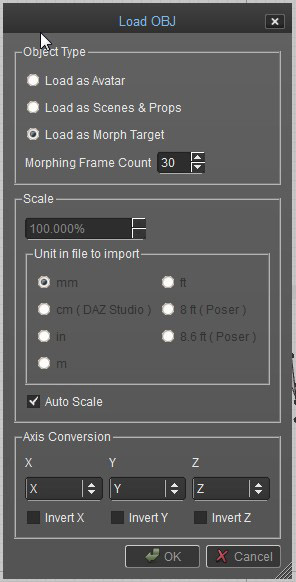
This time you will tick ‘Load as Morph Target’ and check ‘Auto Scale’. Marvelous Designer will run a simulation using the posed .obj as its target. When the simulation is complete, the clothing will be fitted on the posed model.
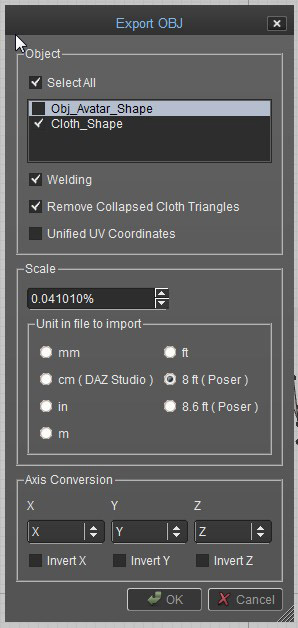
After the clothing is fitted to the figure, you can export it to Carrara. In Marvelous Designer choose File/Export/Obj. A dialogue box will appear giving you the export options. You will need to check boxes for Cloth_Shape, Welding and Remove Collapsed Triangles. Unless you want a .obj copy of your original figure, make sure that the box for Obj_Avatar_Shape is unchecked.
I do not check Unified UV Coordinates. I normally add textures in Marvelous Designer. I scale and adjust the textures using Marvelous Designers texture tools. Unifying the UVs will erase all of that on export and make all the textures the same scale. I’ve not noticed any real benefit to unifying the UVs since I’m able to work with textures in Carrara either way, so it all depends on where and how you add textures to your garment.
The last to do is make sure that ‘8ft. Poser’ scale is ticked. This will make sure that the clothing object will be exported in the correct scale.
The next step is importing the new clothing object into Carrara. In Carrara choose File/Import. You will get a dialogue box.

This time make sure you choose ‘Poser’ as your source. Any other option will load the clothing object in the wrong scale. Click ‘OK’. Your garment should load in the correct scale in the pose you exported it with.
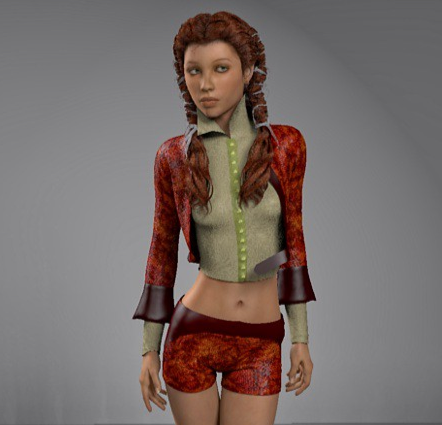
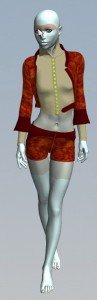
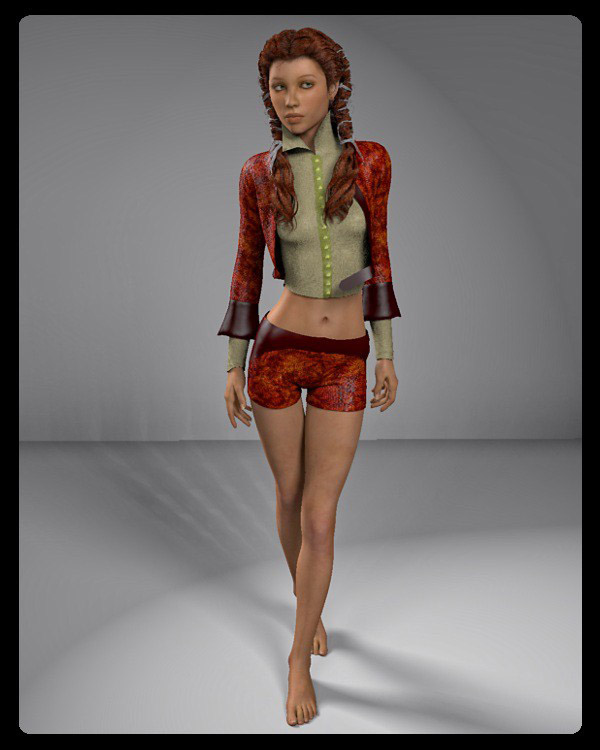
Here is the final image of my Carrara/Marvelous Designer creation. It’s missing some details that can be added in Carrara or Marvelous Designer or in post but in general it looks pretty good.
©2014 David Collins/booksbydavid
Download Carrara/Marvelous Designer Walkthrough as PDF
Carrara_MD_walkthrough.pdf
Additional Links
Marvelous Designer
http://www.marvelousdesigner.com
MDD File Format for Carrara import/export plugin needed for MD’s animation add-on
http://www.daz3d.com/mdd-file-format-for-carrara
Fenric’s OBJ Sequence Exporter plugin alternative to MDD file format
http://fenric.com/wordpress/store/products/object-sequence-exporter/
DCG Importer Digital Carver’s Guild OBJ Sequence import plugin alternative to MDD file format
http://www.digitalcarversguild.com/plugin.php?ProductId=21

by Dartanbeck | Dec 9, 2013 | Cafe Articles
By Dartanbeck
Carrara is unlike all other modeler apps out there – and one of the huge differences is its built in ability to use nearly any of the popular types of purchasable content on the market, including that which is usually only associated with Poser and/or DAZ Studio. This gives us a huge advantage – those of us whom haven’t the time to create all of our own models ourselves! 
Carrara has the ability to load in and use most types of 3d model files on the market. It has a rather genius browser window to help us to catalog and find it all. But how do I set it up? And what kind of content can I buy and expect to work easily within Carrara’s interface? I bought it, installed it, but how do I find it?
What exactly is ‘Carrara Content’, and why doesn’t much come up in a search?
This topic can seem confusing at first. When you run a search for content that is compatible with Carrara, you might end up with only the content displayed in my list of Carrara Resources in the Carrara discussion forum at DAZ 3D. This is a great list of items specifically made for use in Carrara. However, this does not answer the question regarding “What will work within Carrara?”. This is because Carrara has been specially ported to accept content made for Poser and now, with version 8.5, DAZ Studio too. Since Carrara 5 Pro we have had the ability to import Poser content and work with it as one might in Poser: The clothing conforms, smart-props apply correctly, pose files, expression files – these all work very much as if we were actually using Poser. Many changes in that regard have occurred over the years, in the newer versions, arguably for the better. I say it this way because what DAZ 3D has done is to make such content more like ‘native Carrara’ content, so that no special importing steps need to be taken in order to get Poser and/or DAZ Studio content into your scenes. Furthermore, you can now see the content in a library, complete with the thumbnails, as you would see it in the other apps. In doing so some of the conveniences offered previously have changed – especially when it comes to exchanging files, like the use of external ‘dynamic clothes’ files. So while the new improvements truly are improving the workflow, it has caused degrees of upset with some users – but I think that, through the use of a script for Poser, available here in the Carrara Cafe Downloads Section, and the new ability to export DUF files from DAZ Studio for use with Carrara 8.5, most of these issues have found new methods of, once again, being available to us. So what does all of this mean?
What this means is that you may, for the most part, consider your content purchases nearly the same way as you would as if you were buying content for Poser and/or DAZ Studio. There are some broad categories of things to look out for – things that simply are not compatible with Carrara. Things that are made specifically to work with a special plugin like, “Look at my Hair” plugin products for DAZ Studio, products that make use of special features only available in either Studio or Poser like, Uber Environment, materials, camera effects, environmental effects… you’ll become savvy to the fact that, while most models made to work in Poser work within Carrara, specific Poser-only features will not – and the same goes for DAZ Studio products and Carrara. For some of us, whom have already been into Poser and DS before coming into Carrara, already have a good understanding of what we can use and what we cannot. Allow me to try and make this a bit easier to understand:
Poser and/or DAZ Studio Models
Models are things like buildings and scenery sets, vehicles, people, animals, monsters, etc., that have geometry and material settings. Carrara has been made to show these sorts of things as if you were seeing them in their native applications. To do so you add the runtime library(s) to Carrara’s browser. You may then see the item’s thumbnails amongst their various categories, just as you do in Poser or DAZ Studio. In the Poser Runtime structure, some of the categories are not shown. This is to aid you in knowing what works within Carrara. Categories like “Lights” and “Cameras” are not shown to avoid you trying to load them. While you might be able to actually import and use Poser lights and cameras into Carrara, you won’t get satisfactory results. You may, however, choose to show the hidden folders from the file/folder menu of Carrara’s browser, but I do not recommend doing so. Everyone I know who has tried has become frustrated.
If you are new to this whole idea, and are not certain about the Poser Runtime structure, I have written a short article explaining how many of us set them up. With the birth of the DAZ Install Manager, I have included instructions on how to create these runtime structures using it – which can help if you plan to use the DIM for installing your DAZ 3D content. I like the DIM. Just keep in mind that, since it only works for DAZ 3D content, you’ll still need to install content from other vendors manually. Here’s a link to my article: Daz Install Manager – Installing Custom Poser Runtimes
 I mention the Poser Runtime structure first for a good reason. For my own purposes of keeping everything straight, at least the way things stand at the time of this writing, I find it much easier to keep using the Poser Runtime structures for everything except for Genesis and Genesis-related items. In saying “Genesis”, I actually mean any of the new DAZ 3D Triax rigged figures which also includes the DAZ Horse 2 and will be including more figures as time goes on. You see, these new figures and DAZ Studio 4.5 have been developed together – to work together. The figures require a special installation file placement in order to work properly. Between the release of DAZ Studio 4.5 and the latest DS, there have been many changes to the Triax models and their files. Some such files needed to be deleted as the new ones were installed in order to keep from ‘breaking’ their working structure. Since they had different file types, two files of the same name could conceivably exist in the same location, which is not good and is also confusing. Now this might all sound like a big headache, so I’ll stop rambling about that stuff and move on to my point:
Genesis, Genesis-related items, and other DAZ Studio Triax rigged figures, in my opinion, should really be installed by the DIM – and need to be installed as a DAZ Studio Content library in order to work properly. Because of the need to uninstall certain files as these files are updated, the DIM just makes the whole process work the way it should for these, specific figures. Furthermore, at least for my Carrara endeavors, I find it easier on myself to only install Genesis, Genesis-related items, and other DAZ Studio Triax rigged figures, into that DAZ Studio library. In Carrara (at this writing) the folders in the DAZ Studio library structure that don’t contain any user-usable files are NOT hidden – making it very confusing (at first, anyways) towards where to look for your files. By limiting your installations to this library structure to only Genesis, Genesis-related items, and other DAZ Studio Triax rigged figures, you only need to look under “People” or “Animals” under the “My DAZ 3D Library” heading in the Content browser to find your products. Okay now that I’ve gotten the wordiness out of the way, Ill sum up. If the sum up doesn’t make sense, try reading the above over again – as it can take a bit to soak in sometimes. I must say: While this might seem to be more difficult than it needs to be, please understand that it is actually a much smoother work flow, once you get used to it, than having to go: “File > Import > navigate to your directory for files” that you would have to do in some other software applications. Okay, let’s sum this up:
Using Genesis
Install all Genesis, Genesis-related items, and other DAZ Studio Triax rigged figures to the same directory using the DAZ Install Manager (DIM).
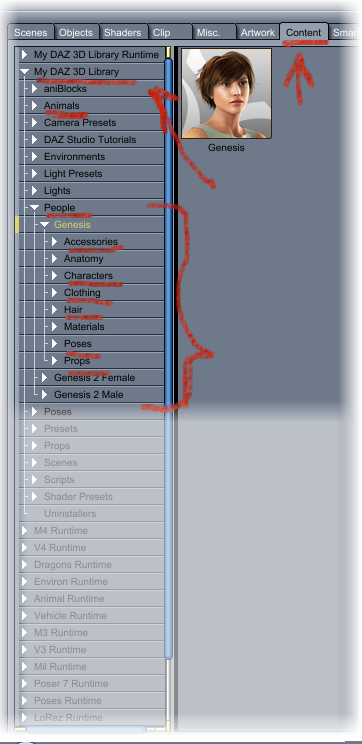
 To find the products in Carrara, I’ll use the default installation library of DIM as an example. Go to your Content tab in the browser: “My DAZ 3D Library”. For Genesis, Genesis-related items, go to the “people” category. In here you’ll find all material presets, poses, people, characters, clothing, hand poses, etc., while for other DAZ Studio Triax rigged figures it will depend upon what they are. For Animals, go to “Animals”, such is the case for the DAZ Horse 2 and up and coming animal figures. It’s truly that simple. I’m fairly certain that there are no other user-usable files to be found in any of the other places you can go in here. Do keep in mind that DAZ Studio does come with other content worth using. Much of this is found in the “My DAZ 3D Library Runtime” folder, and sorted as it is in other Poser Runtime structure categories: Figures, Hands, Poses, Props, etc.,
Using Poser and DAZ Studio Buildings, Scenery, Plants, Creatures, People and Animals that are not Genesis-related, and so on
Install these items as if you were using Poser. Whether or not you’ll be using the DIM, the article about Daz Install Manager – Installing Custom Poser Runtimes will certainly help you to wrap your head around how to organize your content, if you haven’t already a system of your own.
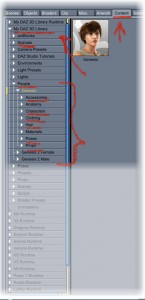
 Now you need to make this content available in Carrara’s browser. If you have more than one DAZ Studio Library directory, you may have to follow this procedure to add whatever Carrara didn’t already. Go to your Content tab in Carrara. On the far right of the browser, just above the main window, is a small dark icon “File/Folder Menu”(see the above image – follow the red arrow). Click that and select “Add Runtime” and navigate to one of your runtime directories. Note that you do not select the actual folder: “Runtime”, but the folder that contains it. You’ll then be asked if this is a runtime or content. If it is a Poser Runtime structure you’re adding, choose “Runtime”. If you’re adding a new DAZ Studio Library, choose “Content”. Carrara, at the time of this writing, only allows you to add one such library at a time. Go ahead and add all of your runtimes. Once done, you’ll see the familiar content categories that you may have seen in Poser: Faces, Figures, Hair, Hands, Poses, and Props. As I’ve mentioned earlier, folders that contain incompatible files are hidden by default. Going to that File/Folder menu you may “reveal hidden” folders to see what else is in that runtime. Remove that check mark to go back to the default view. Furthermore, you may choose to have Carrara auto-detect all of your content locations by going to the File/Folder menu and choosing “Auto-Detect Runtimes”.
NOTE that you also use this File/Folder menu to add Carrara-Specific content folders to your browser as well.
If you’ve checked out my article on Runtimes, you’ll have seen that I use a rather vague approach that works best for me. I don’t mind having huge runtimes, I just like them to be sorted in some, broad sense. Many other folks enjoy getting much more specific, having separate hair runtimes, perhaps some just for specific props, etc., the goal here, is to make sure that YOU know where to look for YOUR content without getting a headache in the process. For example, my “Environs” runtime contains everything from scenery and buildings to anything and everything that might be used with them to create a full scene – including medicine bottles, cookie jars, furniture, flowers, trees, plants, rocks… All living creatures that are not people or dragons go into my “Animals” runtime, and so on. So let’s take a practical example of what I’ve been going on about:
I just bought “Space Base”, a Platinum Club item with a cool collection of scenery items for space and/or scifi style scenes. Since I put all of this stuff into my “Environs” runtime, I will open the DIM and as I mention in the article, I’ll have the “Show Details” box on the bottom right, checked. In the Path selection drop down, I’ll grab my “Environs” runtime and run the Install (Download, Install, then Delete the installer (optional)) for my new Space Base. I’ll often have numerous things in my downloads availability that have to go to multiple places. Sometimes I’ll place check marks in only those for a specific runtime, or the DS Library (where I use the DIM default “My DAZ 3D Library”) and start the queue and then repeat the process for each. Other times I’ll deselect the “Install after Download” box and download everything – where I individualize their installations later. Either way, I’m sorting my content to where “I” know where to look for them.
 Michael 6, on the other hand, is the new Genesis 2 Male so I want him and all of his stuff to go to the same place: My DAZ 3D Library, which does a great job of sorting stuff as it is – so I haven’t really felt any need to have separate libraries for any of my Genesis stuff. Besides, every single instance I’ve seen where people are having major frustration with errors using Genesis is where they are not using DIM, or are trying to use multiple libraries with Genesis. Especially libraries that are what I will refer to as “Impure”. An Impure library is one that uses the DIM, but also has manual installations as well. While the official word is that this can be just fine, I will always advise against it. After all, what is a library anyways? It’s just a darn folder with stuff in it. Make a new one if you really need to manually play with stuff like freebies and the like. An exception might be stuff that is made for Genesis that is not made by DAZ 3D, since it cannot use the DIM. While it should be safe to share with the DIM’s library, “should” is not always adhered to – especially by potential artists whom might accidentally include files that mess up the whole works. It is, and always will be, my advise to tread carefully when using Genesis. It is an advanced figure with highly advanced features, but break it and the best option becomes deleting the whole shebang and starting from scratch. So if you do use content for Genesis other than that which is sold by DAZ 3D, I would advise to either make a new library, specific to non-DIM Genesis items, or to exercise a good method of knowing what it is that you’re adding to your Genesis library. Morphs might need to be installed in the same library. Keep a good filing system for storing the installer zips for this content so that you always have a place to look when trying to determine where something is installed to.
Purchasing Content for use in Carrara
I’d like to, just briefly, discuss the idea of “What works in Carrara, and what doesn’t”. I know I’ve said some stuff earlier on this, but now that I’ve talked about where stuff should go amidst your runtimes and libraries, I’d really like to help to instill some ‘savvy’ into what you should always expect NOT to work in Carrara, and you can then assume that most everything else will. These are just guidelines to help you out. It is truly your responsibility to look at each product you purchase and determine, for yourself, whether it will work in Carrara or not. Luckily for us, however, DAZ 3D is most kind when we make mistakes – and just refund our money. Gotta love that!
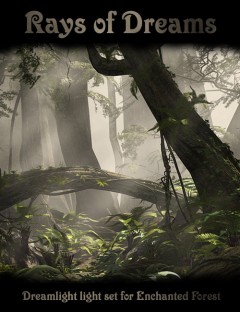 Let’s have a look at a real example here. Stonemason’s Enchanted Forest product works beautifully in Carrara. Being scenery, I install it into my Environs runtime. Rays of Dreams, by Dreamlight, uses features unique to DAZ Studio to enhance that scene for the user within DAZ Studio and, as such, will not be something you’d likely wish to purchase for use in Carrara. I say this because you will not be able to use the product within Carrara as one would expect to in DAZ Studio. It might still be a beneficial learning experience, however, to load it in DS and observe what the artist is doing, so then you may apply a similar technique within Carrara on your own. See the difference? There are some products made that rely on DAZ Studio, Poser, Bryce, Vue, etc., features for them to work. By rights, the product should mention something along these lines within the promotional write-up. Still not sure? Look under the “What’s Included & Features” tab in the store page.
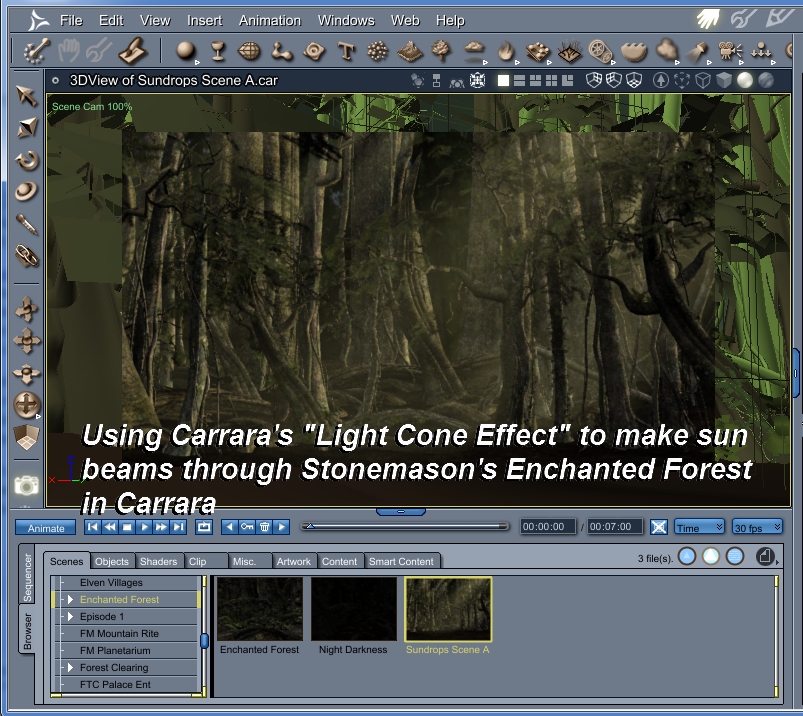
Models and texture packs for those models will generally work fine in Carrara. With the advent of Genesis, however, there are a few hidden exceptions like the Genesis Supersuit. While it likely works just fine in Carrara, the material packs are made for DAZ Studio because that was before DSON for Poser, etc., and everything Genesis was simply done within DS and DS only. This is not to say that the Supersuit won’t work. Like many things, we just need to talk to the textures and get them optimized within Carrara. If you should happen to purchase a product with the intentions of using it within Carrara, and it turns out that such a thing just doesn’t work out… get in contact with DAZ 3D and get satisfied. While it can be somewhat dis-heartening, there’s really no reason to get too bent out of shape about it.
Carrara has been set up, a long time ago, to be able to import many types of file for your authoring endeavors. The DAZ 3D Content store is not the only source you have. Take a look at the Import/Export portion of your manual. You can find all sorts of obj file format models online, either free or for purchase, that can work marvelously in Carrara with a bit of work – often on the materials. Some files come with material files that import with the object just fine – others don’t. In either case (and this goes for all 3d rendering software, not just Carrara) you’re using a render engine specifically designed to work with the material options available in its Texture room – so you’ll get the best results by optimizing.
Now that we have a few things to think about when purchasing or downloading content we will certainly get used to what to look for, and what to avoid as we make purchases and search for downloads in the future. Once in a while, however, we’ll get excited about a particular product and have it downloaded before reading the fine print – only to get really bummed out when we find out it won’t work. Unfortunate but it happens. We just have to learn from what we do, get our satisfaction, and move on.
Sincerely, I hope that this article helps to straighten out any confusion related to “Content that works in Carrara”. Really the only way that items get flagged to be included in the Carrara search box in the DAZ 3D store, is if it is flagged that way by the artist, or if it contains Carrara-specific files optimizing its use in Carrara, or if it is truly a Carrara-specific product, entirely. Our shopping gallery is much larger than that. Nearly every time you see a new item in the store, it will be a product that will work in Carrara. Just have a good look at it first to be sure. Finally, if you have any further questions, feel free to ask!
Take care, and happy rendering from all of us, here at Carrara cafe!
by cyborgty | Dec 4, 2013 | Cafe Articles

A Pirate’s Quest by CyBoRgTy uses motion capture to animate in Carrara
Mocap in Carrara – by CyBoRgTy
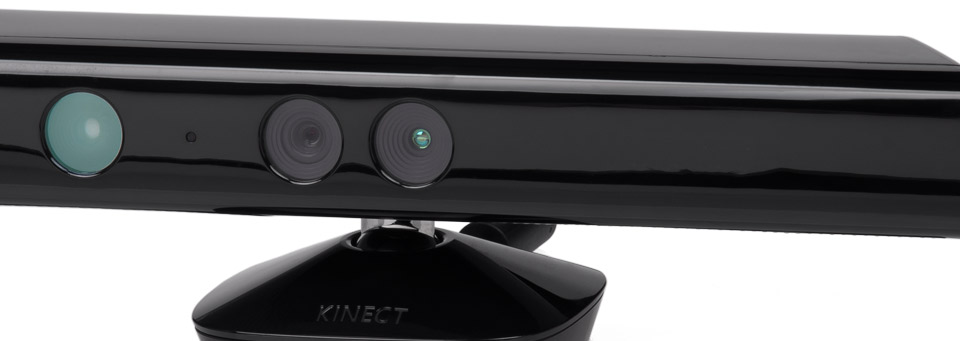
Animating in Carrara can be a lot of fun, especially when you combine keyframe animation with your personally captured motions. As a hobbyist creating mocap, I like to use the markerless kinect-based solutions. Some are free but don’t have the features and usually cannot provide the results possible with more costly solutions. When comparing affordable kinect-based mocap solutions, I found iPiSoft tools (iPi Recorder and iPi Mocap Studio) using the dual kinect configuration provided the best results. So, my mocap to Carrara workflows will usually include iPisoft.

iPi Motion Capture™ supports off-the-shelf cameras, depth sensors and motion controllers
Using Carrara and iPiSoft tools with unrigged characters
This is what I use most with my personally created animated characters. If you are like me and not afraid to model or if you locate unrigged characters around the internet, this might be of interest to you. With this procedure, you are applying the iPi exported rig directly to your character. This speeds up the rigging process and creates the shortest/fastest path for taking iPi created animations to Carrara. The general workflow is:
1. Create story, design set, storyboard, etc.
2. Create or acquire unrigged character
3. Use iPi Recorder and iPi Mocap Studio to create motions required by the story for
that character (I use either one or two xbox Kinect cameras)
4. Export motions including T-pose from iPi Mocap Studio using general FBX
export

Export motions from iPiSoft in FBX format
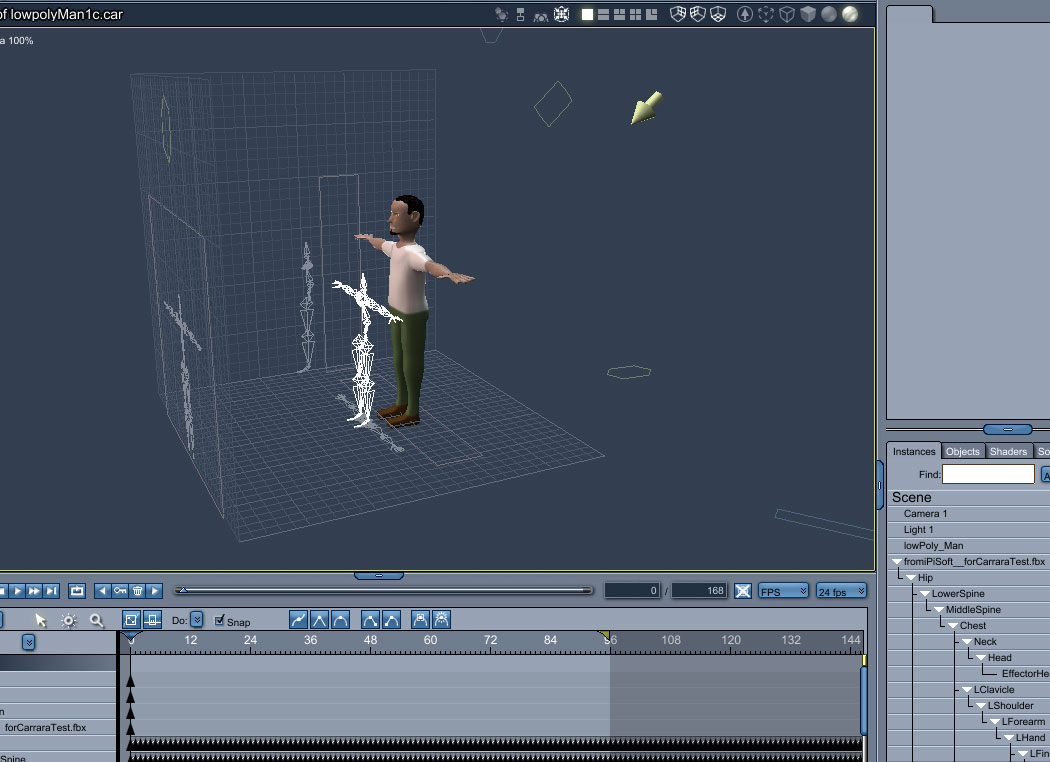
5. In Carrara, import FBX motion file created in iPi Mocap Studio.

Import the FBX motion file into Carrara
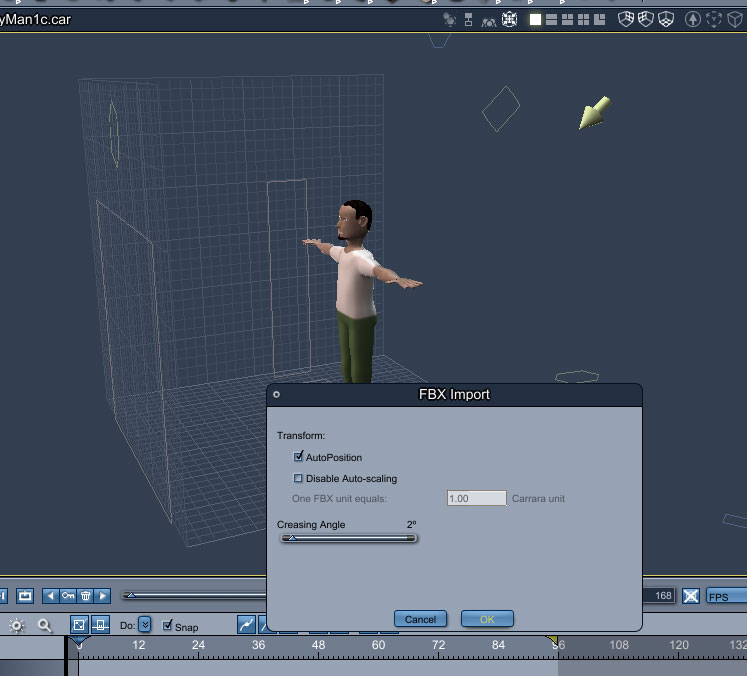

6. Align motion bones with character size and shape.
You should select the bone group and scale it to the character’s height. Then, translate the bones to place the joints where they should be on the character.
7. Attach bone hierarchy to character and adjust weights as needed.
Scrub through the timeline to watch the animation and to check bending as well as bone influence on the character mesh. The character shown above is a simple low poly man that I created in Carrara (around 2000 polygons). I almost did not have to adjust any of the bone weights (I had to adjust a little around the fingers and thumbs). But you might have more to adjust with more complex characters.
8. Add character and bones to animation group.
9. Create animation clip from motion data.
I usually will covert the animation to Animation Clips, which helps with reuse of animation sequences as well as retiming.
If you need to import additional motions for this character, you should select the ‘Create New Skeleton’ option when importing. Add this new skeleton to an animation group. Now you should add the motions to a new animation clip and this clip could be used with your previously rigged character.
by Holly Wetcircuit | Nov 14, 2013 | Cafe Articles

Enhance:C Space3D Shaders and Primivol help create this original planet
Realistic Earth-like planets in Carrara!
Need a high resolution Earth model as a backdrop for your blockbuster disaster movie? How about a newly discovered “terranova” for your space opera? According to news just this week, one in five sunlike stars observed by NASA’s planet-hunting Kepler spacecraft has an Earth-size planet in the so-called habitable zone, where liquid water — and, potentially life — could exist….
Kepler can’t *see* those planets directly. It actually recorded dips in the brightness of their suns, indicating a planetary transit. Since no one has actually seen them, it’s anyone’s guess how they will look…. I predict a bull run on Terra artwork, and we’re going to need a lot more planets!
To celebrate I’ve put together 10 Tips to launch your planet scenes into orbit!
#1 – HIGH RESOLUTION EARTH MAPS
Carrara comes with a complete Solar System of planets organized under the Scenes Tab in the Browser. An Earth model is included with a separate cloud layer. It’s part of the Native Content download that is free with purchase. These planets are great except for one thing, they use low-res maps only 1000 x 500 pixels.

Low res models of the planets are included with Carrara
Serious players will spend $8 to download the fullsize 10k Earth maps from JHT’s Planetary Pixel Emporium, which are prepped to be used in 3D models with color, bump, and a specularity map for the ocean. While you are there, grab the free 4k maps of the Moon!

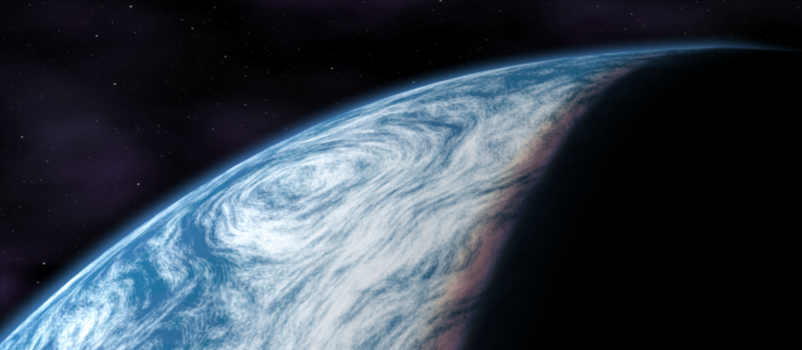
THE BLUE MARBLE by NASA
This remarkable collection includes different color maps for each month of the year so you can show annual vegetation and ice cycles, an extremely high res cloud map, and this stunning night-side map of city lights. These images are freely available to educators, scientists, museums, and the public.

rendered in Carrara with NASA’s Blue Marble maps
CLICK TO KEEP READING

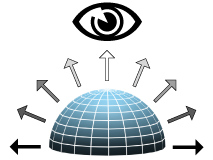
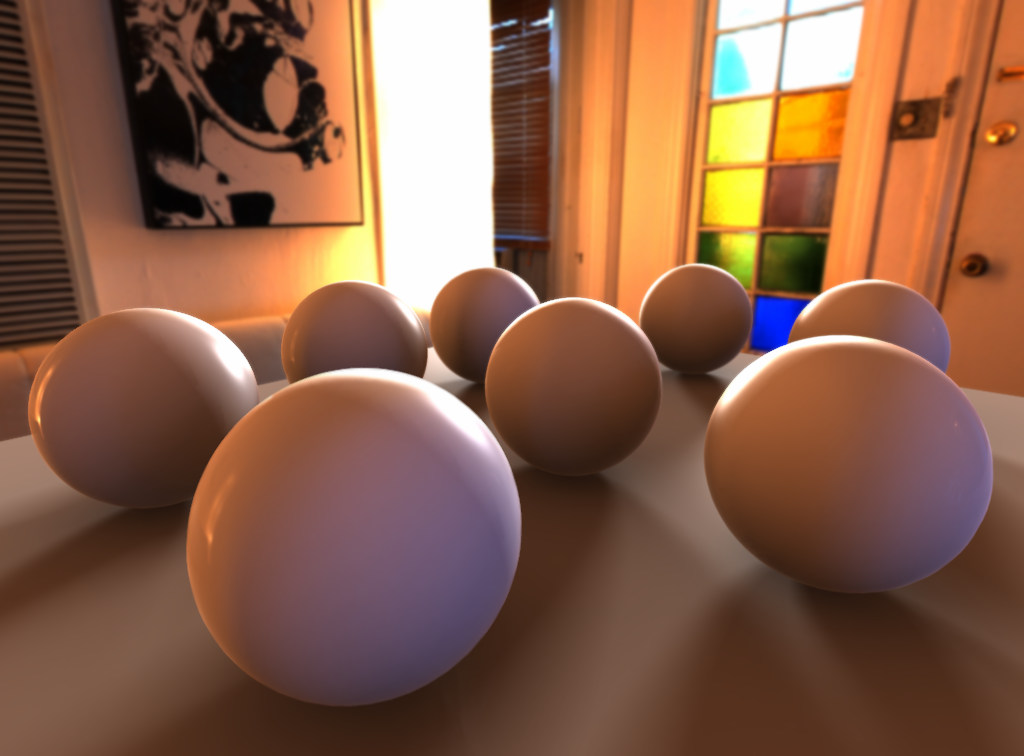
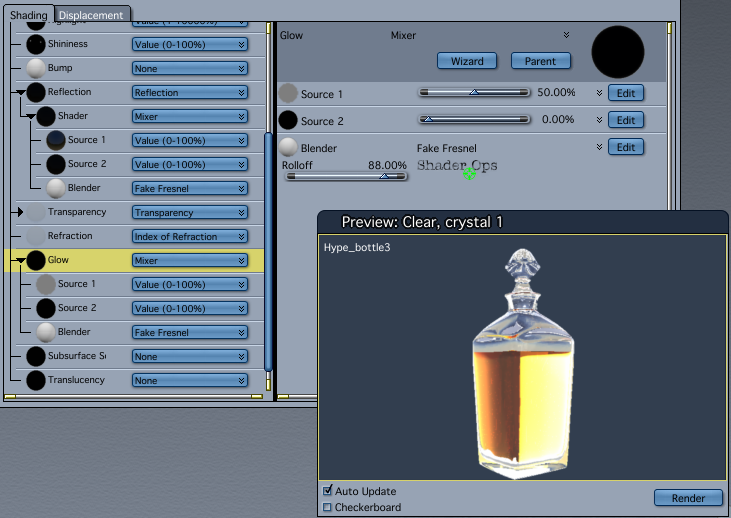
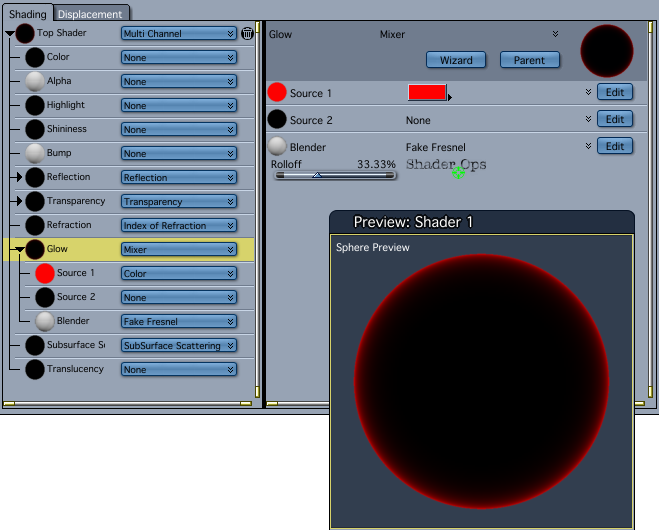 Fake Fresnel in Shader Ops will always “point at” the rendering camera, but the Shoestring Shaders are more versatile allowing any scene object to be the “point at” object. All the examples in this article use the simpler Fake Fresnel shader. Links to the plugins are at the end of the article.


 Saving...