by Conrad3DC | May 7, 2014 | Cafe Articles
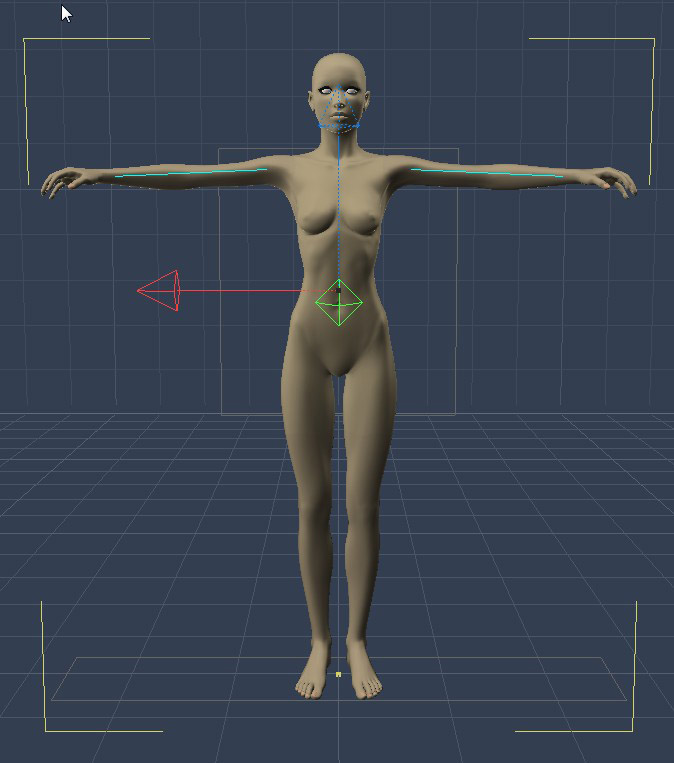
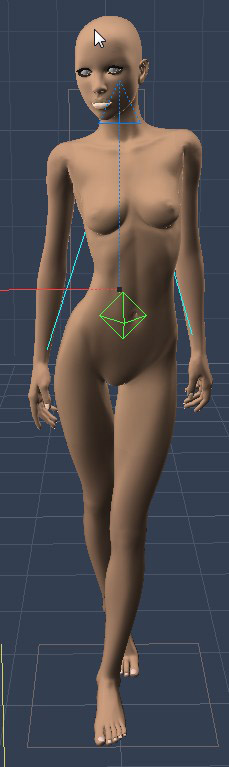
Fenric has created for us a very powerful animation automation tool with the Carrara ERC plug-in. As such there are some great advanced examples available on the Internet that at first make it appear very daunting. However, the core concept of ERC is very simple; thing A moves thing B or more accurately thing A controls/modifies thing B. ERC is basically acting like the string between a puppet and its human master.
In the Carrara world the master can be anything that can be animated using the keyframe sequencer. For example this could be the arm of an evil sorcerer in our scene. The puppet can be, once again, anything that can be animated using the sequencer. In our first example let’s say the puppet is a chair in our scene. I can use ERC to magically levitate the chair whenever our character raises his arm (yes, this is a truly evil sorcerer). To do this I would simply connect our string (ERC) from the shoulder rotation of our sorcerer to the Z-axis position of the chair. Now whenever our evil sorcerer raises his arm, our chair flies up into the air and off our screen. Not exactly what we had in mind; we were going for some low altitude levitation. To fix this, ERC allows us to do some fancy things with our string. It allows us to change the degree by which the arm movement changes the chair movement. So we can tell ERC that we want our arm to move the chair only a small fraction of how much it was moving it before, even though our arm movement will remain exactly the same.
But wouldn’t it be simpler to just animate the arm and then separately animate the chair? Probably, but it made for a good example. One of the real indispensabilities of ERC is in the animation of things that are associated with each other on a repetitive basis. Let’s look at a face for example. When we move something on our face it typically causes other parts of our face to move as well. When I raise my eyebrows I get big wrinkles on my forehead. When I smile, same thing, my eyes wrinkle. Unfortunately I find this association to be far more desirable on my 3D characters than on myself and while I can’t do anything about me, I can use ERC to emulate these associated facial movements on my Daz characters.
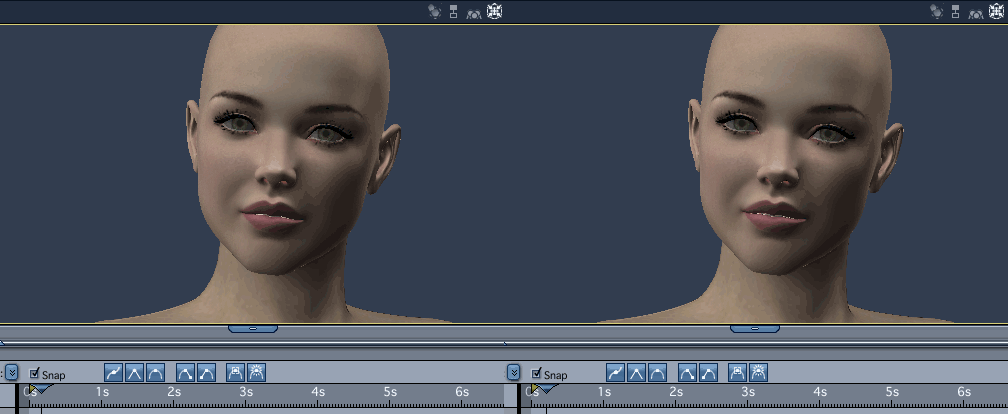
For a basic implementation I like to add forehead wrinkles and a slight top eyelid movement driven by the eyebrow keyframe animation. (ERC enhancement on the left)
I also add cheek puff (under eye wrinkling), eye squinting and ear movement driven by the smile keyframe animation. (ERC enhancement on the left)
Daz characters have an abundance of morph parameters that can control virtually all aspects of the face allowing us to get very detailed with our automated animations by setting up an ERC modifier to control anything we want; from anything we want.
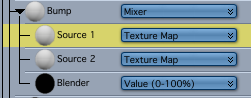 Additionally, because Carrara shaders can be animated, we can create an effect that mimics fine wrinkles on our characters face. We could setup a face bump map using the regular bump map and a second bump map with additional wrinkle lines and then use an ERC modifier to mix between the two as our controlling parameter (mouth movement) changes.
by Dartanbeck | Mar 8, 2014 | Cafe Articles
Carrara has a vast array of little check boxes and fields to fill in that help us to have things animate on their own with just a little input from us. All over the place the Carrara interface is checking to see if we need some automatic animation assistance, and I think that’s very cool, indeed! In this article I wanted to instead demonstrate my simple method of character animation. There are many techniques to animating characters and I’ve read instructions about quite a few of them from text books to online tutorials and even a few videos on the subject. The method I ended up becoming the most comfortable with is most similar to the text book, but likely has a bit of other sources mixed in as well. All in all, I don’t really think that it’s the studying that makes us better at animation, but the practice. Not to belittle education mind you. Not even close. It’s the study that gives us knowledge and inspiration – a good idea of where to begin with great advice on how we need to interact in between and performing counter balance motions, weight distributions. But nothing can actually make that stuff happen for you. In order to make it happen, you actually need to advance that timeline and make a move! So let’s get started.
CLICK TO KEEP READING

by Dartanbeck | Mar 6, 2014 | Cafe Articles
Materials (Shader) Optimization in Carrara
Truly optimizing is, by definition, uniquely different from one individual’s needs to the next. We all have different tastes and goals which leads to different scene setups with lighting and rendering – even render engine considerations. Purchasing optimization files, like shaders, is a great way to learn a good many ways that Pro Carrara users use to optimize their files. Tim Payne optimizes skies in a way that would take me quite some time and a whole pile of headaches and wasted test renders to get similar results from. The solution? I bought Tim’s Skies and used them as my initial starting points, and now I know enough to simply start from scratch, all on my own. Whether or not this is true for the next person, it paves way to my point. From purchasing Tim Payne’s skies I now have a much better understanding and base of inspiration of what the realistic sky editor is capable of. I used Tim as an example, but I have purchased many other products from other artists over the years, and have learned from every one of them.
Carrara comes loaded with a good selection of examples, where no additional purchases are necessary to learn a wide variety of techniques which can help you in many situations. Lighting, Scenery, Skies, Models, Modifiers, etc., which are a wonderful way to learn. Load one up and look at how it’s set up. I find this particularly useful for shaders.
 The included shaders have some really well thought out ways to achieve a certain look. Do keep in mind, however, that shaders work with lights and render settings to produce their appearance. What works in some scenes may not be the best in another. I’ve created a generic scene which is set up with my favored method of lighting, test render settings and resolution, and saved the scene where it’s easy to grab in the browser at start up. This scene is empty of everything except the lighting and any helpers that I want included, and is very helpful for me in setting up my shaders the way I need them to work. Of course, lighting often changes on each scene – but I have a fairly consistent look and feel to my scenes in this way. This method is mostly useful for outdoor scenes, since most interiors are calling out their own needs where lighting is concerned. So I also have another scene using a simple three-point lighting setup specifically for testing shaders. Since I have adopted my own, standard techniques for lighting, my shaders have been working very well in most of the situations I put them through.
Lights in the scene are not always enough, though. Some shaders, like White Gold, Gold, Chrome, and many others, rely on reflections of scene elements to achieve their appearance. Be mindful of this, as they will not look correct at all in an otherwise empty scene. This is where the use of spherical background or HDR background images can help without adding architecture to the scene. In nearly the same way, the Bi-Gradient Background feature provides surrounding color to assist with reflections and so forth. When Global Illumination or even just Indirect Lighting are used, these backgrounds also contribute to lighting. So I have several other preset scenes using those.
This article has a goal to help you solve some of the more basic aspects of tweaking existing shaders to appear in the scene the way you want them to. While it mostly focuses on character shaders, what is said here also applies to all shaders in Carrara. I plan to get much further in depth with shaders in future articles and, perhaps some tutorials. But do take it upon yourself to explore the drop-down options available to shader channels when ever you have time to just experiment and learn. Carrara truly is set up to help you create nearly any look without even using texture maps at all, remaining completely procedural, while also offering the tools necessary to paint your own texture maps too! All of this takes practice and patience, however, which is why I feel that many people whom might give up on Carrara simply haven’t given themselves enough time to get used to all that it has to offer. So I like to write helpful tips and tricks, like this, to help Carrara users get up and running quickly – solving some of the most immediate issues that we face right up front. The rest comes with time and practice.
The Power of Carrara Shaders – The Texture Room
When we purchase items made directly for use in Carrara they should come with optimized shaders, where applicable. But, what about products made for other software applications, like Poser, DAZ Studio, or even something else? This is where you will be more apt to notice something strange going on. True, many of the newer products come with shader settings (for the other apps) that already agree fairly well with Carrara’s render engine, and can be used straight ‘out of the box’. Other times you need to make some changes to get reasonable renders. This is not a malfunction or a bug, but rather the difference between how each app looks at material settings compared to lighting and finally, rendering. Let’s take a quick look at some of the most common shader issues when importing DAZ or Poser figures.
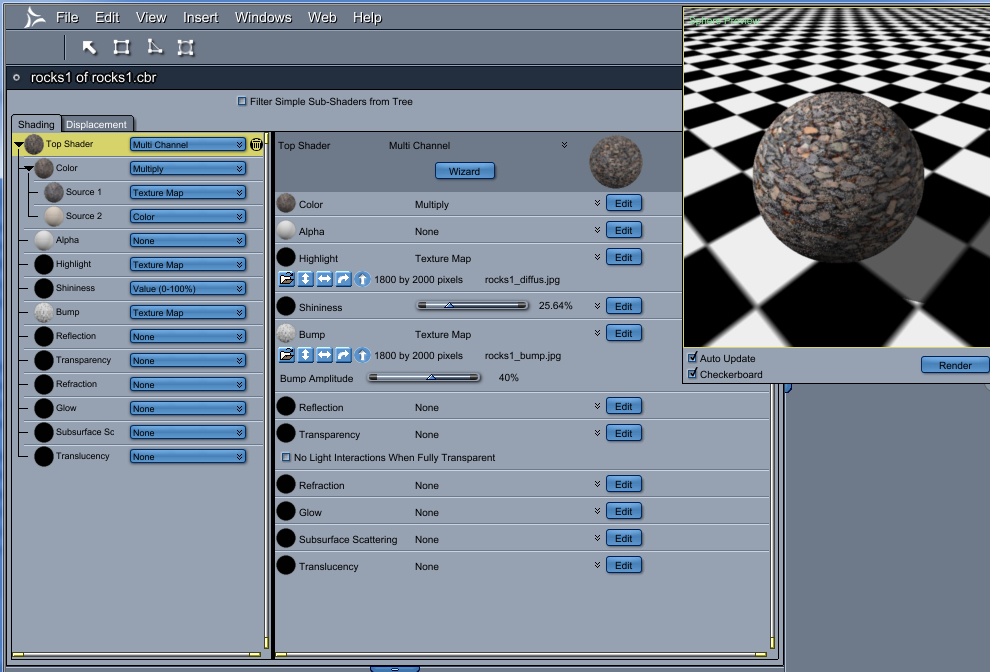 Specular Highlights – Poser and DS use different methodology when displaying specular settings compared to how this is handled in Carrara. Because of this, maps used for specular placement (Specular Maps) do not load in automatically when loading in a figure from the runtime or content libraries. This is an important bit of information to know, and to get used to correcting. After all, when an artist goes through all of the work to meticulously create a map to control the specular (“Highlight” in Carrara) highs and lows of the figure, to leave it out of use could be cheating yourself of some great, professional optimization assistance. To include it we need to understand a bit more about how Carrara uses this information. Like other apps, the lighter the image gets, the more highlights are applied. The artist will, therefore, use a map of dark to light gray-scale to make more noticeable areas that should stand out and back off to dark where they shouldn’t. In Carrara we combine this information with the ‘Shininess’ channel to interpret what happens to the light when it lands on areas set to be highlighted. To help illustrate this, I’ll use a 1 – 100 slider in both Highlight and Shininess channels in Carrara, rather than using a specular map in the Highlight.
When Highlight is set to zero there will be no highlight, so the shininess channel will have no effect, as there will be no highlighting to work with. On the other end of the spectrum, setting Highlight to 100 will give full highlight to the object as white. It is also important to understand that highlights may also include colors, if you wish. Now it is up to Shininess to determine how this works against the angles of incoming light. When Shininess is set to zero the light will spread evenly across the surface. Remember this: the lower the Shininess value, the smoother the spread of light will be. Higher values ‘tighten’ the angle of light spread to create more of a ‘shine’, but increasing this too much can remove the effect of highlighting altogether, too, as the angle become too small for the eye to see. This also depends upon how sensitive your render accuracy settings are set. Lower resolution renders might loose any shininess over 20 or 30, for example. So for a high sheen on a lower resolution render, values between 15 and 25 will ‘shine’ the highlight setting closely along the edge of the shape according to how the light hits it. So special highlight settings can also be used to show wet and dry areas on the same figure. Lighter Highlight areas will allow Shininess to create a wet look, where black will appear dry, no matter what. So you can use maps or other Carrara shader functions to make drops or streaks of water on an otherwise dry surface. That all being said, let’s have a more practical look at this.
When I mentioned artists creating specular maps earlier, I was thinking mostly of character products. Most texture/shape packs come with a full set of image maps: Color, Specular, and Bump. Some include more as well, but for now we’re only concerned with these three. If this product is some kind of scaly creature, whose scales are hard and glossy with a fleshy, tough skin underneath, I would expect to see a specular map with brighter regions for each scale and the areas where the skin might show through will be darker, with more fluctuations in brightness at those darker levels to help highlight the texture of the skin itself. This would likely be very similar to the bump map, as the scales would need to be elevated above the skin. Bump maps work the same way. Brighter is higher, darker means lower. This is why some artists might find that the bump map works well for a specular map, rather than having the extra maps. In this example, since the scales are said to be hard and glossy, we’ll want the map to use brighter shades where the scales are, making them look somewhat wet or glossy when used as the specular map. If the bump is high enough, we might get decent results even at a lower shininess value. But since we wanted gloss, I would start my shininess setting at 16 or 18 and tweak the value from there. Note that maps used in the highlight channel might add too much specular highlight for what we want, yet the difference in highs and lows still need to be maintained by the map. Lowering the brightness of the map itself, in the highlight channel, can correct this.
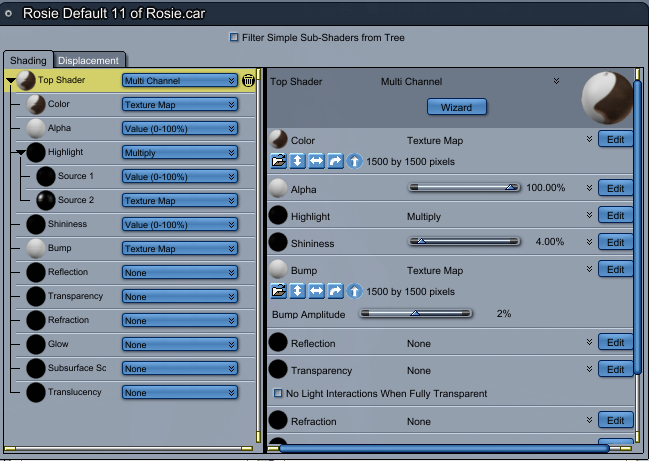 Let’s look at human skin. When skin is dry, with no added help from lotions or makeup, it has a very even spread when it comes to interactions with light. Being somewhat translucent, we could really get into detail with this – and we certainly shall in a future article, perhaps. But for simplicity, let’s just assume that we want to make the person look believable without getting too heavily engrossed in all of the many ways that you could really tweak the skin for incredibly high realism. We were looking at Highlight and Shininess. These two channels can go very far in helping to make great looking skin.
Highlight – If your character product came with a Specular map, you’ll want to use it in the highlight channel. Depending upon how bright the image is, we might have to turn the brightness down, which is done within the highlight channel, itself, just under the image thumbnail. The optional method that I prefer most of the time is to use “Operations > Multiply” in the highlight channel with Source 1 as the specular image map and a 1 – 100 value slider for Source 2, and use the slider to darken the map. 0 being black and 100 being white – full brightness. Same thing – just another method of looking at it. Also, it can be much easier if you keep your shader windows in ‘window’ mode instead of full screen – as the value to the right of the brightness slider of an image will often be hidden from view without expanding it larger.
Shininess – Before adjusting the brightness of the Highlight channel too much, let’s set a good, even spread of light using the shininess channel. Zero is a great place to start for this. If you are using a bump map and/or specular map that are supposed to show off specific details, you could try raising this value to 2, 4 or even 6 or 7, but the figure will begin to take on a more wet or moist appearance with higher levels. This is where it becomes important to practice patience and test render different combinations of levels between these two channels.
Bump – This value also plays differently depending upon the overall resolution of detail you’re using in your render settings. If your figure seems to look fuzzy, it is often due to too high of a bump value compared to your render resolution. This can cause black artifacts in the render which can usually be fixed either by increasing accuracy, anti-aliasing, and/or resolution settings or by lowering the Bump value in the shader.
There must be an easier way!
Sometimes we’re not looking for spectacular realism, close-up, intense appearances – but just want the thing to look good without fuss. It has become fairly standard to crank the highlight and shininess channels down to zero. This has the immediate effect of removing a ‘plastic’ look from the object, making it have no highlights on a dry surface – relying only on lights and shadows to give natural highlights. Since most models – especially people – have many material zones to adjust, this can become tedious and time-consuming. This never bothers me – as I love messing with shaders. There’s also the ability to go: Edit > Remove Unused Masters > Consolidate Duplicate Shaders, which makes for fewer shaders to adjust by merging all identical shaders into just one, and discarding those that are no longer used as a result.
A very popular solution is to use any of Fenric’s helper plugins dedicated to mass shader correction. He even has one that automates the entire solution I’ve just mentioned above to any model in your scene. On that note, of all of the plugins I’ve purchased from Fenric (and I own almost all of them), I find myself using them constantly. They have simply become Carrara features to me.
Victoria 4 and Michael 4
Generation 4 figures came with material settings applied to answer to the way they initially loaded within Poser. Without digging into the ‘why’ of it, I simply assumed that it had something to do with the use of negative lights that Poser applied as default. At any rate, their materials included a blue color chip multiplied with the color (texture) maps for the skin. To correct this in Carrara, simply drag the texture map out of the Multiply nest directly onto the color channel. This will remove the multiplier as well as the blue color chip. Again, Fenric has an automated answer for this in his plugins collection.
There are many other channels in these shaders
Carrara’s Texture room provides a lifetime of practice towards making materials look exactly the way you want them to look, and behave as you would expect them to against light and anything else in your scene. Although these topics go vastly beyond the scope of this, ‘Getting Started’ style of article, I’d like to at least mention that it will be very much worth your while to practice in the Texture room. With the plethora of shader examples provided in the Native Content, Carrara certainly gives you many built in tutorials on how to tweak on these channels and make some spectacular results. In exploring a preset shader for its secrets, I like to look at everything – especially keeping an eye out for functions that I’ve never used, or are set up differently than my normal setup. Then I open that branch of the shader and explore away, adding useful knowledge, in most cases, that I can apply on my own when building my own shaders. That said, I urge you to look into all of the power that Carrara gives your appearances in the Texture room. It’s a vast place of endless possibilities.
So I have to do this every time?
A great habit to get yourself into is to save your optimized figures to your browser window. I have written a short article in the DAZ 3D Carrara Discussion forum, Your Carrara Browser, regarding setting up your own, custom categories within the browser. I use this method to save all of my assets so that I can call upon them at a moments notice. Further, you can even save different versions that include special features, render settings, lighting, effects, etc., to speed up repetitive actions in your endeavors. Since I save so many things in this way, I prefer to use “Local” settings, to keep my file sizes low. If you store all of the textures with each file, your drive will fill up fast, but you can load those files into Carrara without the original files.
When it comes to Genesis, saving an optimized version has the affect of bypassing any new shapes that you purchase after the save. In other words, your Carrara-saved-Genesis will not include shape sliders that were added to Genesis after you’ve saved that instance to Carrara. Since you’ve already optimized this version, you might be fine with that. But what if you bought the new shapes (like expressions) for use with that character? In Carrara, we can save out different aspects of changes we’ve made to Genesis. Let’s tackle these one at a time.
Shaders – Beyond just Genesis, it’s easy to save the entire list of shaders from one specific model, for use in applying it to the same model later. This is essential when you need to update the base figure of a character, as in this example. Using the “Shaders” portion of the browser, and the browser category methods discussed in my Your Carrara Browser article, simply select “Actor” on Genesis and enter the Texture room. Now drag the large multi-colored ball at the top of the shaders list into an appropriate category in the browser and, of course, give it a memorable (or identifiable) name. You’ve just saved a Multi Shader file. It can also be very useful to save individual shader files for specific domains for later use. This can allow you to use carefully crafted shader settings on a figure or model that differs from the original model that your new Multi Shader will not apply properly to. Even though the mapping will likely be altogether different, the settings may be of great value, leaving you only to replace the texture maps within the shader. I do this quite often to save time in getting shaders made quickly without sacrifice.
To install the above saved Multi Shader set to another Genesis figure, simply drag the saved shader file to the multi-colored ball – just the reverse of how we saved it. Notice at this point that Carrara assigns a separate shader to each domain, even if those shaders are identical. So our next stop is to go back to the Assembly Room and Edit > Remove Unused Masters > Consolidate Duplicate Shaders. That way if we make changes to the torso shader, for example, the same changes will occur across all domains that use that map. Some might argue that you might, sometime, wish to have those as separate shaders. I’m here to tell ya, It’ll save you much more in resources to can them now. To make a new one, simply go to the shaders tab. Select the one you wish to have a second copy of, and duplicate it (Ctrl D/Cmd D).
Shaders and Lighting
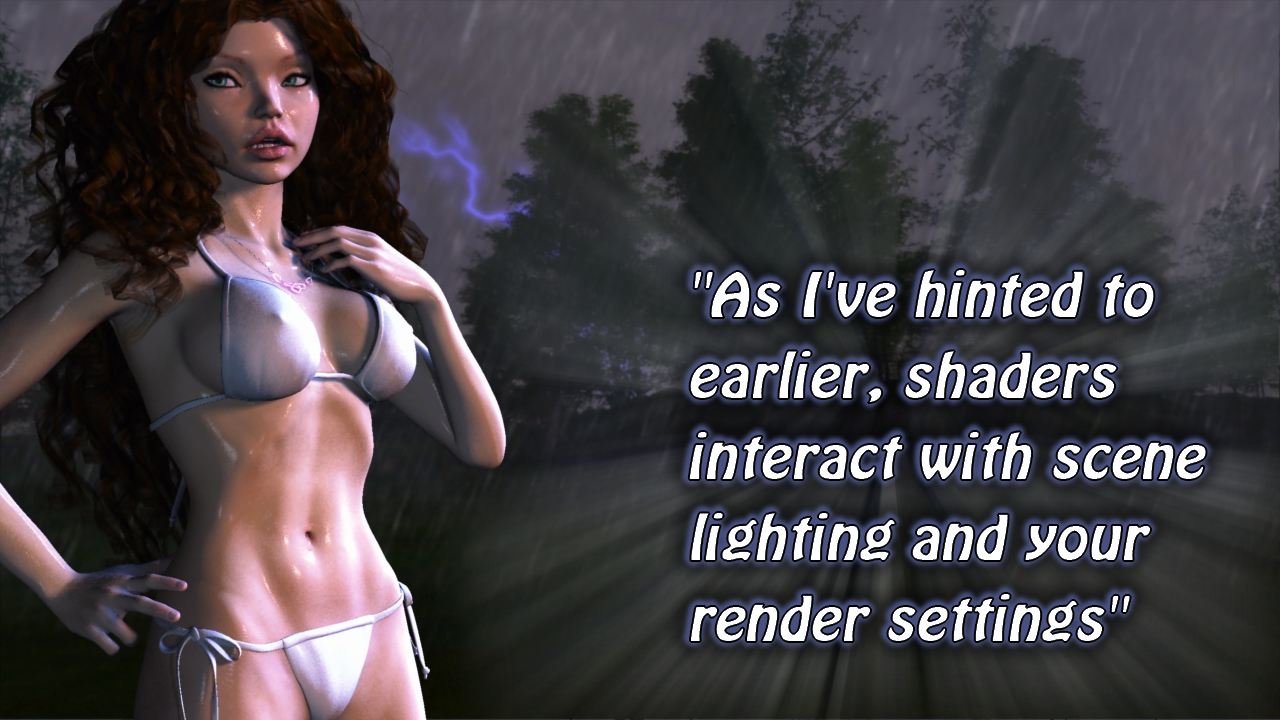
As I’ve hinted to earlier, shaders interact with scene lighting and your render settings. Because of this, it’s always good to adopt a good base understanding of how you light and render your scenes. I completely understand that it is often the case that all of these things can change with the flow of imagination or job requirement. But if you are already familiar with your own method for lighting and rendering – the techniques you use most often – it’s going to be easier to get consistent results from your shaders if they’re set up in consistent conditions. Saving lighting rigs is easy and it can be highly efficient when you’re setting up brand new scenes. Here’s an example of how it worked for me over the past few years.
I noticed that, every time I would load a new Poser or DS content product into Carrara, that I really needed to set up every shader. Not everyone may be like this, but it is one of the very first things I do when adding a new piece from a runtime. Although I already have a good idea of how to make my shader settings work with how I light scenes, I still need to light the scene anyways, so that should really be part of this process as well. Since I truly believe what I’ve just said about consistency, I have a base scene file that I almost always start with when making an outdoor scene. So before I even load in the new content, I’ve already started my fresh new scene not from the file menu, but by clicking on a saved file in my browser. The one with the background landscape and the lights. The lights and background already set at a bare minimum. I can faithfully adjust my shaders and check my work in the process. By adopting this method I am able to optimize several scenes in one sitting – depending upon the complexity of the scene.
What about indoor lighting? I still hold to the idea that adopting an early method is the best way to go for any scene. When I create a new indoor scene, I use my base preset that has nothing but the default light, a target helper, a main camera with the production frame on, and all of my render setting the way I like them. Now I load in the interior content and arrange it and then immediately consolidate the duplicate shaders. I change the default light into a bulb with an area of effect at between 30 and 60, depending upon the size of the area, with a fairly high falloff and drag it into the scenery model somewhere. I’ll set the color and brightness to how I’d like the mood of the place to be and then duplicate that light and place them around where it feels fitting for the environment. Sometimes I turn up the Scene Ambient to a basic color chip with a somewhat dark, low saturation color at a value of 5 to 10, again depending upon the situation, just to make for fast stark shadow reduction. Many others will have their own favored starting method. The very next thing I do, if I didn’t already, is to find the folder where all of the textures for the product are stored and look for maps that are meant for the glow channel. These are usually easy to find, marked with some sort of suffix to give away their use. Some products don’t need them as the entire glowing bit has its own shading domain. I like to look anyways – because it’s good to know what maps you have to work with. Characters, for instance, contain Specular highlight maps that we can use in the Highlight channel, and so on. other times there may be other options for colors and such. I like to know where all of my resources are found. So now I go through and adjust my shaders, one by one.
The time comes when we read some cool new article or post or see an inspiring video that causes us to rethink how our scenes look and feel. But we have already adopted an entirely different lighting model and set up all of our shaders to that! Okay, true. You have just optimized your shaders to a specific lighting scheme. But what about when these things change? It’s not going to be a really big deal. In most cases, you’ll find that, unless you’re going for an entirely different render engine, you’re going to be fine. As you change the lighting scheme, this new scheme will show on the shaders you’ve made and chances are that you’ll like it. If there are changes to be made, they’ll likely be nearly the same for all of those which need changing.
Some Helpful Resources
In my ►►► Carrara Information Manual ◄◄◄ thread in the DAZ 3D Carrara Discussion forum, I have a few topics that you may find helpful in these endeavors.
►►► Carrara Resources ◄◄◄ A list of links to content made specifically for Carrara
► Working with Content Some notes that I jotted down to answer some commonly asked questions regarding content within Carrara. This article does have some useful links in it including one of my favorite shader tutorials for characters within Carrara, by Indigone. A more updated article regarding Content in Carrara can be found here at the Cafe – What Content can I use in Carrara?.
► Cripeman’s Carrara Video Tutorials Index Whether you’re looking to see an example of how to set up lights, make shaders, animate things, whatever, our local Superhero, Cripeman, makes learning fun!
Your Carrara Browser
Making great stuff isn’t as cool if you can’t remember where you put it. Let’s get some good habits going right from the start
Daz Install Manager – Installing Custom Poser Runtimes
Basic walkthrough of designing your own custom runtime structure
► Some Miscellaneous Tips & Tricks includes some more tips along these lines
► Classic Carrara – Render Images by Ringo Monfort Has some great inspiration for lighting and shaders by looking at some famous Carrara renders

by Dartanbeck | Mar 5, 2014 | Cafe Articles
A brief word about how I juggle the creation of my own meager, yet somewhat epic in scale, production in Carrara
Amidst the darkness of reality arose a hero lost in his own imagination. Together, he and his fascinations protect what little light remains and strive to make it brighter….
One thing that I really love to do when I’m at a computer is to animate 3d scenes. This includes the modeling, mapping, texturing, lighting, layout… I enjoy pretty much all of it. But when I begin to tackle the notion of making my own movie, I come to the brutal conclusion that I really cannot do it all. At least that’s what the reality was when I first took on this idea. During my quest in this I’ve taken up a habit of watching all of the Disc 2 special features that come with movies – especially watching for their production footage on special effects and animation. It was interesting to learn that the near one minute shot of Obi-Wan Kenobi vs Anakin Skywalker in the lava pit cost over 70,000 man hours to make – just that one scene! Very interesting stuff. It really helps to bring about an understanding of what sort of goals to set if one does wish to do it all by ones self.
CLICK TO KEEP READING
by Holly Wetcircuit | Feb 10, 2014 | Cafe Articles

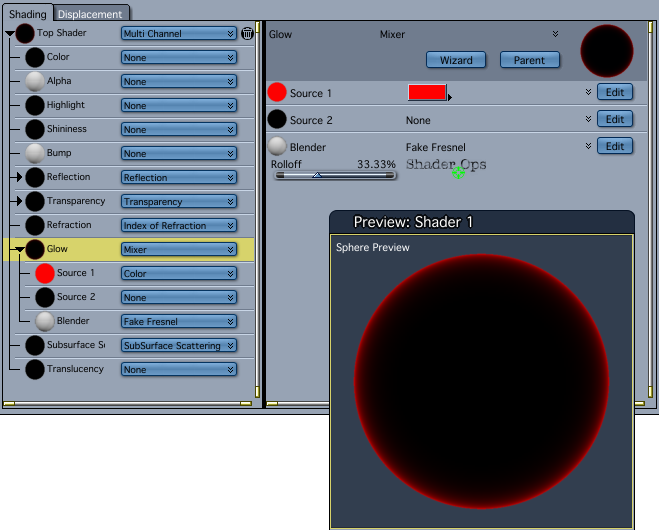
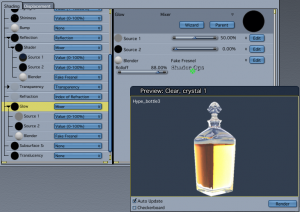
What if I told you there is a single effect that can deliver more visual impact from your renders, allowing you to redefine reflection, highlight, and shadow with the contours of your scene objects. Create photoreal fabric and glass shaders, and enhance skin with subtle, flattering effects that render in a fraction of the time of subsurface scattering. Well it’s all true. It’s called Falloff, and it’s not included with Carrara but probably should be.
What is Falloff
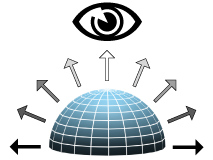
Falloff is a value based on viewing angle
As of Carrara8.5 there is no falloff shader included with Carrara. Fortunately we have several choices with plugins. Digital Carver’s Guild offers a simple Fake Fresnel shader with SHADER OPS. SHOESTRING SHADERS adds the more sophisticated Fresnel and Angle shaders. Sparrowhawke3D recently updated the Laboratory plugins for Carrara8.5, including a free Edge Falloff Shader.
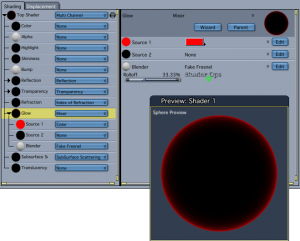 Fake Fresnel in Shader Ops will always “point at” the rendering camera, but the Shoestring Shaders are more versatile allowing any scene object to be the “point at” object. All the examples in this article use the simpler Fake Fresnel shader. Links to the plugins are at the end of the article.
- EDGE POP
Let’s start with a simple falloff in the glow channel. See how the cherries “pop” from the dark background? They almost seem to float in space in front of the screen. This is because the extra contrast separates the layer from the background. If we were seeing this in real life, there would need to be empty space behind the cherries to create this kind of “light wrap” effect. Our eyes perceive the fall off as depth, as well as adding a kind of glossy highlight all around the curved surfaces. Use this trick anytime you want to make an object jump out and grab attention.
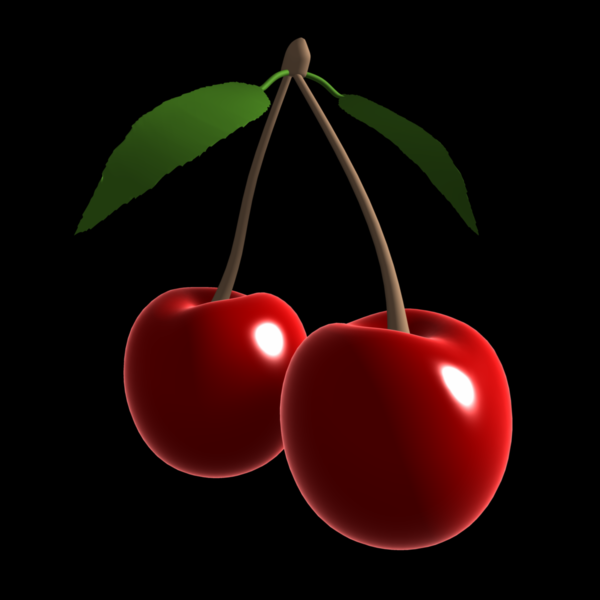
Falloff edges “pop” from a dark background
- METAL and ENAMEL REFLECTION
Instead of “popping out” of the screen, falloff in the Reflection Channel can help embed an object into your environment, especially when using an hdr background to wrap your scene. Hard surfaces made of metal or glossy enamel coatings start to reflect at oblique angles, even if they don’t have a highly mirrored surface. Airplane wings, automobile hoods, chrome bumpers, stainless steel tools, and ceramic-tile countertops are objects that will show more reflection when viewed edge-on. Adding falloff in the Reflection Channel also creates a better light wrap on hard surfaces when using hdr backgrounds and image-based lighting.
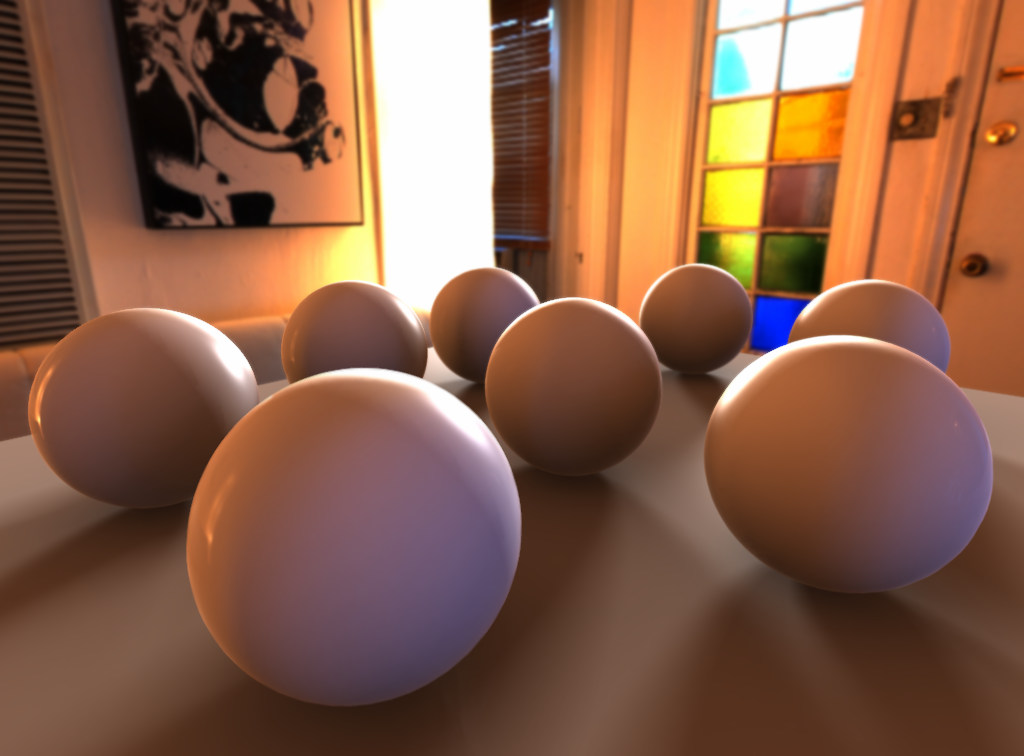
HDR courtesy http://www.hdrlabs.com/sibl/archive.html
- GLASS EDGES
Glass can be one of the most challenging surfaces to render in 3D. Even with extra lights and heavy refraction the edges of glass objects can easily disappear. A thin, bright, edge falloff glow gives glass more “presence”. As above, falloff in the reflection channel can also be added for additional photorealism.
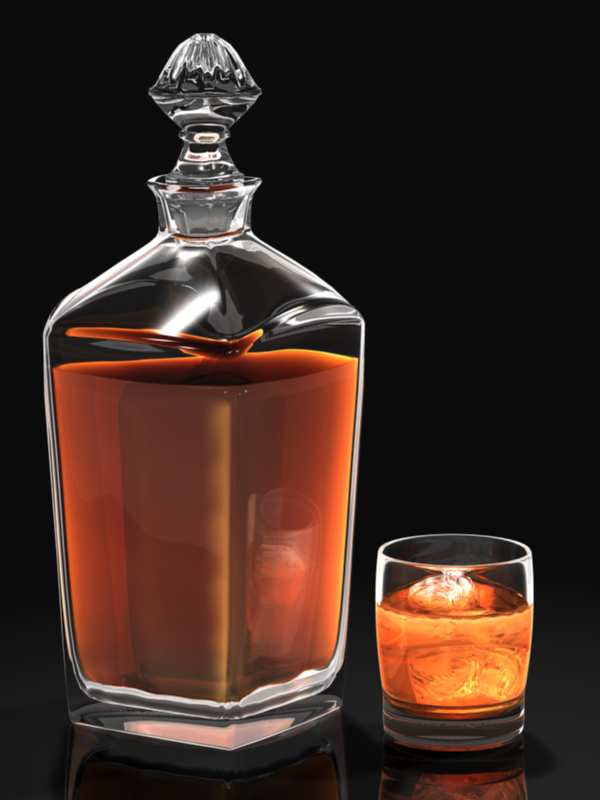
Glass shader uses falloff in Glow and Reflection
CLICK TO KEEP READING
by booksbydavid | Jan 11, 2014 | Cafe Articles, Tutorials
A Carrara/Marvelous Designer Walk through
by David Collins/booksbydavid
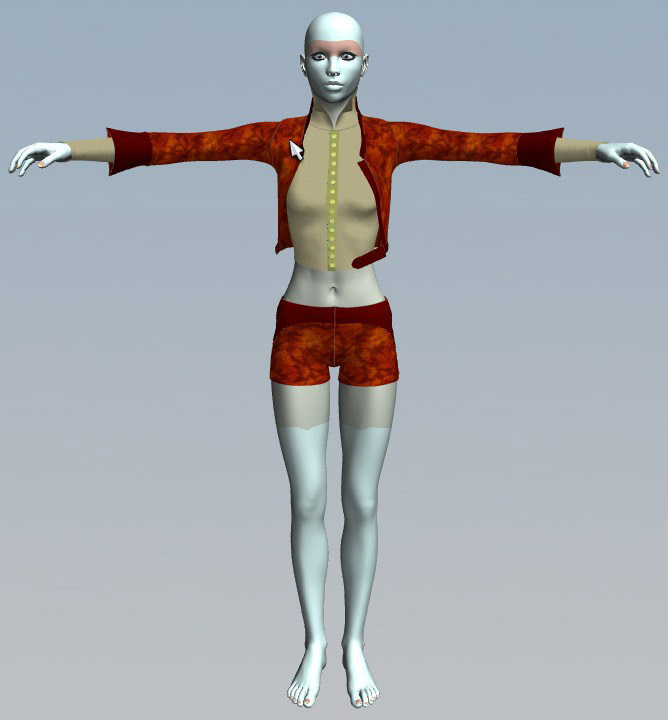
Marvelous Designer is a clothing design program that allows you to create and drape simple as well as very complex dynamic clothing. It translates 2D patterns into 3D cloth ready to fit any imported avatar. It takes a bit of time to learn how Marvelous Designer does things, but after you’ve passed that hurdle dynamic clothing creation is simple.
While Carrara doesn’t have built in dynamic cloth functions, dynamic clothing can be used to good effect in Carrara via Marvelous Designer. This short walk through is how I get dynamic clothing from Marvelous Designer to Carrara.
For this walk through, I’m using Carrara 8.1 Pro and Marvelous Designer 2. There are newer versions of both programs, but the upgrade cost for both programs is out of my reach. As far as I can tell, however, this walk through should work for the newer versions of each program as well.
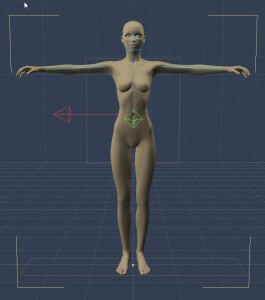
First, in Carrara load the figure you plan to dress. I’m using Victoria 4 for this example. It is also a good idea to load whatever morphs you will need and morph the character now before you move it into Marvelous Designer. This saves time and aggravation later.
Once you’ve got the figure you want, you will need to export your figure as a .obj file. Marvelous Designer will import Collada as well, but I have not had good results going that route. To export the figure in Carrara, choose File/Export. A dialogue box will appear.
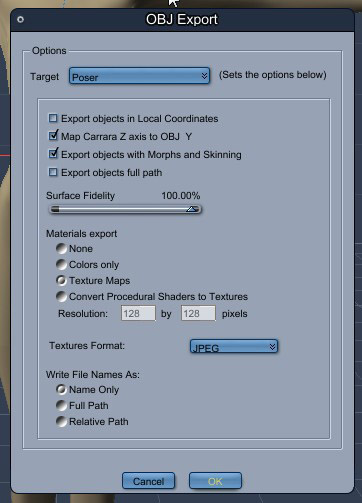
You will have several different Target choices. It doesn’t really matter which one you choose as Marvelous Designer will automatically scale the model when it’s imported. If you choose the default target make sure you check Export objects with Morphs and Skinning, so your figure will import with its morphs intact. To avoid confusion, I always choose the Poser target.
Next, pose your figure as you will want it in your final render and export this figure using the same process as above. Save your posed character in Carrara, so you can use it later.

After the figure is exported, you will then import the figure into Marvelous Designer. When Marvelous Designer opens, you will see the default avatar already loaded. You need to delete this avatar and her dress. To delete the avatar, chose Avatar/Clear. Then go to File/New to clear the scene.

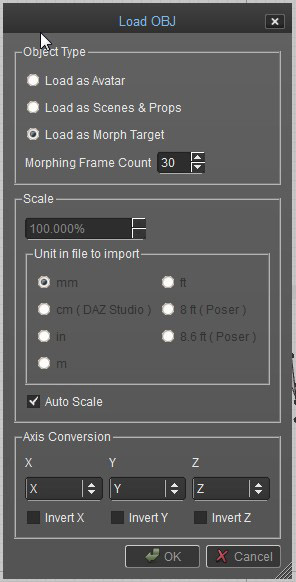
Next, you will import your figure. Go to File/Import/Obj and locate your figure. A dialogue box will appear.
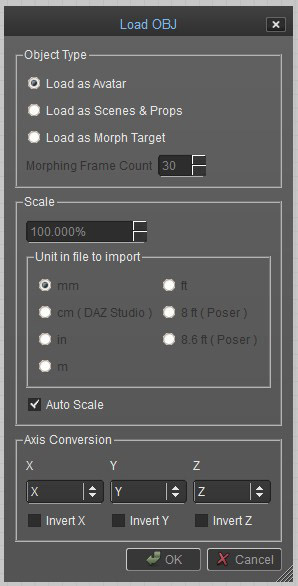
You will need to make sure ‘Load as Avatar’ is ticked and ‘Auto Scale’ is checked. Then hit ‘OK’. Your figure will load into Marvelous Designer properly scaled and with morphs intact.
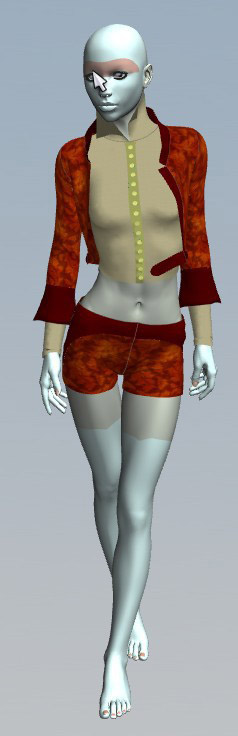
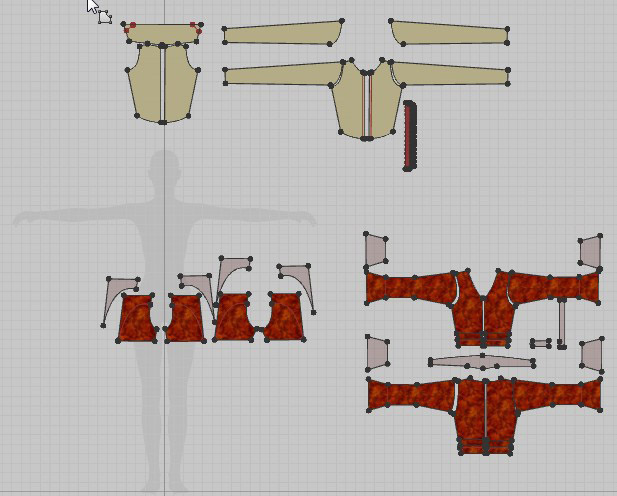
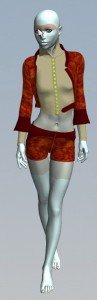
You can now proceed to create your clothing pattern. Here is an outfit I created for V4.
Once you have created your clothing, you will need to fit the clothing to the figure.

Now, we want to fit the clothing to our posed avatar. Choose File/Import/Obj again. This time select the .obj of the posed figure you created at the beginning. A dialogue box will appear.
This time you will tick ‘Load as Morph Target’ and check ‘Auto Scale’. Marvelous Designer will run a simulation using the posed .obj as its target. When the simulation is complete, the clothing will be fitted on the posed model.
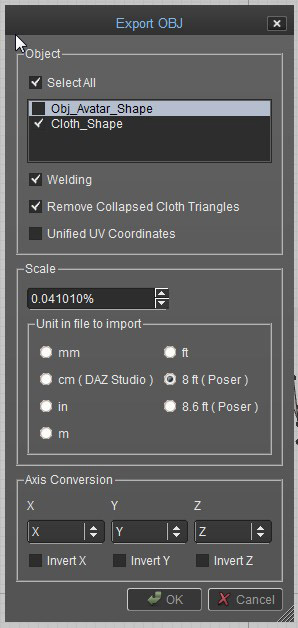
After the clothing is fitted to the figure, you can export it to Carrara. In Marvelous Designer choose File/Export/Obj. A dialogue box will appear giving you the export options. You will need to check boxes for Cloth_Shape, Welding and Remove Collapsed Triangles. Unless you want a .obj copy of your original figure, make sure that the box for Obj_Avatar_Shape is unchecked.
I do not check Unified UV Coordinates. I normally add textures in Marvelous Designer. I scale and adjust the textures using Marvelous Designers texture tools. Unifying the UVs will erase all of that on export and make all the textures the same scale. I’ve not noticed any real benefit to unifying the UVs since I’m able to work with textures in Carrara either way, so it all depends on where and how you add textures to your garment.
The last to do is make sure that ‘8ft. Poser’ scale is ticked. This will make sure that the clothing object will be exported in the correct scale.
The next step is importing the new clothing object into Carrara. In Carrara choose File/Import. You will get a dialogue box.

This time make sure you choose ‘Poser’ as your source. Any other option will load the clothing object in the wrong scale. Click ‘OK’. Your garment should load in the correct scale in the pose you exported it with.
Here is the final image of my Carrara/Marvelous Designer creation. It’s missing some details that can be added in Carrara or Marvelous Designer or in post but in general it looks pretty good.
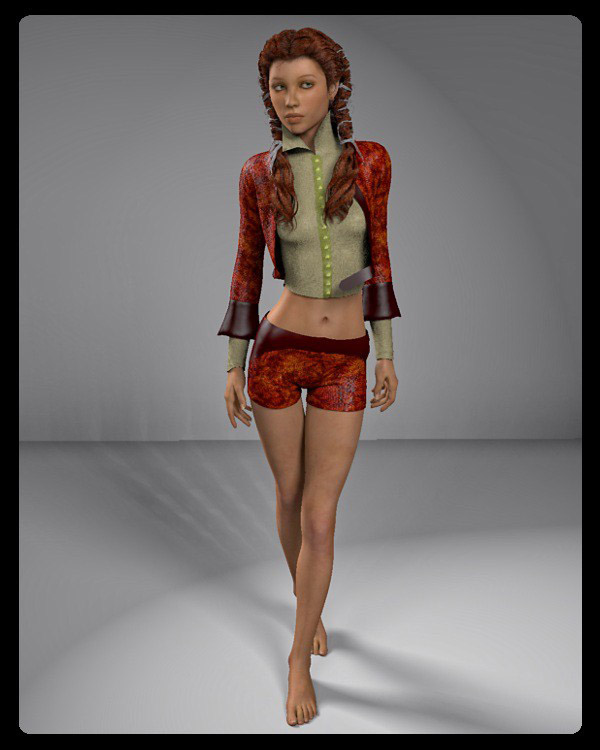
©2014 David Collins/booksbydavid
Download Carrara/Marvelous Designer Walkthrough as PDF
Carrara_MD_walkthrough.pdf
Additional Links
Marvelous Designer
http://www.marvelousdesigner.com
MDD File Format for Carrara import/export plugin needed for MD’s animation add-on
http://www.daz3d.com/mdd-file-format-for-carrara
Fenric’s OBJ Sequence Exporter plugin alternative to MDD file format
http://fenric.com/wordpress/store/products/object-sequence-exporter/
DCG Importer Digital Carver’s Guild OBJ Sequence import plugin alternative to MDD file format
http://www.digitalcarversguild.com/plugin.php?ProductId=21

by Dartanbeck | Dec 9, 2013 | Cafe Articles
By Dartanbeck
Carrara is unlike all other modeler apps out there – and one of the huge differences is its built in ability to use nearly any of the popular types of purchasable content on the market, including that which is usually only associated with Poser and/or DAZ Studio. This gives us a huge advantage – those of us whom haven’t the time to create all of our own models ourselves! 
Carrara has the ability to load in and use most types of 3d model files on the market. It has a rather genius browser window to help us to catalog and find it all. But how do I set it up? And what kind of content can I buy and expect to work easily within Carrara’s interface? I bought it, installed it, but how do I find it?
What exactly is ‘Carrara Content’, and why doesn’t much come up in a search?
This topic can seem confusing at first. When you run a search for content that is compatible with Carrara, you might end up with only the content displayed in my list of Carrara Resources in the Carrara discussion forum at DAZ 3D. This is a great list of items specifically made for use in Carrara. However, this does not answer the question regarding “What will work within Carrara?”. This is because Carrara has been specially ported to accept content made for Poser and now, with version 8.5, DAZ Studio too. Since Carrara 5 Pro we have had the ability to import Poser content and work with it as one might in Poser: The clothing conforms, smart-props apply correctly, pose files, expression files – these all work very much as if we were actually using Poser. Many changes in that regard have occurred over the years, in the newer versions, arguably for the better. I say it this way because what DAZ 3D has done is to make such content more like ‘native Carrara’ content, so that no special importing steps need to be taken in order to get Poser and/or DAZ Studio content into your scenes. Furthermore, you can now see the content in a library, complete with the thumbnails, as you would see it in the other apps. In doing so some of the conveniences offered previously have changed – especially when it comes to exchanging files, like the use of external ‘dynamic clothes’ files. So while the new improvements truly are improving the workflow, it has caused degrees of upset with some users – but I think that, through the use of a script for Poser, available here in the Carrara Cafe Downloads Section, and the new ability to export DUF files from DAZ Studio for use with Carrara 8.5, most of these issues have found new methods of, once again, being available to us. So what does all of this mean?
What this means is that you may, for the most part, consider your content purchases nearly the same way as you would as if you were buying content for Poser and/or DAZ Studio. There are some broad categories of things to look out for – things that simply are not compatible with Carrara. Things that are made specifically to work with a special plugin like, “Look at my Hair” plugin products for DAZ Studio, products that make use of special features only available in either Studio or Poser like, Uber Environment, materials, camera effects, environmental effects… you’ll become savvy to the fact that, while most models made to work in Poser work within Carrara, specific Poser-only features will not – and the same goes for DAZ Studio products and Carrara. For some of us, whom have already been into Poser and DS before coming into Carrara, already have a good understanding of what we can use and what we cannot. Allow me to try and make this a bit easier to understand:
Poser and/or DAZ Studio Models
Models are things like buildings and scenery sets, vehicles, people, animals, monsters, etc., that have geometry and material settings. Carrara has been made to show these sorts of things as if you were seeing them in their native applications. To do so you add the runtime library(s) to Carrara’s browser. You may then see the item’s thumbnails amongst their various categories, just as you do in Poser or DAZ Studio. In the Poser Runtime structure, some of the categories are not shown. This is to aid you in knowing what works within Carrara. Categories like “Lights” and “Cameras” are not shown to avoid you trying to load them. While you might be able to actually import and use Poser lights and cameras into Carrara, you won’t get satisfactory results. You may, however, choose to show the hidden folders from the file/folder menu of Carrara’s browser, but I do not recommend doing so. Everyone I know who has tried has become frustrated.
If you are new to this whole idea, and are not certain about the Poser Runtime structure, I have written a short article explaining how many of us set them up. With the birth of the DAZ Install Manager, I have included instructions on how to create these runtime structures using it – which can help if you plan to use the DIM for installing your DAZ 3D content. I like the DIM. Just keep in mind that, since it only works for DAZ 3D content, you’ll still need to install content from other vendors manually. Here’s a link to my article: Daz Install Manager – Installing Custom Poser Runtimes
 I mention the Poser Runtime structure first for a good reason. For my own purposes of keeping everything straight, at least the way things stand at the time of this writing, I find it much easier to keep using the Poser Runtime structures for everything except for Genesis and Genesis-related items. In saying “Genesis”, I actually mean any of the new DAZ 3D Triax rigged figures which also includes the DAZ Horse 2 and will be including more figures as time goes on. You see, these new figures and DAZ Studio 4.5 have been developed together – to work together. The figures require a special installation file placement in order to work properly. Between the release of DAZ Studio 4.5 and the latest DS, there have been many changes to the Triax models and their files. Some such files needed to be deleted as the new ones were installed in order to keep from ‘breaking’ their working structure. Since they had different file types, two files of the same name could conceivably exist in the same location, which is not good and is also confusing. Now this might all sound like a big headache, so I’ll stop rambling about that stuff and move on to my point:
Genesis, Genesis-related items, and other DAZ Studio Triax rigged figures, in my opinion, should really be installed by the DIM – and need to be installed as a DAZ Studio Content library in order to work properly. Because of the need to uninstall certain files as these files are updated, the DIM just makes the whole process work the way it should for these, specific figures. Furthermore, at least for my Carrara endeavors, I find it easier on myself to only install Genesis, Genesis-related items, and other DAZ Studio Triax rigged figures, into that DAZ Studio library. In Carrara (at this writing) the folders in the DAZ Studio library structure that don’t contain any user-usable files are NOT hidden – making it very confusing (at first, anyways) towards where to look for your files. By limiting your installations to this library structure to only Genesis, Genesis-related items, and other DAZ Studio Triax rigged figures, you only need to look under “People” or “Animals” under the “My DAZ 3D Library” heading in the Content browser to find your products. Okay now that I’ve gotten the wordiness out of the way, Ill sum up. If the sum up doesn’t make sense, try reading the above over again – as it can take a bit to soak in sometimes. I must say: While this might seem to be more difficult than it needs to be, please understand that it is actually a much smoother work flow, once you get used to it, than having to go: “File > Import > navigate to your directory for files” that you would have to do in some other software applications. Okay, let’s sum this up:
Using Genesis
Install all Genesis, Genesis-related items, and other DAZ Studio Triax rigged figures to the same directory using the DAZ Install Manager (DIM).
 To find the products in Carrara, I’ll use the default installation library of DIM as an example. Go to your Content tab in the browser: “My DAZ 3D Library”. For Genesis, Genesis-related items, go to the “people” category. In here you’ll find all material presets, poses, people, characters, clothing, hand poses, etc., while for other DAZ Studio Triax rigged figures it will depend upon what they are. For Animals, go to “Animals”, such is the case for the DAZ Horse 2 and up and coming animal figures. It’s truly that simple. I’m fairly certain that there are no other user-usable files to be found in any of the other places you can go in here. Do keep in mind that DAZ Studio does come with other content worth using. Much of this is found in the “My DAZ 3D Library Runtime” folder, and sorted as it is in other Poser Runtime structure categories: Figures, Hands, Poses, Props, etc.,
Using Poser and DAZ Studio Buildings, Scenery, Plants, Creatures, People and Animals that are not Genesis-related, and so on
Install these items as if you were using Poser. Whether or not you’ll be using the DIM, the article about Daz Install Manager – Installing Custom Poser Runtimes will certainly help you to wrap your head around how to organize your content, if you haven’t already a system of your own.
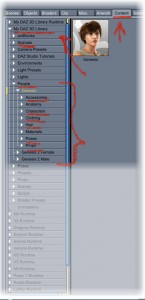
 Now you need to make this content available in Carrara’s browser. If you have more than one DAZ Studio Library directory, you may have to follow this procedure to add whatever Carrara didn’t already. Go to your Content tab in Carrara. On the far right of the browser, just above the main window, is a small dark icon “File/Folder Menu”(see the above image – follow the red arrow). Click that and select “Add Runtime” and navigate to one of your runtime directories. Note that you do not select the actual folder: “Runtime”, but the folder that contains it. You’ll then be asked if this is a runtime or content. If it is a Poser Runtime structure you’re adding, choose “Runtime”. If you’re adding a new DAZ Studio Library, choose “Content”. Carrara, at the time of this writing, only allows you to add one such library at a time. Go ahead and add all of your runtimes. Once done, you’ll see the familiar content categories that you may have seen in Poser: Faces, Figures, Hair, Hands, Poses, and Props. As I’ve mentioned earlier, folders that contain incompatible files are hidden by default. Going to that File/Folder menu you may “reveal hidden” folders to see what else is in that runtime. Remove that check mark to go back to the default view. Furthermore, you may choose to have Carrara auto-detect all of your content locations by going to the File/Folder menu and choosing “Auto-Detect Runtimes”.
NOTE that you also use this File/Folder menu to add Carrara-Specific content folders to your browser as well.
If you’ve checked out my article on Runtimes, you’ll have seen that I use a rather vague approach that works best for me. I don’t mind having huge runtimes, I just like them to be sorted in some, broad sense. Many other folks enjoy getting much more specific, having separate hair runtimes, perhaps some just for specific props, etc., the goal here, is to make sure that YOU know where to look for YOUR content without getting a headache in the process. For example, my “Environs” runtime contains everything from scenery and buildings to anything and everything that might be used with them to create a full scene – including medicine bottles, cookie jars, furniture, flowers, trees, plants, rocks… All living creatures that are not people or dragons go into my “Animals” runtime, and so on. So let’s take a practical example of what I’ve been going on about:
I just bought “Space Base”, a Platinum Club item with a cool collection of scenery items for space and/or scifi style scenes. Since I put all of this stuff into my “Environs” runtime, I will open the DIM and as I mention in the article, I’ll have the “Show Details” box on the bottom right, checked. In the Path selection drop down, I’ll grab my “Environs” runtime and run the Install (Download, Install, then Delete the installer (optional)) for my new Space Base. I’ll often have numerous things in my downloads availability that have to go to multiple places. Sometimes I’ll place check marks in only those for a specific runtime, or the DS Library (where I use the DIM default “My DAZ 3D Library”) and start the queue and then repeat the process for each. Other times I’ll deselect the “Install after Download” box and download everything – where I individualize their installations later. Either way, I’m sorting my content to where “I” know where to look for them.
 Michael 6, on the other hand, is the new Genesis 2 Male so I want him and all of his stuff to go to the same place: My DAZ 3D Library, which does a great job of sorting stuff as it is – so I haven’t really felt any need to have separate libraries for any of my Genesis stuff. Besides, every single instance I’ve seen where people are having major frustration with errors using Genesis is where they are not using DIM, or are trying to use multiple libraries with Genesis. Especially libraries that are what I will refer to as “Impure”. An Impure library is one that uses the DIM, but also has manual installations as well. While the official word is that this can be just fine, I will always advise against it. After all, what is a library anyways? It’s just a darn folder with stuff in it. Make a new one if you really need to manually play with stuff like freebies and the like. An exception might be stuff that is made for Genesis that is not made by DAZ 3D, since it cannot use the DIM. While it should be safe to share with the DIM’s library, “should” is not always adhered to – especially by potential artists whom might accidentally include files that mess up the whole works. It is, and always will be, my advise to tread carefully when using Genesis. It is an advanced figure with highly advanced features, but break it and the best option becomes deleting the whole shebang and starting from scratch. So if you do use content for Genesis other than that which is sold by DAZ 3D, I would advise to either make a new library, specific to non-DIM Genesis items, or to exercise a good method of knowing what it is that you’re adding to your Genesis library. Morphs might need to be installed in the same library. Keep a good filing system for storing the installer zips for this content so that you always have a place to look when trying to determine where something is installed to.
Purchasing Content for use in Carrara
I’d like to, just briefly, discuss the idea of “What works in Carrara, and what doesn’t”. I know I’ve said some stuff earlier on this, but now that I’ve talked about where stuff should go amidst your runtimes and libraries, I’d really like to help to instill some ‘savvy’ into what you should always expect NOT to work in Carrara, and you can then assume that most everything else will. These are just guidelines to help you out. It is truly your responsibility to look at each product you purchase and determine, for yourself, whether it will work in Carrara or not. Luckily for us, however, DAZ 3D is most kind when we make mistakes – and just refund our money. Gotta love that!
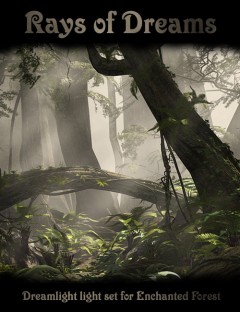 Let’s have a look at a real example here. Stonemason’s Enchanted Forest product works beautifully in Carrara. Being scenery, I install it into my Environs runtime. Rays of Dreams, by Dreamlight, uses features unique to DAZ Studio to enhance that scene for the user within DAZ Studio and, as such, will not be something you’d likely wish to purchase for use in Carrara. I say this because you will not be able to use the product within Carrara as one would expect to in DAZ Studio. It might still be a beneficial learning experience, however, to load it in DS and observe what the artist is doing, so then you may apply a similar technique within Carrara on your own. See the difference? There are some products made that rely on DAZ Studio, Poser, Bryce, Vue, etc., features for them to work. By rights, the product should mention something along these lines within the promotional write-up. Still not sure? Look under the “What’s Included & Features” tab in the store page.
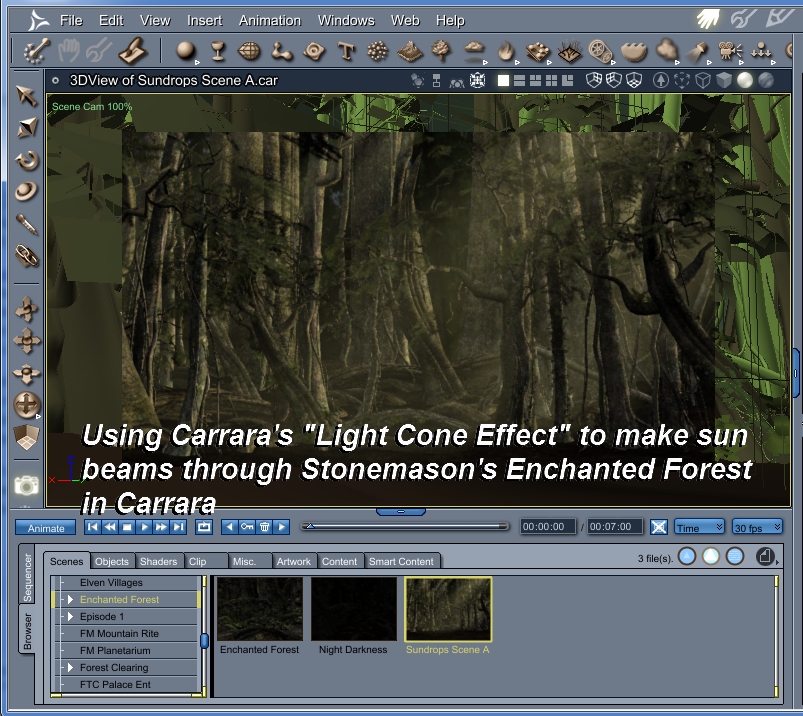
Models and texture packs for those models will generally work fine in Carrara. With the advent of Genesis, however, there are a few hidden exceptions like the Genesis Supersuit. While it likely works just fine in Carrara, the material packs are made for DAZ Studio because that was before DSON for Poser, etc., and everything Genesis was simply done within DS and DS only. This is not to say that the Supersuit won’t work. Like many things, we just need to talk to the textures and get them optimized within Carrara. If you should happen to purchase a product with the intentions of using it within Carrara, and it turns out that such a thing just doesn’t work out… get in contact with DAZ 3D and get satisfied. While it can be somewhat dis-heartening, there’s really no reason to get too bent out of shape about it.
Carrara has been set up, a long time ago, to be able to import many types of file for your authoring endeavors. The DAZ 3D Content store is not the only source you have. Take a look at the Import/Export portion of your manual. You can find all sorts of obj file format models online, either free or for purchase, that can work marvelously in Carrara with a bit of work – often on the materials. Some files come with material files that import with the object just fine – others don’t. In either case (and this goes for all 3d rendering software, not just Carrara) you’re using a render engine specifically designed to work with the material options available in its Texture room – so you’ll get the best results by optimizing.
Now that we have a few things to think about when purchasing or downloading content we will certainly get used to what to look for, and what to avoid as we make purchases and search for downloads in the future. Once in a while, however, we’ll get excited about a particular product and have it downloaded before reading the fine print – only to get really bummed out when we find out it won’t work. Unfortunate but it happens. We just have to learn from what we do, get our satisfaction, and move on.
Sincerely, I hope that this article helps to straighten out any confusion related to “Content that works in Carrara”. Really the only way that items get flagged to be included in the Carrara search box in the DAZ 3D store, is if it is flagged that way by the artist, or if it contains Carrara-specific files optimizing its use in Carrara, or if it is truly a Carrara-specific product, entirely. Our shopping gallery is much larger than that. Nearly every time you see a new item in the store, it will be a product that will work in Carrara. Just have a good look at it first to be sure. Finally, if you have any further questions, feel free to ask!
Take care, and happy rendering from all of us, here at Carrara cafe!