
Making It Happen
The ERC plugin has two methods we can choose from to control our automated animation. These are “Basic” and “Advanced”. In this tutorial we are going to use the Advanced option, which is just as easy to use as the basic option, but allows us to be more precise in choosing what we are going to use as the master and what we are going to use as our puppet.
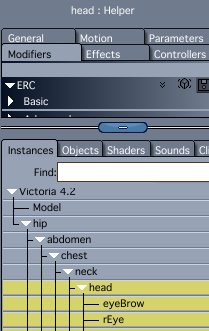 To add an ERC modifier, select the node in the instance tab that has the morph parameter you want to control and then select the “Modifiers” Tab above. To add the modifier click on the “Edit” menu and click “Add ERC Modifier” under the “Fenric” item towards the bottom of the menu dropdown.
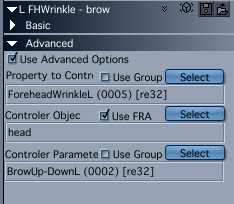
Starting under the “Advanced” tab we will need to check the “Use Advanced Option” checkbox. The next item down is the “Property to Control” selection. This is where we will be selecting which aspect of our puppet we will be targeting to automatically animate. Clicking on the “Select” button will open a dialog box with a very long list of items to choose from. Don’t let this intimidate you.
 There is an easy way to figure out which item you need to select. Animate the property you want to control and then look in the sequencer for the newly added keyframe. This will tell you which property you need to select in the ERC box.
You can only control one parameter with one instance of ERC so this has to be a single XYZ rotation, XYZ movement or morph parameter. In this example we are going to pick the ForeheadWrinkleL morph.
Now that we have our target set, we will need to select the “Controller Object”. This is the object that contains the attribute that will be acting as the master. In this case it is our characters head.
The last item we need to set under this tab is the “Controller Parameter”. This is the facial feature that will drive our automated animation. Since we want the eyebrow to drive the forehead wrinkles we need to select the BrowUp-DownL morph.
In our wizard example at the beginning the “Property to Control” would have been the Z position of the chair. The “Controller Object” would have been his shoulder and “Controller Parameter” would have been the Z rotation of that shoulder and we would have added the ERC modifier under the chair instance.
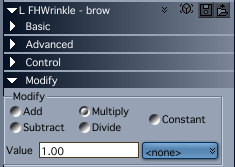 Getting back to our face animation, now that we have successfully attached our string to the master and to the puppet we need to tell the string how to behave. We do this under the “Modify” tab. There are a number of options but they all do the same thing in slightly different ways. This is the setting that controls the degree that the master affects the puppet. Simply selecting “Add” and leaving the value at 0 will mean the value of the master will be added to whatever the current value of the puppet is set at.
 However a one to one correlation is not always desirable as our wizard found out when the chair flew off the screen. Selecting “Multiply” allows us to enhance the effect by multiplying the value of the master by 1.5 (for example) causing the puppet to react one and a half times more intensely than it would react if we multiplied by 1. Or if we set the value to 0.5 our puppet would react only half as intensely than if the value was set to 1.
Playing around with these values will allow you to fine tune your results. Once you become comfortable hooking the string up to the master and the puppet, you will find that it takes no time at all to create a connection between the different elements in your scene.
To make it easier to organize and work with the ERC modifiers we can name them by clicking on the “Change Title” button under the “Global” tab. We can also set stop limits here to prevent our morphs from getting bent out of shape.
One thing to be aware of is that there are many different morphs parameters that can make the same part of our characters face move. For example if our ERC controlling parameter (our master) is MouthSmileSimple, we will not trigger our ERC enhancements by animating the MouthSmile-Frown morph. We would have to change the “Controller Parameter” selection under the Advanced tab to MouthSmile-Frown but this is not an issue if we plan well.
I have included all of the ERC modifiers used in the above face enhancement examples so that you’ll have a running start. This set is for Victoria 4 but can be easily modified for Genesis characters.
ERCFaceSet.zip
ERC has lots more to offer such as chaining multiple ERC modifiers, delayed and decaying control and more, but that is for another tutorial. If you want to dive deeper into the capabilities of ERC here is the official documentation.
CarraraERC.pdf
I am currently creating an ERC rig that will let us Carrara animators drive our characters from a Faceshift motion capture. I have some work left but once I am done I will post the ERC files along with a tutorial.
Carrara Enhanced Remote Control by Fenric at DAZ 3D



This is totally awesome, Conrad3DC! Totally!
Thank you!
Thanks Dartanbeck! That means a lot, especially since I have learned so much from all of the totally awesome video tutorials, articles and information that you have posted!
This is indeed awesome and very much appreciated information – thanks for posting it. Woah . . . the possibilities with ERC are very exciting .
Very clever application of this great plugin!