During the holidays, OctaneRender for Carrara 3.0.0.1 Beta version was released, the GPU rendering plugin that is fully integrated into Carrara.
The beta is free for those that have a license for the 2.x version.
There is also a free demo if you have not tried out OctaneRender for Carrara here: https://home.otoy.com/render/octane-render/demo/
The beta 3.0.5.03.32 Carrara plugin thread at the Octane forums, started 2016-10-16, contains several bug fixes and new features, full release log available in the forum thread: https://render.otoy.com/forum/viewtopic.php?f=79&t=56881
An unofficial CarraraCafe manual for the upcoming LuxusCore plugin for Carrara, that brings GPU accelerated rendering and realtime render preview into Carrara. It is updated frequently, so check back often.
If you have any questions or something to add, check the end of the manual for links to the forum.
Table of Contents 1. What is LuxusCore? (Updated 2016-01-23) 2. Beta installation for Windows x64, free (Updated 2017-01-28) 3. First simple project, rendering and video demo (Updated 2017-02-15) 4. Shaders (Updated 2017-02-15)
5. Lights (Updated 2017-02-14)
6. Cameras (Updated 2017-01-30) 7. FAQ (Updated 2017-01-28) 8. Example LuxusCore renders 9. Animation (Updated 2016-01-23) 10. Benchmarks (Updated 2015-09-04) 11. Settings to use in the Config Settings: PathOCL, BiaspathOCL, Realtime, EXR/HDR and multipass images (Updated 2016-01-23) 12. GUI (Updated 2016-01-23)
13. Hair
14. Release notes (Updated 2017-01-28)
15. Other
1. What is LuxusCore? LuxusCore is based in the LuxCore render engine of the upcoming Luxrender 2.0 (not released at the time of writing) and is a Carrara plugin with a built-in render engine.
LuxusCore supports GPU accelerated rendering and Interactive Photorealistic Rendering (IPR) inside Carrara.
It works on both AMD and NVIDIA graphics cards using the OpenCL language, so you need to have updated graphics drivers.
More about supported graphics cards can be found in the LuxCore wiki here.
Also runs on CPU which supports more functions than GPU only.
Important new features for Carrara users that are now integrated into Carrara: GPU rendering, Unbiased rendering, HDR/EXR with multipass rendering.
2. Beta installation for Windows x64, free (Updated 2017-01-28):
No time limit for the version released october 2016:
Download from https://app.box.com/s/2g03wx4j6y3lyw7uzhxgq6ifnk3hnxga
Unzip to C:\Program Files\DAZ 3D\Carrara8.5\Extensions
Note 1: Path may be different if you installed Carrara elsewhere. Note 2: LuxRender is not needed, unlike Luxus for Carrara. LuxusCore works both with a clean installation of Carrara and also if you already have the older Luxus plugin installed.
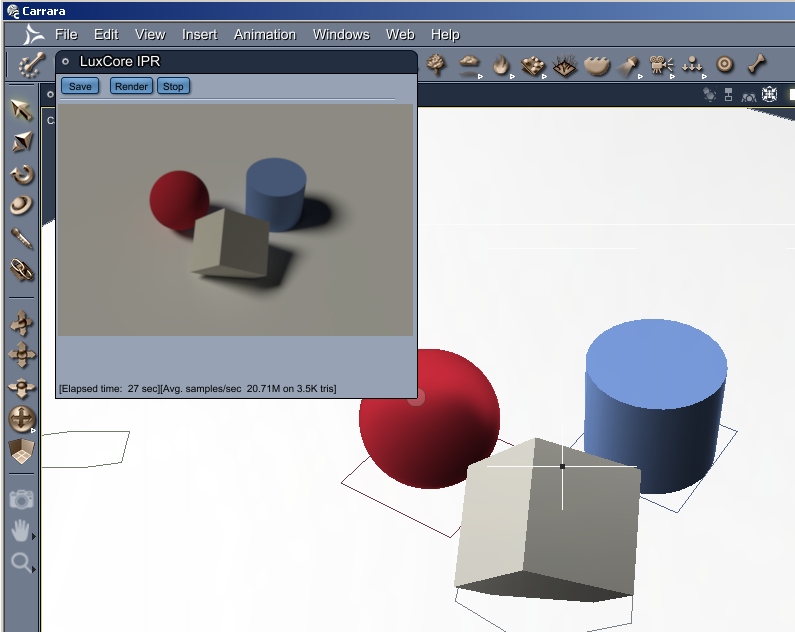
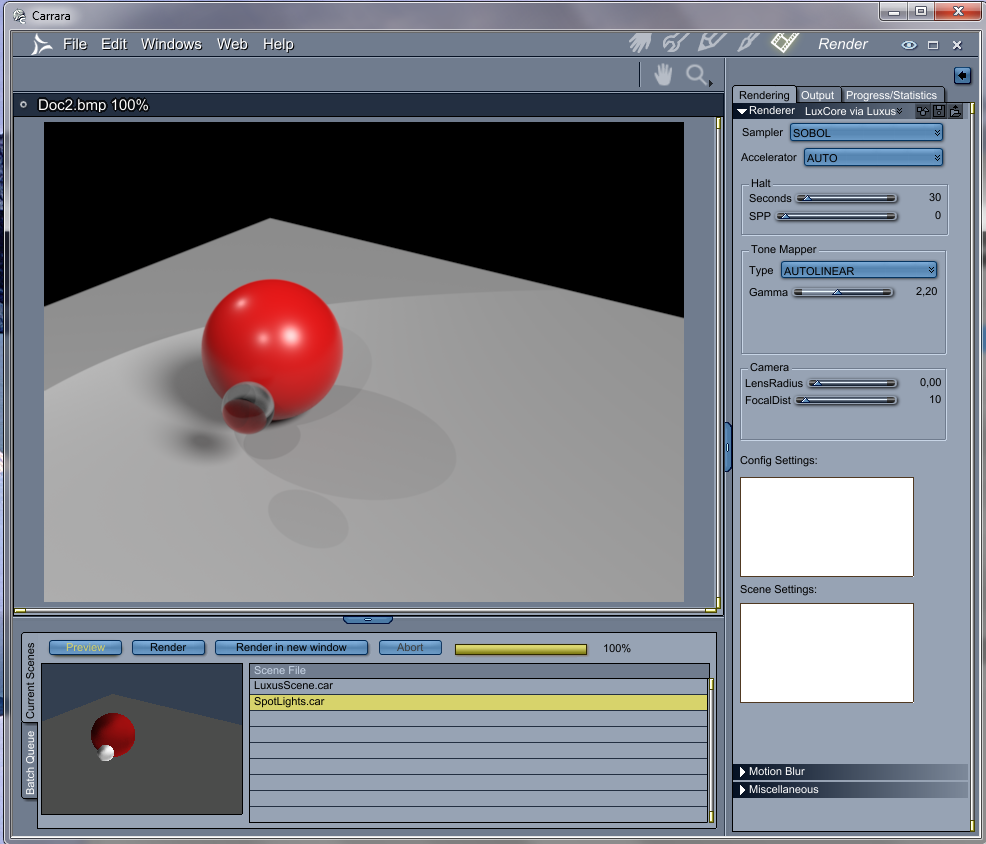
3.1 First simple project and IPR rendering Download the simple test scene and load it in Carrara, press Edit/LuxCore IPR and you should be seeing this:
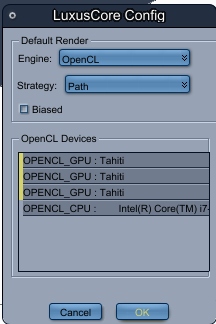
The very first time you may get the same configuration dialog as when choosing Edit -> LuxCore Config where you choose GPU or CPU rendering and the method for rendering. The screenshot shows the recommended settings for GPU acceleration, all graphics cards are selected, the CPU is not:
3.1 First simple project and rendering
Start Carrara and load a default scene to quickly check that LuxusCore is working:
File -> Open Preset -> Global Illumination -> Skylight
Edit -> LuxCore IPR
Now the IPR render window should open and the realtime GPU preview rendering should be running.
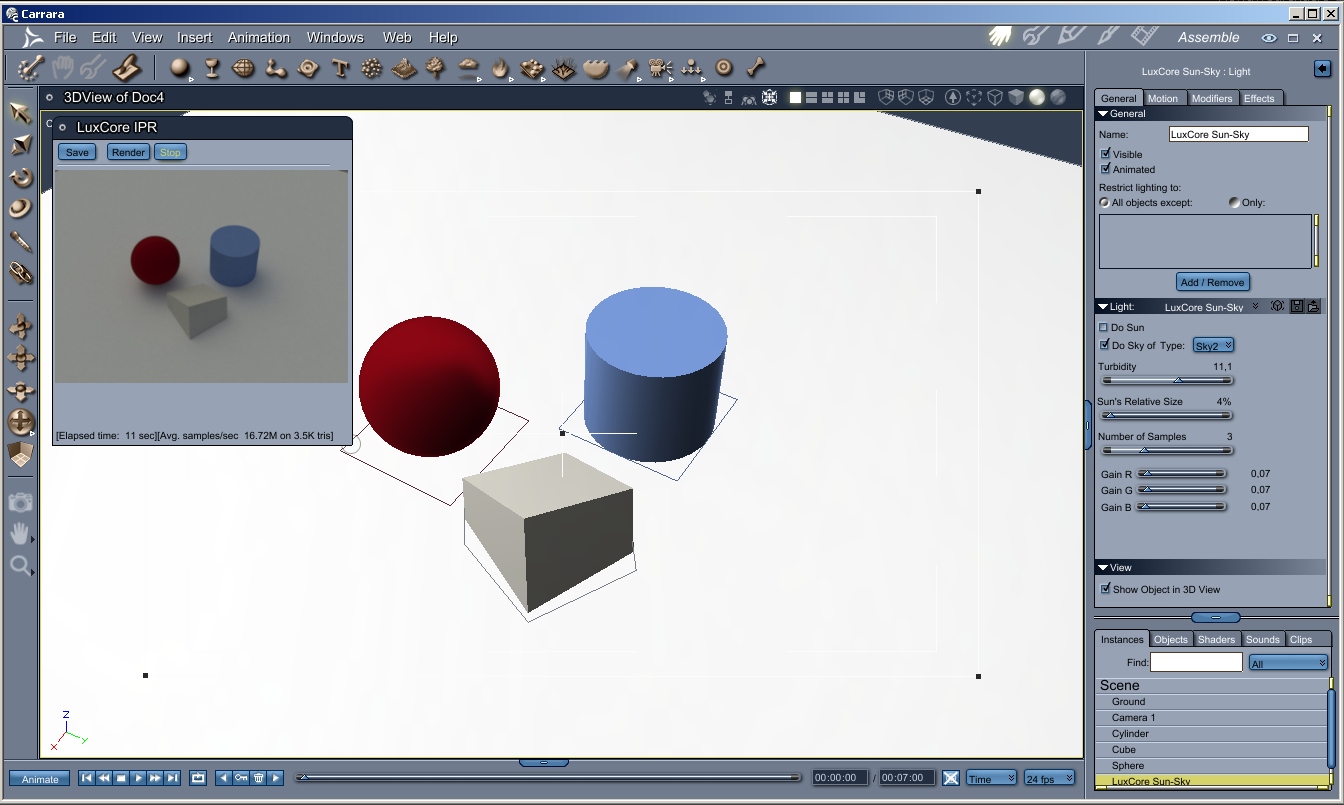
Now delete the default scene light and add a LuxusCore light: Insert -> LuxCore Sun-Sky. Uncheck “Do Sun” and to run the same type of scene as the preset, but using LuxCore setting instead.
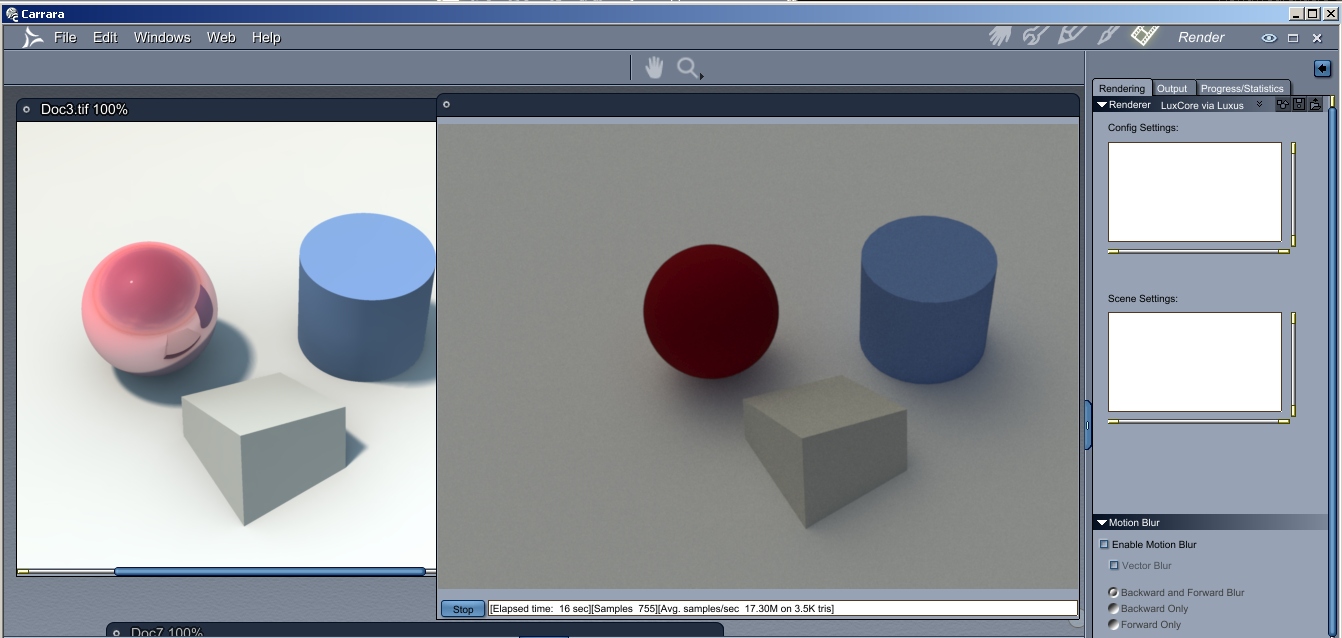
In the Render Room, you can choose Rendering -> Renderer -> Photorealistic -> Luxcore via Luxus to get the full render options.
3.2 Luxuscore Youtube video demonstration by Spheric Labs
A video showing the first version of LuxusCore in Carrara and the new IPR window that supports the realtime rendering workflow with quick changes to the scene, lights and shaders/materials. Some basic shader modifications are shown too. Posted in the end of December 2014 by the LuxusCore developer Spheric Labs.
4. Shaders/materials
As you can see from the Render Room above, the native Carrara render on the left has a Glossy material. In the current version of LuxusCore this is not automatically translated.
A workaround is to build the shader as a new LuxusCore material in the Carrara shader room.
A general overview of the Luxcore materials can be found in the Luxrender wiki, well worth reading since physically based materials are very different from the Carrara shaders used by the Carrara internal rendering engine.
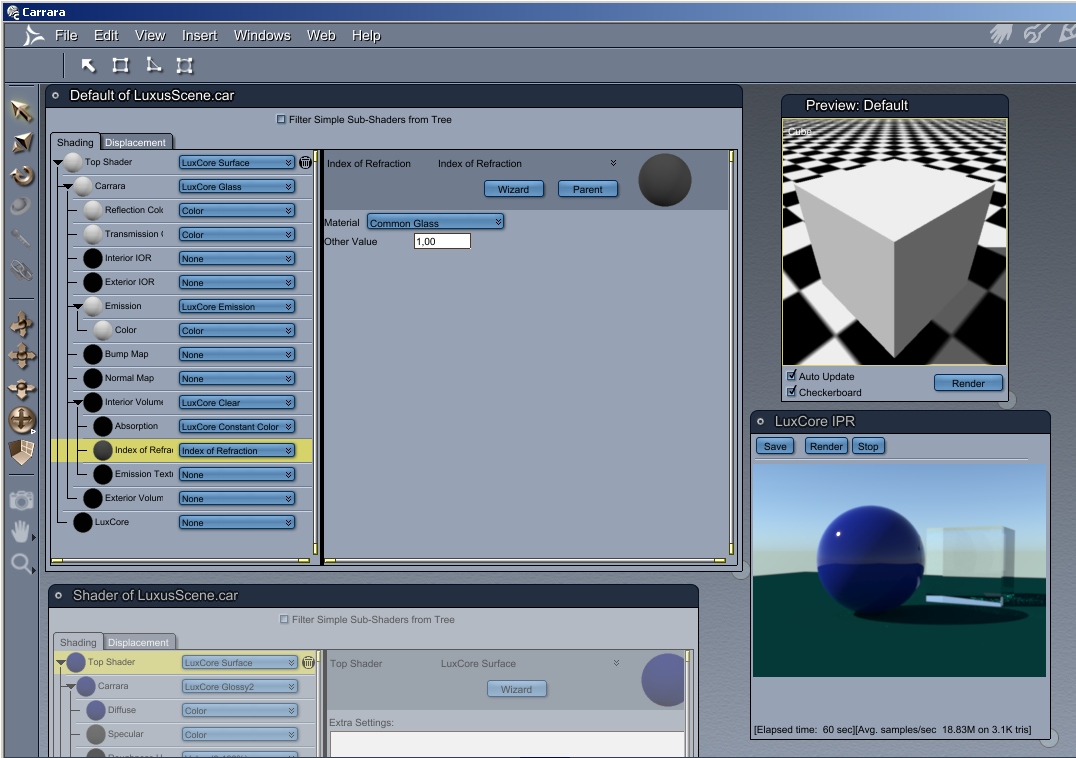
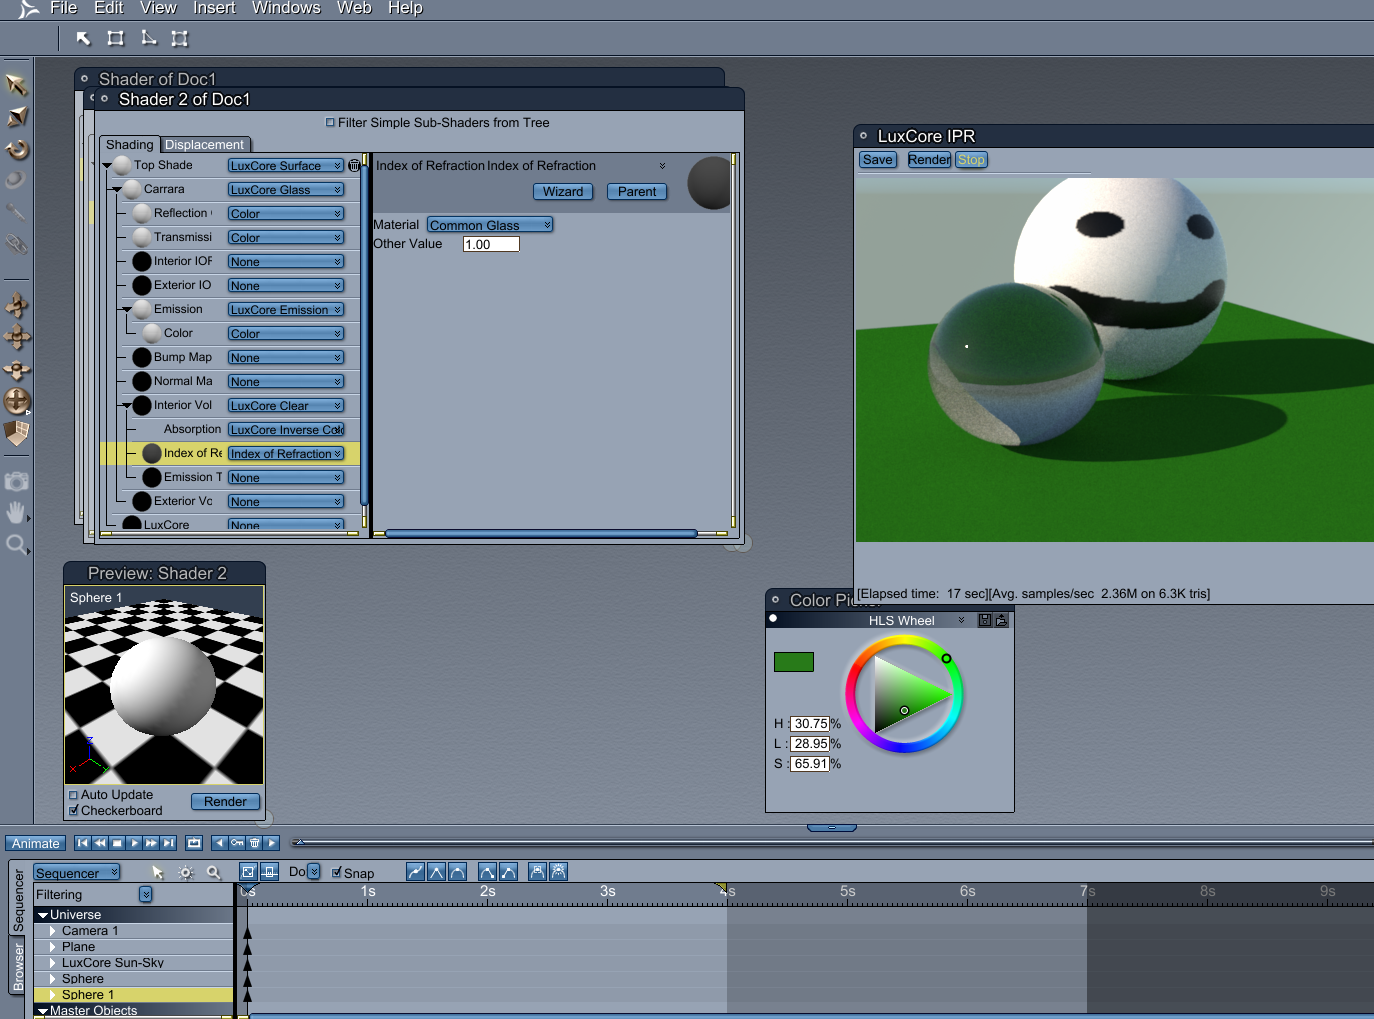
Simple glass material example in Carrara LuxusCore.
4.2 Transparency shader
Transparency with LuxusCore materials, for example eye-lashes:
LuxCore Surface
> LuxCore Mix
>> LuxCore Null
>> LuxCore Matte or whatever material you desire
>> Amount is 0.0 for Null, 1.0 for Matte, or put a carrara texture map in there for something like eyelashes.
(You can swap the order of Null and Matte if you want 1.0 for fully transparent.)
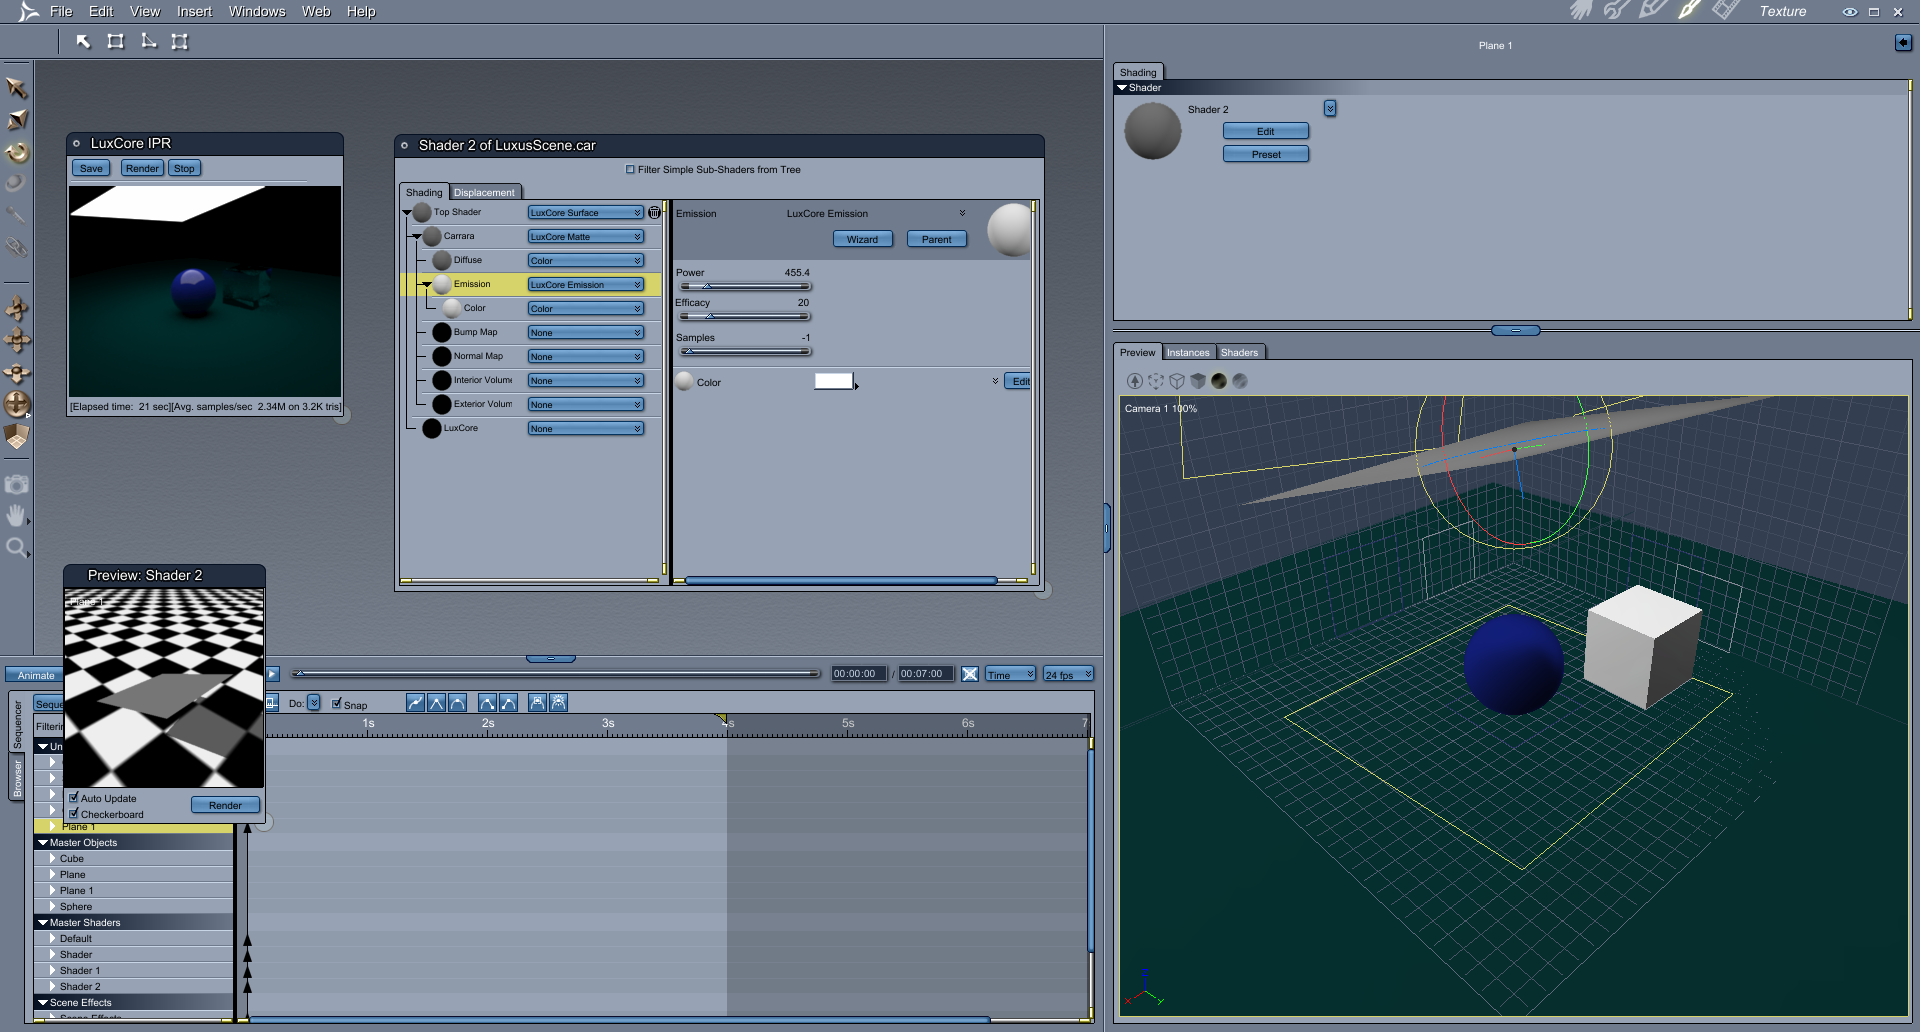
4.3 Emission shader Should be as simple as turning up the power on the emissive channel, but here is a matte material that is emissive.
Its not very powerful, so if you have a sun in the scene, you might not be able to even see it emit light. http://sphericlabs.com/preview/Emissive.zip
A screenshot of the Carrara shading room, showing another example of the emission shader in LuxusCore:
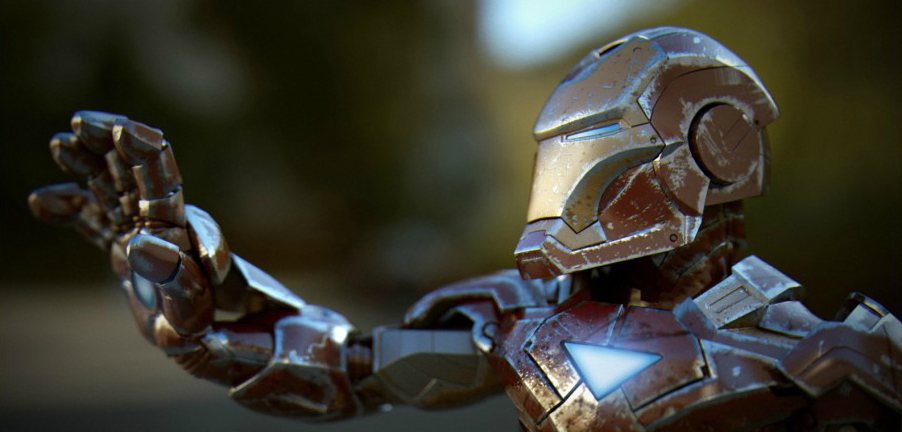
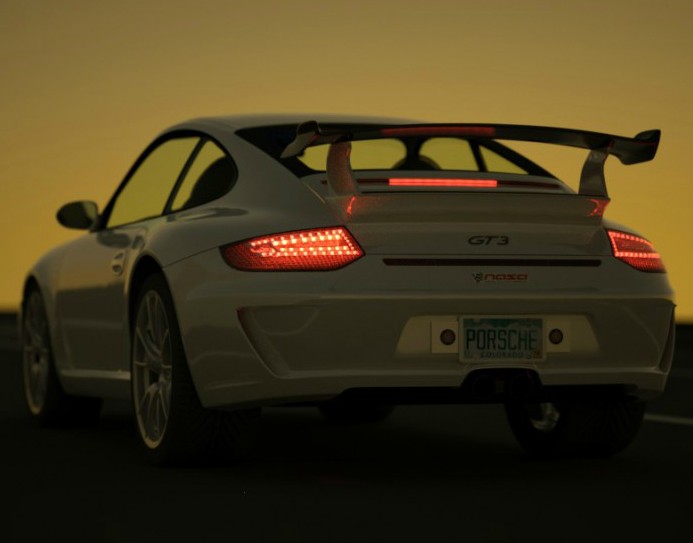
4.4 Car paint shader The shader for the car below, used this shader:
LuxCore Surface
> LuxCore Mix
>> LuxCore Car paint
>> LuxCore Mirror
>> Amount : 25
Joe Pingleton experimented using Lux mix shaders to combine the surface with a mirror so that he could adjust the reflections.
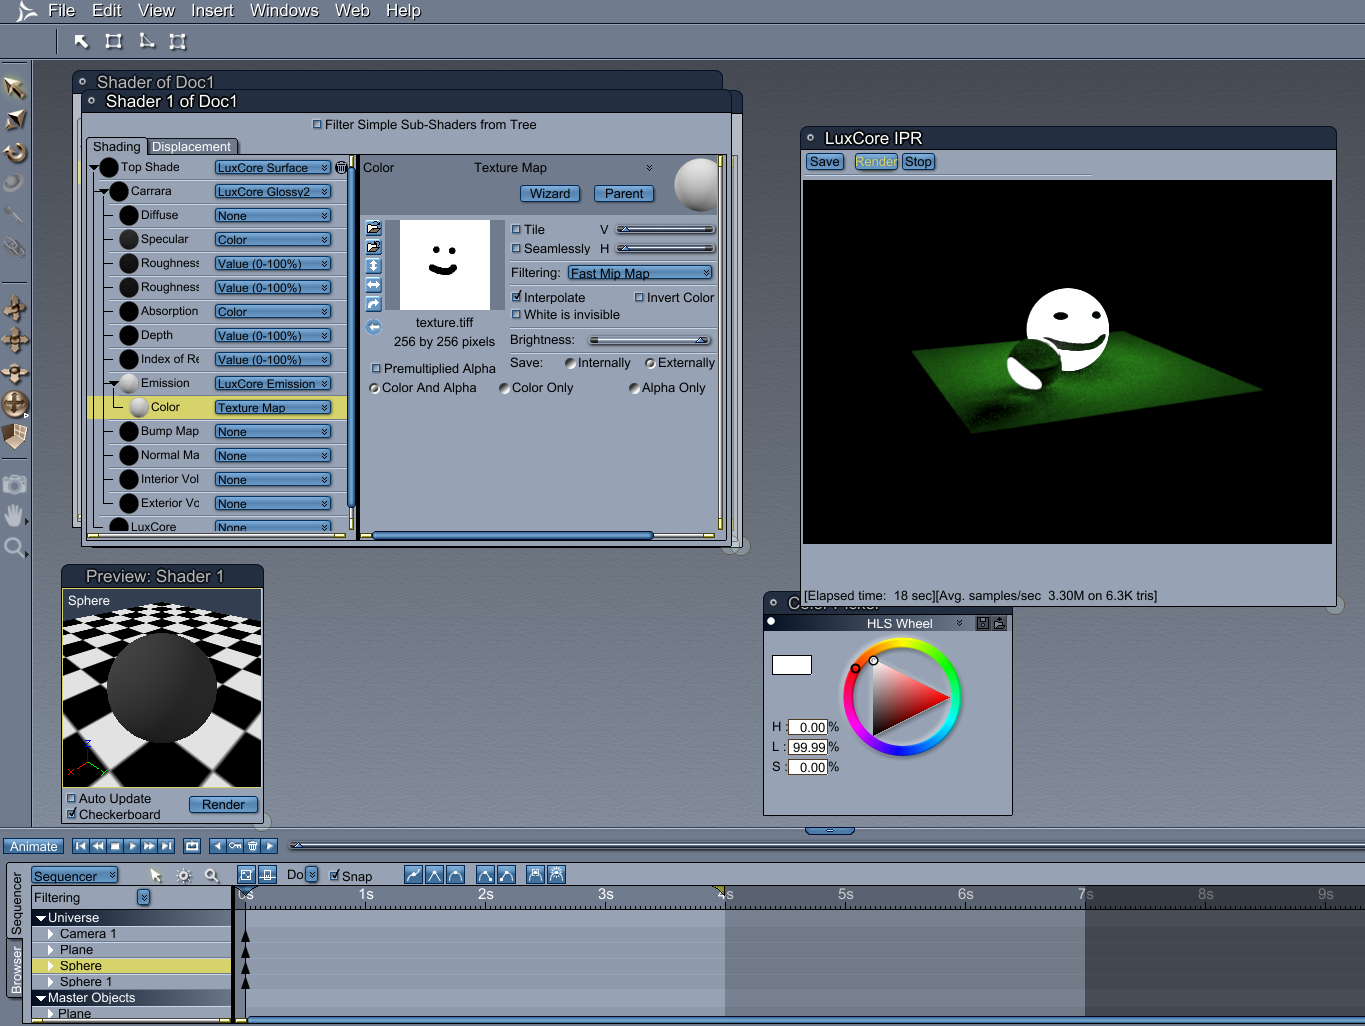
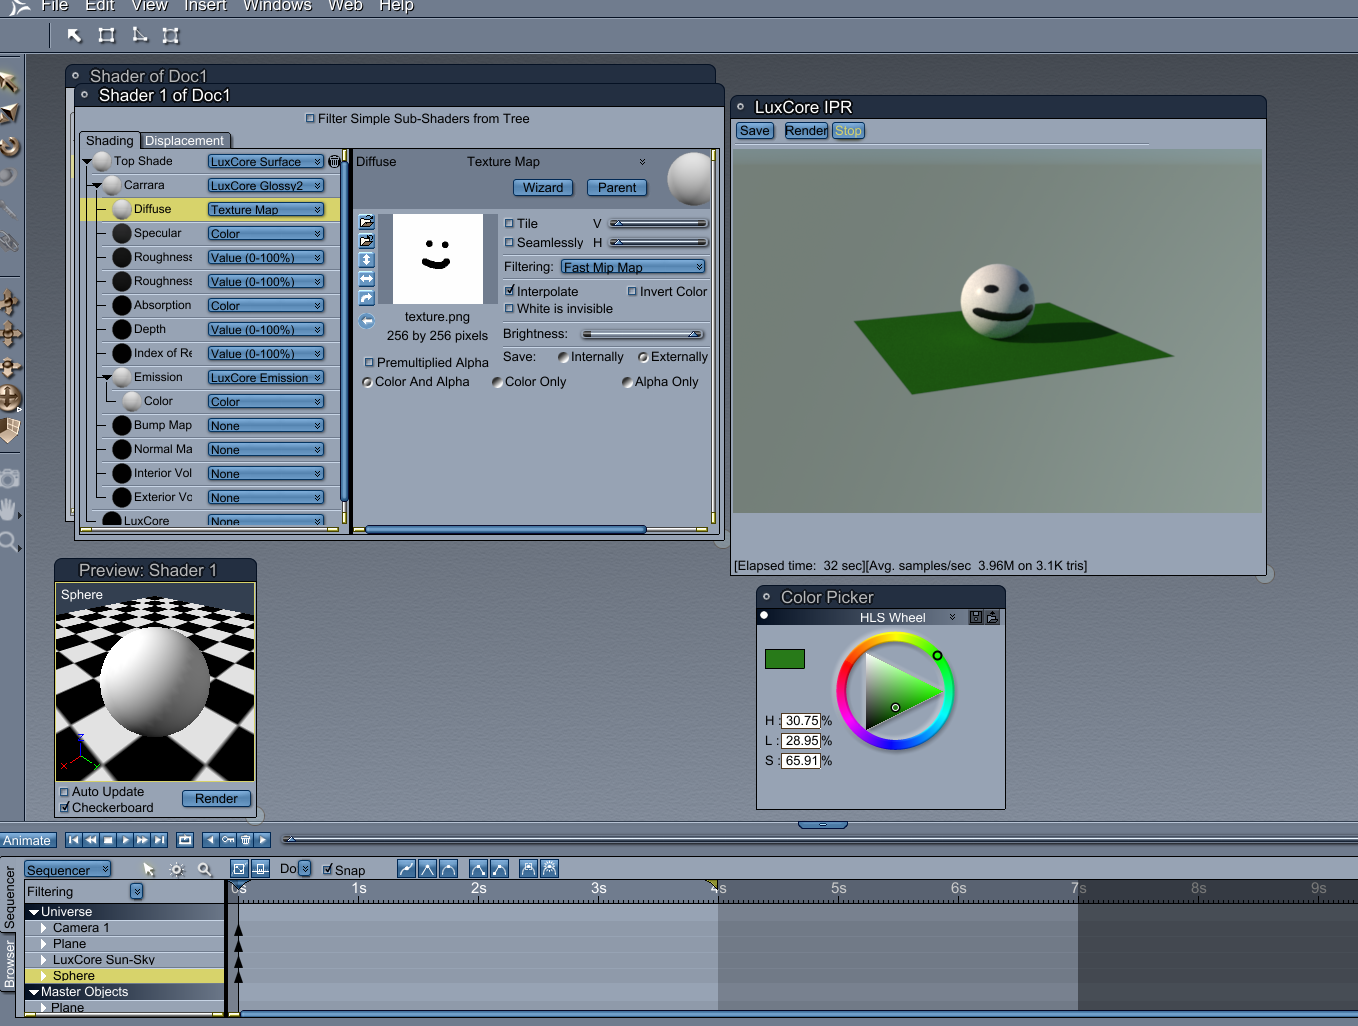
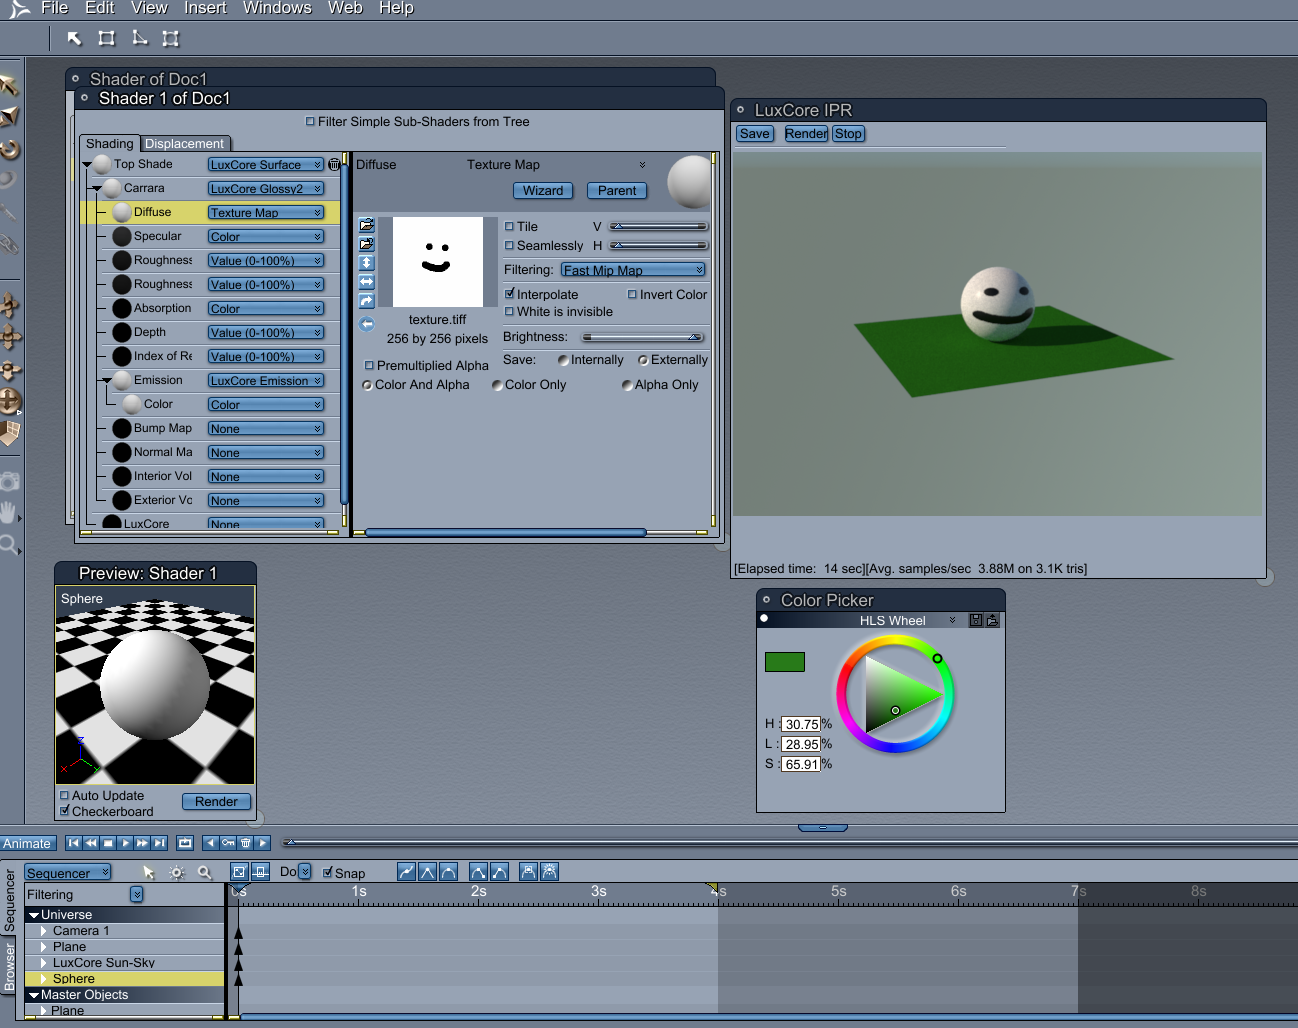
4.5 Texture shaders Here are 2 simple examples from SphericLabs showing the support for textures in both PNG and TIFF format:
5. Lights Lights are available in the Insert menu, grouped with the other lights.
The Luxrender wiki has some good info on different types of lights in Luxrender in general and is worth reading.
5.1 Infinite and Sun-Sky
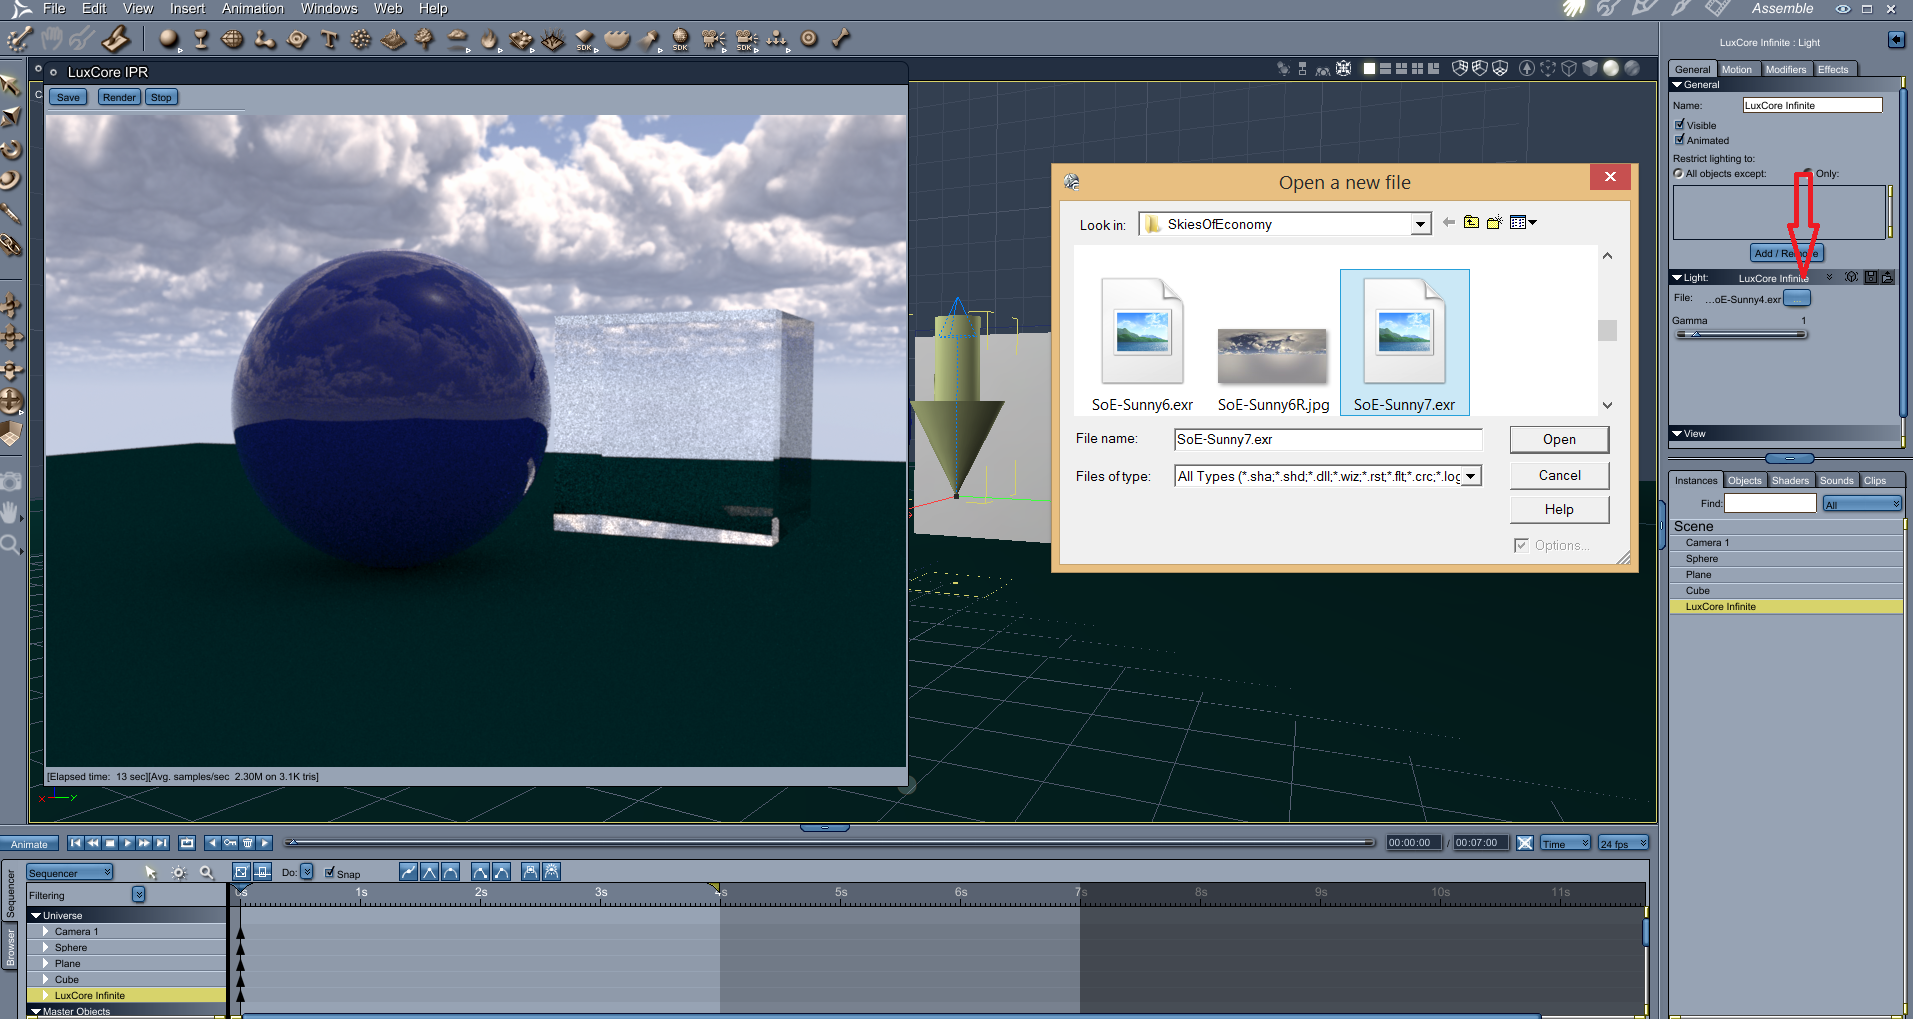
Currently available are LuxCore Infinite and LuxCore Sun-Sky.
LuxCore Infinite supports HDRI images in EXR format, so you need to browse for them. Carrara includes a few HDRI files, DAZ3D store has several HDRI store items and there are several free HDRI files here.
5.2 Spot, bulb and distant lights
Carrara’s own spot, bulb, and distant lights are currently translated into LuxCore.
Although it looks like it is not responding to changes during an IPR render. You will have to stop and start the render to reflect changes.
5.3 Mesh lights
Mesh lights have to be done via the Luxuscore materials and work great. Make anything a LuxCore Matte material and turn up the power on the Emission channel. Here is a screenshot. As a heads up if you make a plane and make it emit, it will emit out of one side of the plane, not both. See also the shaders/materials chapter.
6. Cameras Environment camera (panorama) was just added to the development builds in late 2016, Luxuscore does not support environment cameras yet.
7. FAQ
Q: How can I check if my computer supports LuxusCore GPU rendering? A1: A good test is running the LuxMark V3 benchmark, if all 3 scenes can be rendered, then LuxuxCore should work in Carrara too. Get LuxMark V3.1 here. A2: NVIDIA drivers are more unstable than AMD, for example on NVIDIA GeForce 680M, driver version 353.30 does not work. Roll back to 347.09 for both LuxMark and LuxusCore Carrara to work.
Q: There is a graphics glitch or black screen or wrong colors/shaders, what can I try to change that may help? A0. Try the Luxmark benchmark to verify that your graphics card and driver are working correctly. Download and run LuxMark 3.1, all 3 tests should work. A1. Uncheck the Biased option in Edit/LuxCore Config menu. A2: Try the CPU renderer that is supposed to be more stable first. In the Edit/LuxusCore Config, select CPU/Path, if that still fails, try CPU/Bidir for complex scenes (interiors). More info about the settings is available in the LuxRender wiki here. A3: Try the following config in the render room “Config Settings” box: renderengine.type = “PATHOCL” opencl.platform.index = “-1” opencl.cpu.use = 0 opencl.gpu.use = 1 opencl.gpu.workgroup.size = “64” accelerator.instances.enable = “0” opencl.kernel.options = “-cl-fast-relaxed-math -cl-mad-enable -cl-no-signed-zeros”
To render with both CPU and CPU change the opencl.cpu.use value to 1.
Also try to remove the last line (opencl.kernel.options = “-cl-fast-relaxed-math -cl-mad-enable -cl-no-signed-zeros”) which does speed up rendering (30% for NVIDIA, 3% for AMD in LuxMark V3.1), at the cost of some compatibility (crashes). A4: LuxCore uses accelerators, these speed up ray casting and figuring out what rays hit and where. The default is for LuxCore to choose the accelerator:
accelerator.type = AUTO
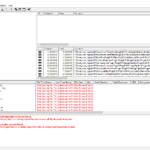
Try these in the config settings: accelerator.type = BVH accelerator.type = MBVH accelerator.type = QBVH accelerator.type = MQBVH More about accelerators in the Luxrender FAQ. A5: Try the simple test scene and the simple spot light test scene. A6: Usual error related to a missing dll can be figured out by using dependency walker. Caution, it is an advanced tool that can give errors when there are none, but it does give us clues as to what is going on. So go get dependency walker, http://www.dependencywalker.com/ . I assume you want the x64 version. Extract it and run it. Drag your LuxusCore.mcx file onto the dependency walker window. It will take a little while and then produce something like the image shown. By default it expands the dependency tree, we only want to see one level deep so close them all so it looks like the images shown.
One image is correct and all dependant dlls were found, the other has a yellow quesion mark next to OpenCL.DLL. OpenCL.DLL is missing in that case
Q: What rendering engine is LuxusCore for Carrara running? A: LuxusCore is using PATHOCL that can run on GPU or CPU. The Feb 2015 version also has: Light and Bidirectional for CPU rendering.
The available render engines in the full LuxCore: * LIGHTCPU: * PATHOCL: * PATHCPU: * BIDIRCPU: * BIDIRHYBRID: * CBIDIRHYBRID: * BIDIRVMCPU: * RTPATHOCL: * PATHHYBRID: * BIASPATHCPU: * BIASPATHOCL: * RTBIASPATHOCL:
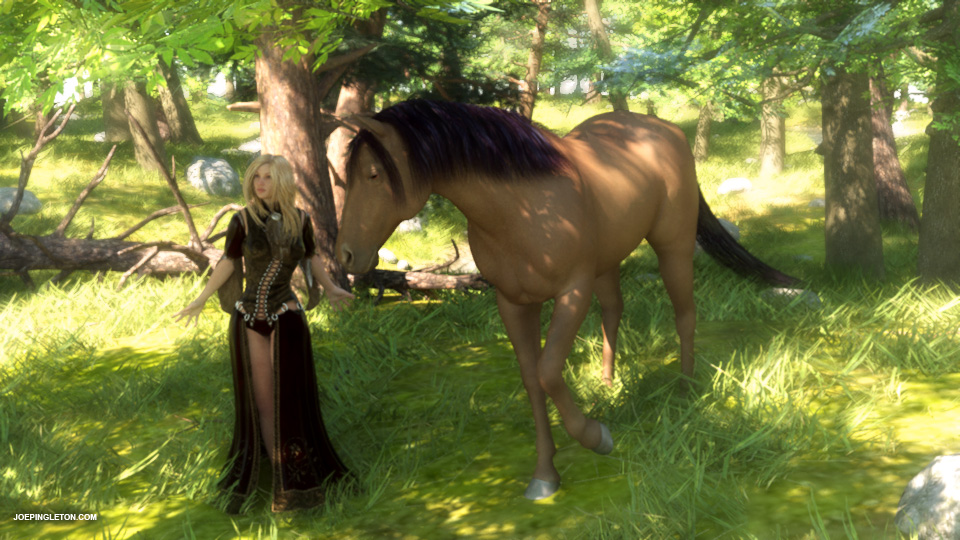
Q: Does replicated replications work? A: Yes, check the test render by SphericLabs below:
Q: What does the “bias” options do? A: Check this Luxrender forum post for more details and renders. A2: Currently seems to be broken since it is in development, uncheck the option in Edit/LuxCore Config menu.
Q: What Carrara shaders are translated into LuxCore shaders? A: Translation of Carrara shaders is certainly limited. Right now it simply looks at the values of the standard multichanel shader and does a guess. It can certainly be improved. Also, internally saved textures will not work at all at this time.
Q: What are the known limitations/problems with LuxusCore? A: Luxuscore plugin: Can’t use Carrara plants objects or terrain shaders. A2: Luxcore engine: Portals are not implemented.
Q: What happens if I use a graphics card with 2GB RAM and another with 4GB RAM? A: Each graphics card needs its own copy of data to render. So if you have a 2GB card and a 4GB card, then you are limited to 2GB if you want to render with both.
Tip: Use only the 4GB card for complex scenes with lots of textures. You can check memory consumption with GPU-Z from here.
Q: How do you set the camera? As in Exposure, White Balance, Depth of Field and Tone Mapping. A: It can be done via the config settings, DOF would be via the scene settings. It will be exposed in a nice UI later.
Q: What can I do if I run out of GPU memory? A: You can try to consolidate shaders. For example a 2600MB scene can be cut down to 1800MB just by doing this.
Also close any open web browsers to free about 100-300MB of GPU memory.
8. Example LuxusCore renders
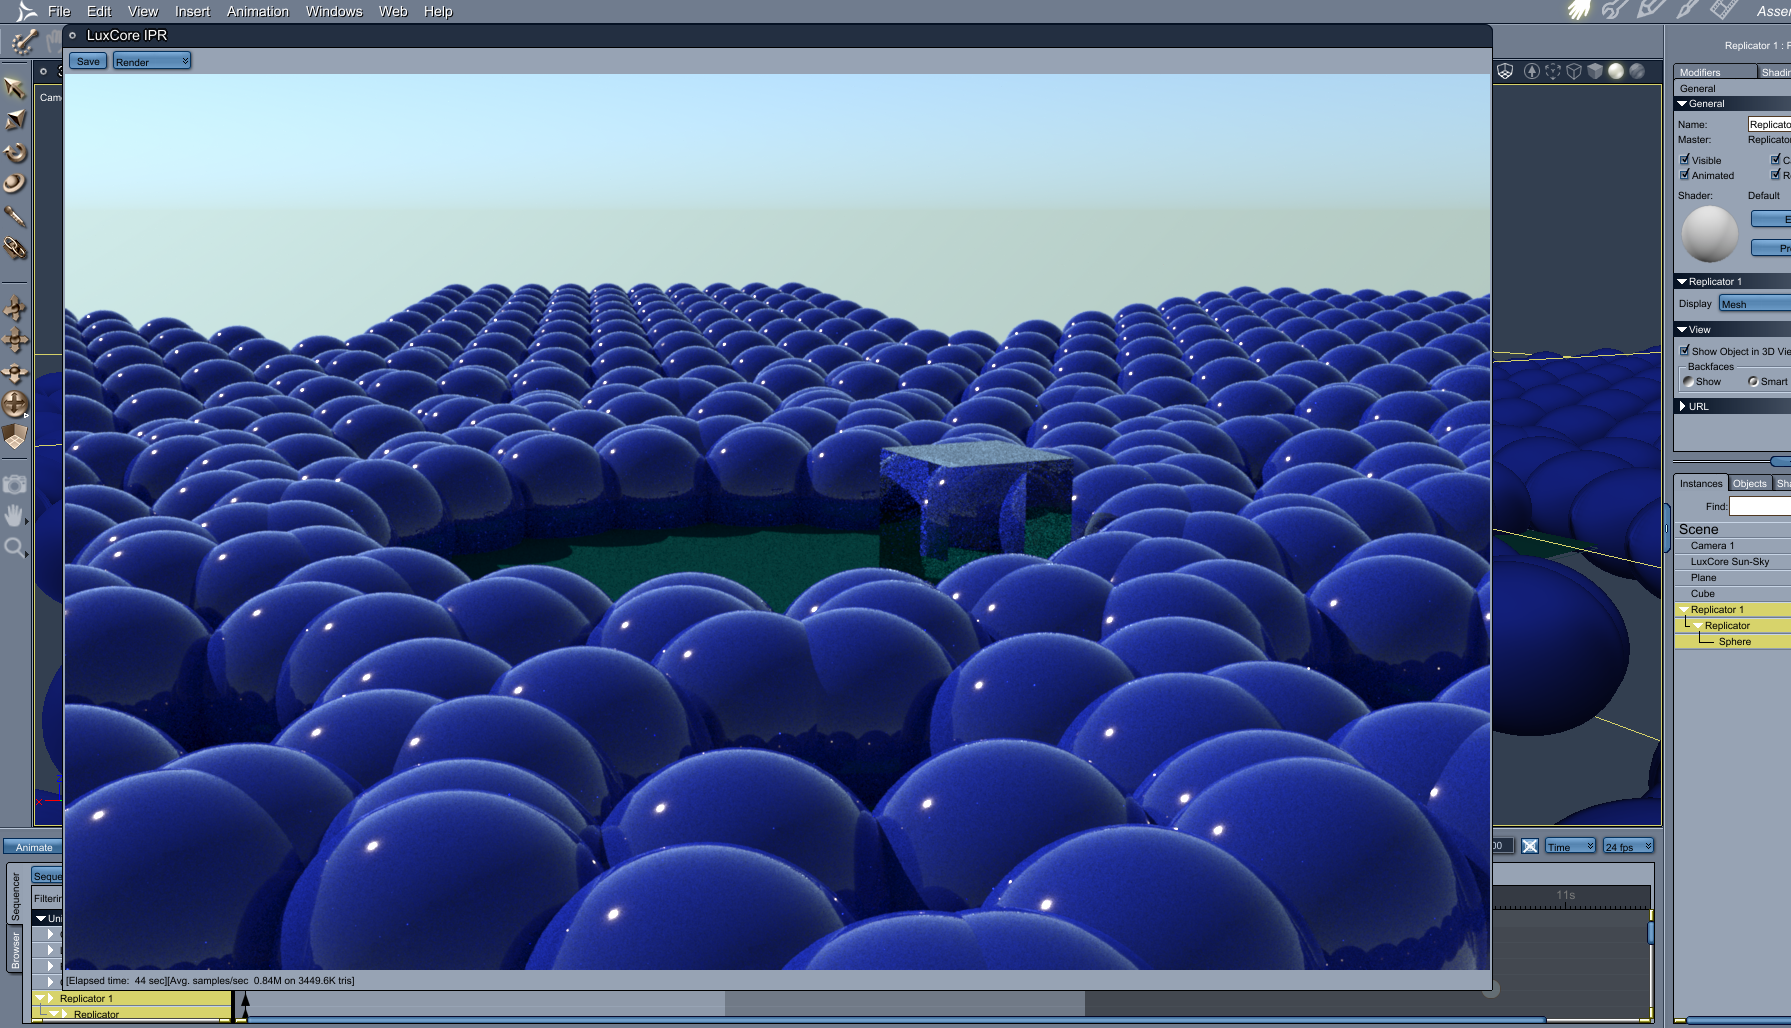
In The Shadows by Joe Pingleton
The Opening of Eyes – by Joe Pingleton
Nicole by Joe Pingleton
This was rendered in 2 minutes with only one infinite light and no messing around with the default shaders.
One of the major benefits of LuxusCore and LuxCore, is the possiblity to render high quality animation quickly on a desktop with a fast graphics card or four.
In the Render Room, enter this data in GUI, to get an animation of 25 seconds of rendertime per frame and using the SOBOL sampler for faster rendering: Halt Seconds: 25 Sampler: SOBOL
If you are running a simple scene on a powerful desktop (or want higher quality), like SpericLabs scene with a translation of the box on multiple graphics cards, try these settings for 256 samples per pixel and the better Metropolis sampler: Halt SPP: 256 Sampler: METROPOLIS
The first frame does show some more details, like the number of samples, which is useful the guess the render time, at least 100 samples is a good starting point.
Both rendering to AVI with uncompressed frames and Sequenced PNG files works. Rendering progress is visible, both the rendered frame is seen and the frame counter is visible.
9.1 About Samplers
-Sobol is better than Metropolis when it comes to rather simple lighting, like outdoor sunlight.
-Sobol is “dumber and faster” than Metropolis.
-Metropolis is better in more complex lighting situations (caustics through glass, light through a small window etc.). It is the default sampler for LuxCore.
-More about samplers at the Luxrender wiki.
Example animations:
LuxusCore Carrara Animation Test 04 by Joe Pingleton:
10. Benchmarks
Benchmarks are useful to check if your rig is setup to run properly.
10.1 LuxusCore
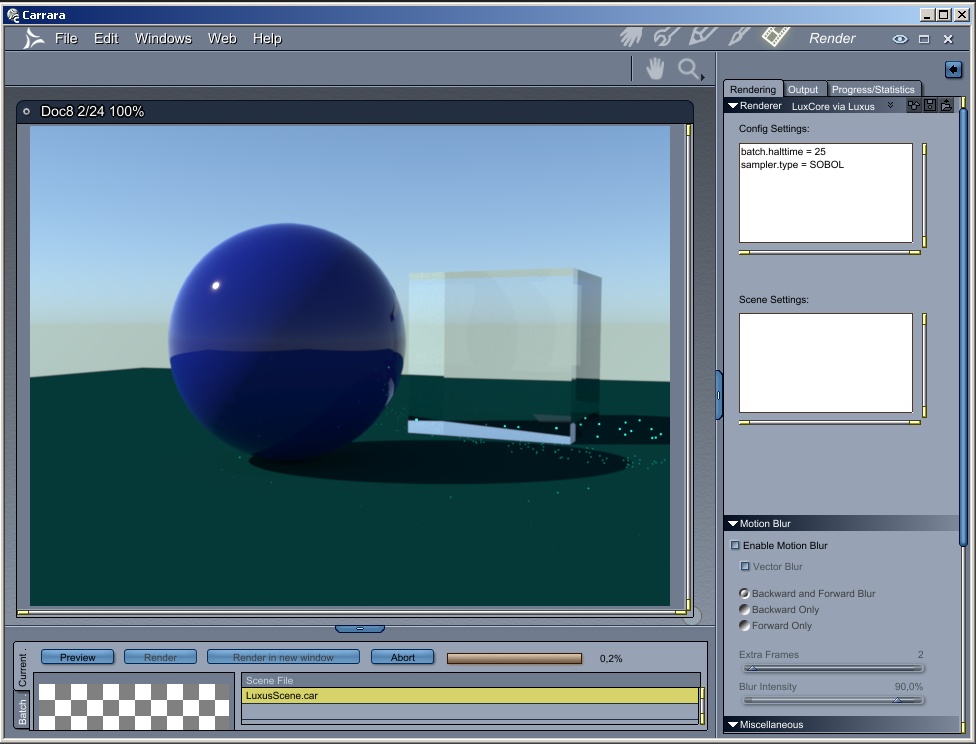
Test scene: 1. SphericLabs simple test scene, get it here: http://sphericlabs.com/scratch/LuxusScene.zip.
Default resolution 640×480 in Render Room. Settings: OpenCL/path/unbiased Results:
CPU Core-17-2700k@4,7GHz (overclocked): 2,0 Ms/s
GPU AMD Radeon 7970 (stock): 8,35Ms/s
GPU AMD Radeon 7970 x3 (stock): 25,0Ms/s (perfect scaling, exactly 3x faster)
GPU NVIDIA GTX970 (stock) 8-9Ms/s
10.2 LuxMark 3.1 benchmark
The official LuxRender benchmark application, LuxMark 3.1 is useful for checking that both hardware and software is running at top speed. Update the video card drivers and get the LuxMark app from here, where you can also check LuxMark scores of other rigs.
11. Settings to use in the Config Settings: PathOCL, BiaspathOCL, Realtime, EXR/HDR and multipass images Some config settings to help speed up rendering / IPR (thanks to Steve), until the GUI is finished.
Also added EXR/HDR and multipass images settings.
11.1 These are for PathOCL.
The settings are entered in the “render room > Luxcore via Luxus > Config Settings”
renderengine.type = “PATHOCL” (sets renderer to PathOCL) path.maxdepth = 3 (sets mamimum path depth. A value of 1 will give direct lighting only. I set to 3 for IPR, and set to 4 (or possibly more, depending on scene) for final render) path.clamping.radiance.maxvalue = 10 (clamping radiance, helps prevent fireflys. Good for indoor scenes, but can cause greyed out image if applied on outside well lit scenes if set as a low value). For indoor scenes, I usually set to 10 (as shown) and adjust as needed.) path.clamping.pdf.value = 0 (This works in oposite to radiance clamping, and will clamp low levels. Good to help prevent noisy shadows, but better set to low value, of as example, 0.1 – 0.5. If set too high, image will be black in many areas.) film.filter.type = “NONE” (if filtering set to “NONE”, rendering will be quicker. Other types are: “GAUSSIAN”, “BOX”, “MITCHELL_SS”, “MITCHELL” and “BLACKMAN-HARRIS” film.filter.width = 2 (value to set for filtering when it is not set to NONE)
11.2 Some settings for BiaspathOCL.
renderengine.type = “BIASPATHOCL” (set to BiaspathOCL) tile.size = 32 (Biaspath renders in buckets/tiles. This setting sets the tiles size. In earlier builds of Luxcore, the size of the tiles could affect render times. That, it as been stated, does not now matter. During testing I have found that making tile size smaller can cause a crash, and making tile size bigger can use a lot more graphics card memory. So would suggest leaving that setting at 32 for now). tile.multipass.enable = 1 (enables (set to “1”) multipass rendering. If set to “0” only one pass made.) tile.multipass.convergencetest.threshold = 0.04 (controls quality of render. Lower values give better quality(less noise). Default = 0.04, which for well lit scenes is probably OK. For scenes with lots of shadows or indoor scenes, it will probably need setting lower. I set usually between 0.1 – 0.2 for final renders. Render will stop when threshold reached) biaspath.sampling.aa.size = 3 (Scene total max aa sampling)
Sampling for materials can be set separately for “diffuse”, “glossy” and “specular”. These settings are for scene defaults:- biaspath.sampling.diffuse.size = 2
biaspath.sampling.glossy.size = 2
biaspath.sampling.specular.size = 1 biaspath.pathdepth.total = 10 (Scene total max path depth)
Path depth is also set separately for “diffuse”, “glossy” and “specular” These settings are for scene defaults:- biaspath.pathdepth.diffuse = 2
biaspath.pathdepth.glossy = 1
biaspath.pathdepth.specular = 2
Note: Path depth default for diffuse is set to “2”. That currently is insufficient to give good indirect lighting(certainly for indoor scenes). I suggest it should be set to at least 3: = biaspath.pathdepth.diffuse = 3)
Clamping can also be set as shown/explained in above post: biaspath.clamping.radiance.maxvalue = 0
biaspath.clamping.pdf.value = 0
11.3 Realtime settings If you are interested in using the realtime LuxCore stuff you can try:
Not much difference, except my machine feels more responsive doing other things. But it freezes Carrara when I stop the IPR.
11.4 EXR/HDR and multi-pass image export You will need to put something like the following in the config section: batch.periodicsave=15 film.outputs.1.type=RGB film.outputs.1.filename=image.exr
This means every 15 seconds write an RGB image with filename image.exr. The file will apear in the extension folder. You can specify a path such as C:/Users/Spheric/Documents/image.exr
You could also do stuff like write an HDR and a tonemapped png with batch.periodicsave=15 film.outputs.1.type=RGB film.outputs.1.filename=image.hdr film.outputs.2.type=RGB_TONEMAPPED film.outputs.2.filename=image.png
12. GUI (Beta 2015-Nov release) -It is minimalistic. More will come.
-Sampler and Accelerator are usually best to leave at AUTO. METROPOLIS for indoor scenes. SOBOL for animations.
-Halt time is in seconds. Halt SPP is Samples Per Pixel and then the rendering will stop. 100 would be on the low end, 1000 can take a while.
-ToneMapper. AUTOLINEAR is best for previewing and before final lighting is done. You will never get a bright image or a dark image.
-ToneMapper. LINEAR has one adjustment, scale. Lower is darker, Higher is brighter. We may need to add more decimal places to go very low.
-ToneMapper. LuxLinear is an ISO, Shutter, FStop paradigm for how bright things should be. Sensitivity(ISO), Exposure(Shutter speed), and FStop.
-ToneMapper. Reinhard02 is a nonlinear tonemapper. Google LuxRender Reinhard for an explanation.
-Gamma. You can adjust it, but 2.2 is usually what people leave this at. 1.8 is the other commonly used value here.
-Lens Radius(in meters) is how large the Lens is. A larger lens will have more depth of field effect. 0.5 is very blurry.
-Focal Distance(in meters) is where the focus for depth of field effects is.
-Config Settings and Scene Settings are for things not supported in the Render Settings UI yet. There are many.
13. Hair
Carrara hair is supported by LuxusCore from November 2015.
LuxusCore will look for a LuxCore material in the Tip Color slot of the hair shader See image. Also, emissive hair is kind of trippy.
14. Release notes
201502xx
-Glossy Translucent Material working
-Updated LuxCore to include improvements in last 2 months done by LuxCore developers. For example less memory usage for textures.
20150321:
-Global shader should now work.
20150324:
-Camera can roll and bank.
20150430:
– Updated LuxCore
– Fixed a hang on close.
20150904:
– Internal LuxCore updated to latest source.
– GlossyCoating Material.
– Removed fresnelname as it offers nothing that metal2 presets does not already provide.
– Added fresnelsopra and fresnelluxpop
– Fixed fresnelcolor to not crash
201511xx:
-Another build that now supports Carrara Hair.
-Another build with some improvements to the render settings UI.
201610xx:
-New build. It never times out.
15. Other
If you have anything to add, please post in the Carrara Forums, DAZ3D forums or comment here and we will add it to the manual.
Carrara will have a new GPU render option soon, according to an announcement on Octane Render’s website!
“Today we’re proud to announce that an integrated plug-in is being developed for Carrara from DAZ 3D by Simon Guard….
Carrara users will be pleased to know that they will soon be able to experience OctaneRender’s dazzling speed and quality from inside DAZ 3D’s Carrara, allowing an instantaneous photoreal preview of the scene while editing cameras, lights, materials and objects in the scene.”
on February 3rd, Otoy put out a limited call for beta testers for their Octane Render plugin. It currently supports Windows 7 & 8 preferably 64-bit, and Carrara 8+ (64bit Pro preferred). The testing phase will take “a few weeks” and when it’s done the plugin will then be released as an ongoing beta product. http://render.otoy.com/forum/viewtopic.php?f=7&t=38065#p169499
**UPDATE – new video posted Jan 26 2014
Plugin author Simon Guard posted a second video showing his progress with the Octane Render plugin for Carrara. The video demonstrates some JAW DROPPING NEAR-REALTIME updates between Carrara’s Assembly Room and Octane’s GPU-powered unbiased renderer.
DAZ 3D’s Millennium Dragon 2 model is loaded in Carrara and posed. One of the shaders is converted to the plugin’s Octane Materials Shader tree, which helpfully preserves the original shader in a sub-tree until Octane’s shaders are activated. A menu item will batch convert shaders, but it is not obvious from the video whether converting improved render speed or quality. Remarkably, Carrara’s native shader appeared to pass the imagemap textures to Octane as well.
Trees from Carrara’s Plant Modeler are replicated. A small Terrain with several instances of trees demonstrates Octane’s depth-of-field. As a pièce de résistance HowieFarkes’ NOBLE PINES full environment scene is opened in Carrara and rendered by Octane, although limits of the automated material conversion become apparent. The update looks promising already, but a title at the end says there is still much to do, “texture baking” “animation” and “live DB”.
**from Oct 25 2013
Octane Render offers GPU-based unbiased renders in realtime on your graphics card. The company claims speed increases of 10x to 15x over traditional CPU based unbiased engines. Octane Render supports all major platforms and runs with Window XP, Vista, 7, 8 (32 or 64 bit), Linux 64 bit and MacOS X. Currently, Octane Render requires a CUDA enabled Nvidia video card to be installed.
Octane Render runs as a standalone program, but over the last few months the Octane community has been rolling out integrated plugins for a growing list of 3D programs including Maya, 3DS MAX, Lightwave, Blender, and Cinema4D. The integrated plugin for DAZ 3D’s Carrara was announced on October 24.
A lengthy video below shows the current state of the plug-in:
A release date and price for the plugin has not been announced. The plugin will require a Standalone license, but combo prices for the Standalone and various plugins are offered on the website:
OctaneRender™ for Poser® + Standalone Combo v1.x License (329 €)
OctaneRender™ for Maya® + Standalone Combo v1.x License (359 €)
OctaneRender™ for LightWave™ + Standalone Combo v1.x License (339 €)
a plugin for DAZ Studio is currently in beta and available for purchase:
OctaneRender™ for DAZ Studio v1.0 beta + Standalone v1.1 License Combo (279 €)
OctaneRender 1.0 is now available after a long beta test period.
The GPU accelerated fully physically based, unbiased render engine supports Daz Studio and Poser with plugins,
while Carrara is supported via export to the Wavefront obj format to the base Octane application.
The price of Octane is 199€ and the applications plugins are 99€, with some bundle deals.
There is a demo version to try before you buy.