Eric: “Shader Ops 2 gets a patch to fix a problem where child shaders of Camera Mapping would not animate.”
Shader Ops 2 is a collection of shader plug-ins for Carrara; Light Mangler, Multi Ops, Camera Mapping, and more. Remix your shaders after the lighting is done with Light Mangler. Multi Ops and a new in channel Layers List simplify the shading tree. Camera Mapping opens new avenues for mixing in real world footage or photos.
Truly optimizing is, by definition, uniquely different from one individual’s needs to the next. We all have different tastes and goals which leads to different scene setups with lighting and rendering – even render engine considerations. Purchasing optimization files, like shaders, is a great way to learn a good many ways that Pro Carrara users use to optimize their files. Tim Payne optimizes skies in a way that would take me quite some time and a whole pile of headaches and wasted test renders to get similar results from. The solution? I bought Tim’s Skies and used them as my initial starting points, and now I know enough to simply start from scratch, all on my own. Whether or not this is true for the next person, it paves way to my point. From purchasing Tim Payne’s skies I now have a much better understanding and base of inspiration of what the realistic sky editor is capable of. I used Tim as an example, but I have purchased many other products from other artists over the years, and have learned from every one of them.
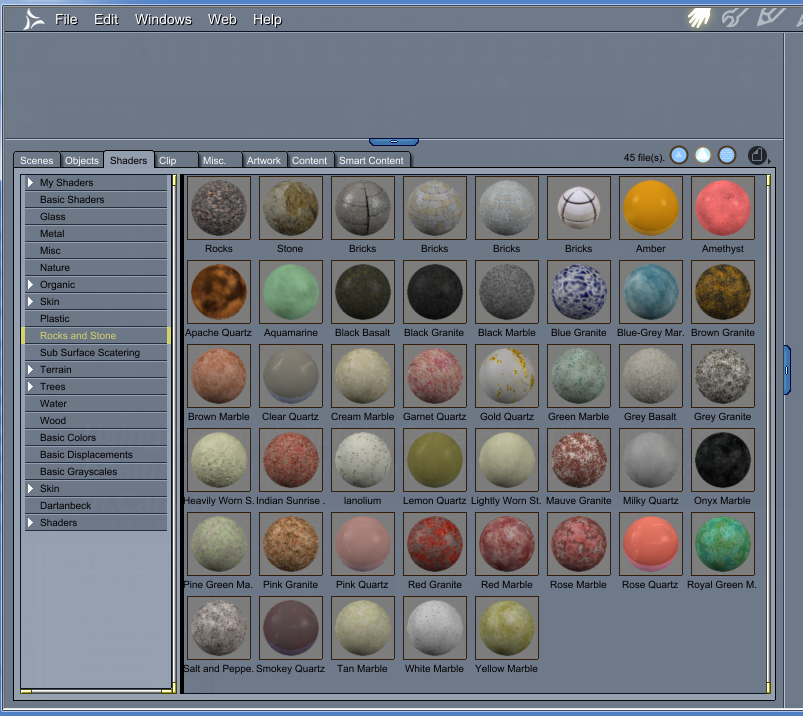
Carrara comes loaded with a good selection of examples, where no additional purchases are necessary to learn a wide variety of techniques which can help you in many situations. Lighting, Scenery, Skies, Models, Modifiers, etc., which are a wonderful way to learn. Load one up and look at how it’s set up. I find this particularly useful for shaders.
The included shaders have some really well thought out ways to achieve a certain look. Do keep in mind, however, that shaders work with lights and render settings to produce their appearance. What works in some scenes may not be the best in another. I’ve created a generic scene which is set up with my favored method of lighting, test render settings and resolution, and saved the scene where it’s easy to grab in the browser at start up. This scene is empty of everything except the lighting and any helpers that I want included, and is very helpful for me in setting up my shaders the way I need them to work. Of course, lighting often changes on each scene – but I have a fairly consistent look and feel to my scenes in this way. This method is mostly useful for outdoor scenes, since most interiors are calling out their own needs where lighting is concerned. So I also have another scene using a simple three-point lighting setup specifically for testing shaders. Since I have adopted my own, standard techniques for lighting, my shaders have been working very well in most of the situations I put them through.
Lights in the scene are not always enough, though. Some shaders, like White Gold, Gold, Chrome, and many others, rely on reflections of scene elements to achieve their appearance. Be mindful of this, as they will not look correct at all in an otherwise empty scene. This is where the use of spherical background or HDR background images can help without adding architecture to the scene. In nearly the same way, the Bi-Gradient Background feature provides surrounding color to assist with reflections and so forth. When Global Illumination or even just Indirect Lighting are used, these backgrounds also contribute to lighting. So I have several other preset scenes using those.
This article has a goal to help you solve some of the more basic aspects of tweaking existing shaders to appear in the scene the way you want them to. While it mostly focuses on character shaders, what is said here also applies to all shaders in Carrara. I plan to get much further in depth with shaders in future articles and, perhaps some tutorials. But do take it upon yourself to explore the drop-down options available to shader channels when ever you have time to just experiment and learn. Carrara truly is set up to help you create nearly any look without even using texture maps at all, remaining completely procedural, while also offering the tools necessary to paint your own texture maps too! All of this takes practice and patience, however, which is why I feel that many people whom might give up on Carrara simply haven’t given themselves enough time to get used to all that it has to offer. So I like to write helpful tips and tricks, like this, to help Carrara users get up and running quickly – solving some of the most immediate issues that we face right up front. The rest comes with time and practice.
The Power of Carrara Shaders – The Texture Room
When we purchase items made directly for use in Carrara they should come with optimized shaders, where applicable. But, what about products made for other software applications, like Poser, DAZ Studio, or even something else? This is where you will be more apt to notice something strange going on. True, many of the newer products come with shader settings (for the other apps) that already agree fairly well with Carrara’s render engine, and can be used straight ‘out of the box’. Other times you need to make some changes to get reasonable renders. This is not a malfunction or a bug, but rather the difference between how each app looks at material settings compared to lighting and finally, rendering. Let’s take a quick look at some of the most common shader issues when importing DAZ or Poser figures.
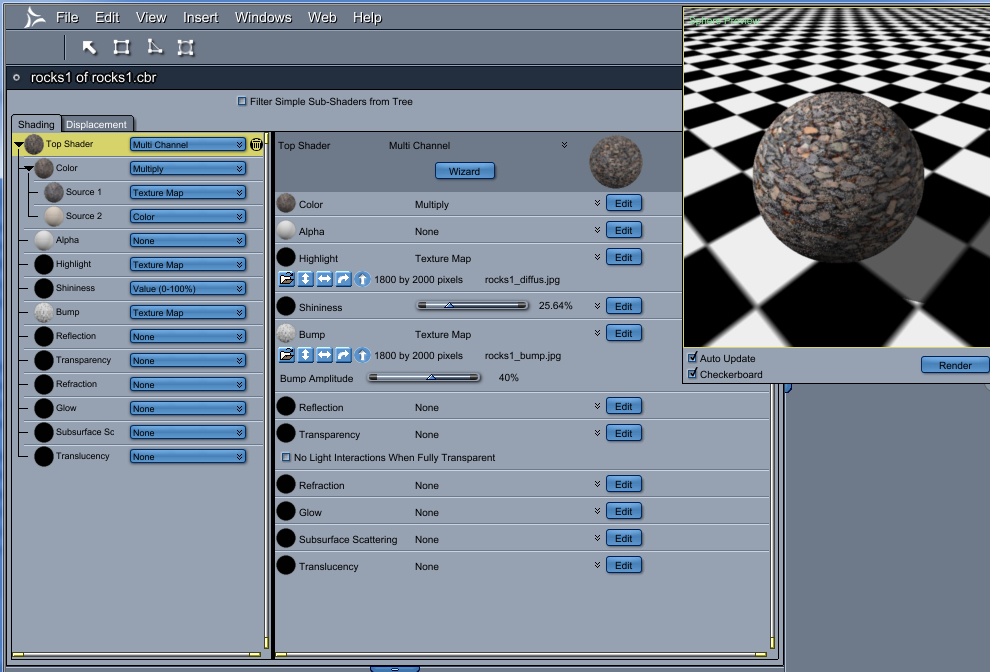
Specular Highlights – Poser and DS use different methodology when displaying specular settings compared to how this is handled in Carrara. Because of this, maps used for specular placement (Specular Maps) do not load in automatically when loading in a figure from the runtime or content libraries. This is an important bit of information to know, and to get used to correcting. After all, when an artist goes through all of the work to meticulously create a map to control the specular (“Highlight” in Carrara) highs and lows of the figure, to leave it out of use could be cheating yourself of some great, professional optimization assistance. To include it we need to understand a bit more about how Carrara uses this information. Like other apps, the lighter the image gets, the more highlights are applied. The artist will, therefore, use a map of dark to light gray-scale to make more noticeable areas that should stand out and back off to dark where they shouldn’t. In Carrara we combine this information with the ‘Shininess’ channel to interpret what happens to the light when it lands on areas set to be highlighted. To help illustrate this, I’ll use a 1 – 100 slider in both Highlight and Shininess channels in Carrara, rather than using a specular map in the Highlight.
When Highlight is set to zero there will be no highlight, so the shininess channel will have no effect, as there will be no highlighting to work with. On the other end of the spectrum, setting Highlight to 100 will give full highlight to the object as white. It is also important to understand that highlights may also include colors, if you wish. Now it is up to Shininess to determine how this works against the angles of incoming light. When Shininess is set to zero the light will spread evenly across the surface. Remember this: the lower the Shininess value, the smoother the spread of light will be. Higher values ‘tighten’ the angle of light spread to create more of a ‘shine’, but increasing this too much can remove the effect of highlighting altogether, too, as the angle become too small for the eye to see. This also depends upon how sensitive your render accuracy settings are set. Lower resolution renders might loose any shininess over 20 or 30, for example. So for a high sheen on a lower resolution render, values between 15 and 25 will ‘shine’ the highlight setting closely along the edge of the shape according to how the light hits it. So special highlight settings can also be used to show wet and dry areas on the same figure. Lighter Highlight areas will allow Shininess to create a wet look, where black will appear dry, no matter what. So you can use maps or other Carrara shader functions to make drops or streaks of water on an otherwise dry surface. That all being said, let’s have a more practical look at this.
When I mentioned artists creating specular maps earlier, I was thinking mostly of character products. Most texture/shape packs come with a full set of image maps: Color, Specular, and Bump. Some include more as well, but for now we’re only concerned with these three. If this product is some kind of scaly creature, whose scales are hard and glossy with a fleshy, tough skin underneath, I would expect to see a specular map with brighter regions for each scale and the areas where the skin might show through will be darker, with more fluctuations in brightness at those darker levels to help highlight the texture of the skin itself. This would likely be very similar to the bump map, as the scales would need to be elevated above the skin. Bump maps work the same way. Brighter is higher, darker means lower. This is why some artists might find that the bump map works well for a specular map, rather than having the extra maps. In this example, since the scales are said to be hard and glossy, we’ll want the map to use brighter shades where the scales are, making them look somewhat wet or glossy when used as the specular map. If the bump is high enough, we might get decent results even at a lower shininess value. But since we wanted gloss, I would start my shininess setting at 16 or 18 and tweak the value from there. Note that maps used in the highlight channel might add too much specular highlight for what we want, yet the difference in highs and lows still need to be maintained by the map. Lowering the brightness of the map itself, in the highlight channel, can correct this.
Let’s look at human skin. When skin is dry, with no added help from lotions or makeup, it has a very even spread when it comes to interactions with light. Being somewhat translucent, we could really get into detail with this – and we certainly shall in a future article, perhaps. But for simplicity, let’s just assume that we want to make the person look believable without getting too heavily engrossed in all of the many ways that you could really tweak the skin for incredibly high realism. We were looking at Highlight and Shininess. These two channels can go very far in helping to make great looking skin.
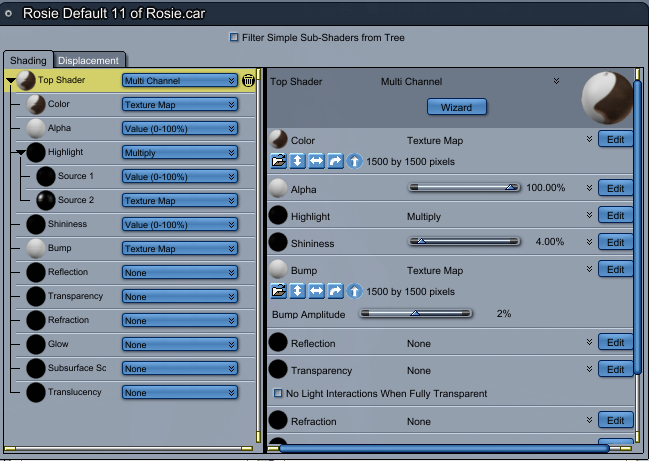
Highlight – If your character product came with a Specular map, you’ll want to use it in the highlight channel. Depending upon how bright the image is, we might have to turn the brightness down, which is done within the highlight channel, itself, just under the image thumbnail. The optional method that I prefer most of the time is to use “Operations > Multiply” in the highlight channel with Source 1 as the specular image map and a 1 – 100 value slider for Source 2, and use the slider to darken the map. 0 being black and 100 being white – full brightness. Same thing – just another method of looking at it. Also, it can be much easier if you keep your shader windows in ‘window’ mode instead of full screen – as the value to the right of the brightness slider of an image will often be hidden from view without expanding it larger.
Shininess – Before adjusting the brightness of the Highlight channel too much, let’s set a good, even spread of light using the shininess channel. Zero is a great place to start for this. If you are using a bump map and/or specular map that are supposed to show off specific details, you could try raising this value to 2, 4 or even 6 or 7, but the figure will begin to take on a more wet or moist appearance with higher levels. This is where it becomes important to practice patience and test render different combinations of levels between these two channels.
Bump – This value also plays differently depending upon the overall resolution of detail you’re using in your render settings. If your figure seems to look fuzzy, it is often due to too high of a bump value compared to your render resolution. This can cause black artifacts in the render which can usually be fixed either by increasing accuracy, anti-aliasing, and/or resolution settings or by lowering the Bump value in the shader.
There must be an easier way!
Sometimes we’re not looking for spectacular realism, close-up, intense appearances – but just want the thing to look good without fuss. It has become fairly standard to crank the highlight and shininess channels down to zero. This has the immediate effect of removing a ‘plastic’ look from the object, making it have no highlights on a dry surface – relying only on lights and shadows to give natural highlights. Since most models – especially people – have many material zones to adjust, this can become tedious and time-consuming. This never bothers me – as I love messing with shaders. There’s also the ability to go: Edit > Remove Unused Masters > Consolidate Duplicate Shaders, which makes for fewer shaders to adjust by merging all identical shaders into just one, and discarding those that are no longer used as a result.
A very popular solution is to use any of Fenric’s helper plugins dedicated to mass shader correction. He even has one that automates the entire solution I’ve just mentioned above to any model in your scene. On that note, of all of the plugins I’ve purchased from Fenric (and I own almost all of them), I find myself using them constantly. They have simply become Carrara features to me.
Victoria 4 and Michael 4
Generation 4 figures came with material settings applied to answer to the way they initially loaded within Poser. Without digging into the ‘why’ of it, I simply assumed that it had something to do with the use of negative lights that Poser applied as default. At any rate, their materials included a blue color chip multiplied with the color (texture) maps for the skin. To correct this in Carrara, simply drag the texture map out of the Multiply nest directly onto the color channel. This will remove the multiplier as well as the blue color chip. Again, Fenric has an automated answer for this in his plugins collection.
There are many other channels in these shaders
Carrara’s Texture room provides a lifetime of practice towards making materials look exactly the way you want them to look, and behave as you would expect them to against light and anything else in your scene. Although these topics go vastly beyond the scope of this, ‘Getting Started’ style of article, I’d like to at least mention that it will be very much worth your while to practice in the Texture room. With the plethora of shader examples provided in the Native Content, Carrara certainly gives you many built in tutorials on how to tweak on these channels and make some spectacular results. In exploring a preset shader for its secrets, I like to look at everything – especially keeping an eye out for functions that I’ve never used, or are set up differently than my normal setup. Then I open that branch of the shader and explore away, adding useful knowledge, in most cases, that I can apply on my own when building my own shaders. That said, I urge you to look into all of the power that Carrara gives your appearances in the Texture room. It’s a vast place of endless possibilities.
So I have to do this every time?
A great habit to get yourself into is to save your optimized figures to your browser window. I have written a short article in the DAZ 3D Carrara Discussion forum, Your Carrara Browser, regarding setting up your own, custom categories within the browser. I use this method to save all of my assets so that I can call upon them at a moments notice. Further, you can even save different versions that include special features, render settings, lighting, effects, etc., to speed up repetitive actions in your endeavors. Since I save so many things in this way, I prefer to use “Local” settings, to keep my file sizes low. If you store all of the textures with each file, your drive will fill up fast, but you can load those files into Carrara without the original files.
When it comes to Genesis, saving an optimized version has the affect of bypassing any new shapes that you purchase after the save. In other words, your Carrara-saved-Genesis will not include shape sliders that were added to Genesis after you’ve saved that instance to Carrara. Since you’ve already optimized this version, you might be fine with that. But what if you bought the new shapes (like expressions) for use with that character? In Carrara, we can save out different aspects of changes we’ve made to Genesis. Let’s tackle these one at a time.
Shaders – Beyond just Genesis, it’s easy to save the entire list of shaders from one specific model, for use in applying it to the same model later. This is essential when you need to update the base figure of a character, as in this example. Using the “Shaders” portion of the browser, and the browser category methods discussed in my Your Carrara Browser article, simply select “Actor” on Genesis and enter the Texture room. Now drag the large multi-colored ball at the top of the shaders list into an appropriate category in the browser and, of course, give it a memorable (or identifiable) name. You’ve just saved a Multi Shader file. It can also be very useful to save individual shader files for specific domains for later use. This can allow you to use carefully crafted shader settings on a figure or model that differs from the original model that your new Multi Shader will not apply properly to. Even though the mapping will likely be altogether different, the settings may be of great value, leaving you only to replace the texture maps within the shader. I do this quite often to save time in getting shaders made quickly without sacrifice.
To install the above saved Multi Shader set to another Genesis figure, simply drag the saved shader file to the multi-colored ball – just the reverse of how we saved it. Notice at this point that Carrara assigns a separate shader to each domain, even if those shaders are identical. So our next stop is to go back to the Assembly Room and Edit > Remove Unused Masters > Consolidate Duplicate Shaders. That way if we make changes to the torso shader, for example, the same changes will occur across all domains that use that map. Some might argue that you might, sometime, wish to have those as separate shaders. I’m here to tell ya, It’ll save you much more in resources to can them now. To make a new one, simply go to the shaders tab. Select the one you wish to have a second copy of, and duplicate it (Ctrl D/Cmd D).
Shaders and Lighting
As I’ve hinted to earlier, shaders interact with scene lighting and your render settings. Because of this, it’s always good to adopt a good base understanding of how you light and render your scenes. I completely understand that it is often the case that all of these things can change with the flow of imagination or job requirement. But if you are already familiar with your own method for lighting and rendering – the techniques you use most often – it’s going to be easier to get consistent results from your shaders if they’re set up in consistent conditions. Saving lighting rigs is easy and it can be highly efficient when you’re setting up brand new scenes. Here’s an example of how it worked for me over the past few years.
I noticed that, every time I would load a new Poser or DS content product into Carrara, that I really needed to set up every shader. Not everyone may be like this, but it is one of the very first things I do when adding a new piece from a runtime. Although I already have a good idea of how to make my shader settings work with how I light scenes, I still need to light the scene anyways, so that should really be part of this process as well. Since I truly believe what I’ve just said about consistency, I have a base scene file that I almost always start with when making an outdoor scene. So before I even load in the new content, I’ve already started my fresh new scene not from the file menu, but by clicking on a saved file in my browser. The one with the background landscape and the lights. The lights and background already set at a bare minimum. I can faithfully adjust my shaders and check my work in the process. By adopting this method I am able to optimize several scenes in one sitting – depending upon the complexity of the scene.
What about indoor lighting? I still hold to the idea that adopting an early method is the best way to go for any scene. When I create a new indoor scene, I use my base preset that has nothing but the default light, a target helper, a main camera with the production frame on, and all of my render setting the way I like them. Now I load in the interior content and arrange it and then immediately consolidate the duplicate shaders. I change the default light into a bulb with an area of effect at between 30 and 60, depending upon the size of the area, with a fairly high falloff and drag it into the scenery model somewhere. I’ll set the color and brightness to how I’d like the mood of the place to be and then duplicate that light and place them around where it feels fitting for the environment. Sometimes I turn up the Scene Ambient to a basic color chip with a somewhat dark, low saturation color at a value of 5 to 10, again depending upon the situation, just to make for fast stark shadow reduction. Many others will have their own favored starting method. The very next thing I do, if I didn’t already, is to find the folder where all of the textures for the product are stored and look for maps that are meant for the glow channel. These are usually easy to find, marked with some sort of suffix to give away their use. Some products don’t need them as the entire glowing bit has its own shading domain. I like to look anyways – because it’s good to know what maps you have to work with. Characters, for instance, contain Specular highlight maps that we can use in the Highlight channel, and so on. other times there may be other options for colors and such. I like to know where all of my resources are found. So now I go through and adjust my shaders, one by one.
The time comes when we read some cool new article or post or see an inspiring video that causes us to rethink how our scenes look and feel. But we have already adopted an entirely different lighting model and set up all of our shaders to that! Okay, true. You have just optimized your shaders to a specific lighting scheme. But what about when these things change? It’s not going to be a really big deal. In most cases, you’ll find that, unless you’re going for an entirely different render engine, you’re going to be fine. As you change the lighting scheme, this new scheme will show on the shaders you’ve made and chances are that you’ll like it. If there are changes to be made, they’ll likely be nearly the same for all of those which need changing.
Some Helpful Resources
In my ►►► Carrara Information Manual ◄◄◄ thread in the DAZ 3D Carrara Discussion forum, I have a few topics that you may find helpful in these endeavors.
►►► Carrara Resources ◄◄◄ A list of links to content made specifically for Carrara
► Working with ContentSome notes that I jotted down to answer some commonly asked questions regarding content within Carrara. This article does have some useful links in it including one of my favorite shader tutorials for characters within Carrara, by Indigone. A more updated article regarding Content in Carrara can be found here at the Cafe – What Content can I use in Carrara?.
► Cripeman’s Carrara Video Tutorials IndexWhether you’re looking to see an example of how to set up lights, make shaders, animate things, whatever, our local Superhero, Cripeman, makes learning fun!
Your Carrara Browser Making great stuff isn’t as cool if you can’t remember where you put it. Let’s get some good habits going right from the start
Carrara will have a new GPU render option soon, according to an announcement on Octane Render’s website!
“Today we’re proud to announce that an integrated plug-in is being developed for Carrara from DAZ 3D by Simon Guard….
Carrara users will be pleased to know that they will soon be able to experience OctaneRender’s dazzling speed and quality from inside DAZ 3D’s Carrara, allowing an instantaneous photoreal preview of the scene while editing cameras, lights, materials and objects in the scene.”
on February 3rd, Otoy put out a limited call for beta testers for their Octane Render plugin. It currently supports Windows 7 & 8 preferably 64-bit, and Carrara 8+ (64bit Pro preferred). The testing phase will take “a few weeks” and when it’s done the plugin will then be released as an ongoing beta product. http://render.otoy.com/forum/viewtopic.php?f=7&t=38065#p169499
**UPDATE – new video posted Jan 26 2014
Plugin author Simon Guard posted a second video showing his progress with the Octane Render plugin for Carrara. The video demonstrates some JAW DROPPING NEAR-REALTIME updates between Carrara’s Assembly Room and Octane’s GPU-powered unbiased renderer.
DAZ 3D’s Millennium Dragon 2 model is loaded in Carrara and posed. One of the shaders is converted to the plugin’s Octane Materials Shader tree, which helpfully preserves the original shader in a sub-tree until Octane’s shaders are activated. A menu item will batch convert shaders, but it is not obvious from the video whether converting improved render speed or quality. Remarkably, Carrara’s native shader appeared to pass the imagemap textures to Octane as well.
Trees from Carrara’s Plant Modeler are replicated. A small Terrain with several instances of trees demonstrates Octane’s depth-of-field. As a pièce de résistance HowieFarkes’ NOBLE PINES full environment scene is opened in Carrara and rendered by Octane, although limits of the automated material conversion become apparent. The update looks promising already, but a title at the end says there is still much to do, “texture baking” “animation” and “live DB”.
**from Oct 25 2013
Octane Render offers GPU-based unbiased renders in realtime on your graphics card. The company claims speed increases of 10x to 15x over traditional CPU based unbiased engines. Octane Render supports all major platforms and runs with Window XP, Vista, 7, 8 (32 or 64 bit), Linux 64 bit and MacOS X. Currently, Octane Render requires a CUDA enabled Nvidia video card to be installed.
Octane Render runs as a standalone program, but over the last few months the Octane community has been rolling out integrated plugins for a growing list of 3D programs including Maya, 3DS MAX, Lightwave, Blender, and Cinema4D. The integrated plugin for DAZ 3D’s Carrara was announced on October 24.
A lengthy video below shows the current state of the plug-in:
A release date and price for the plugin has not been announced. The plugin will require a Standalone license, but combo prices for the Standalone and various plugins are offered on the website:
OctaneRender™ for Poser® + Standalone Combo v1.x License (329 €)
OctaneRender™ for Maya® + Standalone Combo v1.x License (359 €)
OctaneRender™ for LightWave™ + Standalone Combo v1.x License (339 €)
a plugin for DAZ Studio is currently in beta and available for purchase:
OctaneRender™ for DAZ Studio v1.0 beta + Standalone v1.1 License Combo (279 €)
What if I told you there is a single effect that can deliver more visual impact from your renders, allowing you to redefine reflection, highlight, and shadow with the contours of your scene objects. Create photoreal fabric and glass shaders, and enhance skin with subtle, flattering effects that render in a fraction of the time of subsurface scattering. Well it’s all true. It’s called Falloff, and it’s not included with Carrara but probably should be.
What is Falloff
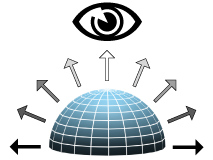
Falloff is a value based on viewing angle
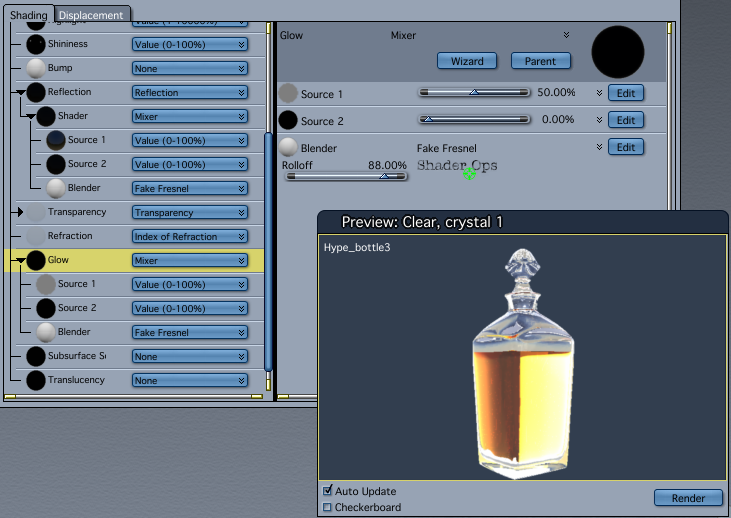
Falloff is a value based on the viewing angle of the geometry to another point in 3D space, usually the camera. Polygons that face the camera receive a high value, while polygons that angle their surface away from the camera are given a lower value. You will often see the term fresnel (pronounced fra-nell). Generally, fresnel is used when discussing transparency and refraction while falloff refers to color or glow, but for our discussion the two words are more or less interchangeable.
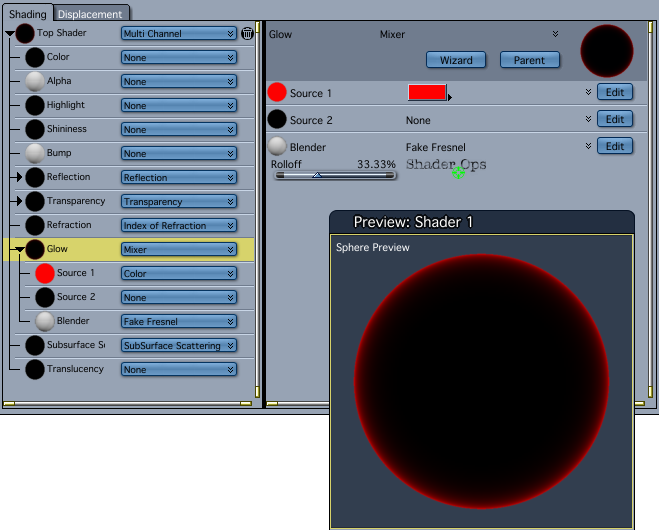
As of Carrara8.5 there is no falloff shader included with Carrara. Fortunately we have several choices with plugins. Digital Carver’s Guild offers a simple Fake Fresnel shader with SHADER OPS. SHOESTRING SHADERS adds the more sophisticated Fresnel and Angle shaders. Sparrowhawke3D recently updated the Laboratory plugins for Carrara8.5, including a free Edge Falloff Shader.
Fake Fresnel in Shader Ops will always “point at” the rendering camera, but the Shoestring Shaders are more versatile allowing any scene object to be the “point at” object. All the examples in this article use the simpler Fake Fresnel shader. Links to the plugins are at the end of the article.
EDGE POP
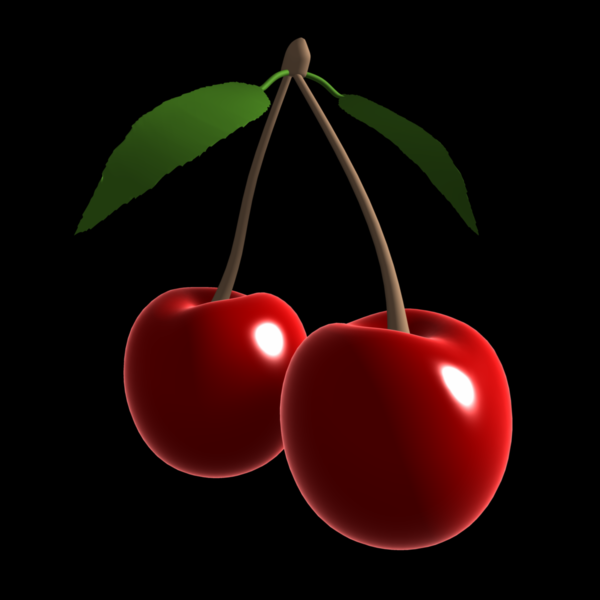
Let’s start with a simple falloff in the glow channel. See how the cherries “pop” from the dark background? They almost seem to float in space in front of the screen. This is because the extra contrast separates the layer from the background. If we were seeing this in real life, there would need to be empty space behind the cherries to create this kind of “light wrap” effect. Our eyes perceive the fall off as depth, as well as adding a kind of glossy highlight all around the curved surfaces. Use this trick anytime you want to make an object jump out and grab attention.
Falloff edges “pop” from a dark background
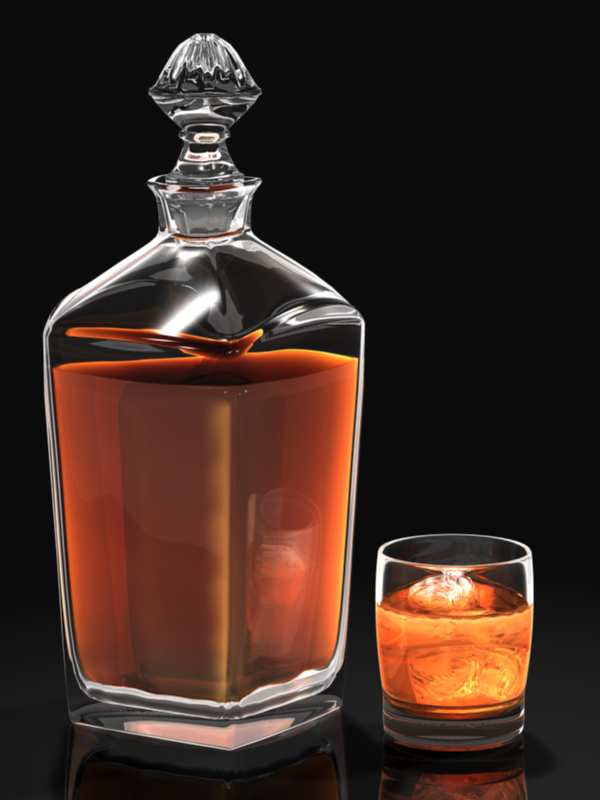
METAL and ENAMEL REFLECTION
Instead of “popping out” of the screen, falloff in the Reflection Channel can help embed an object into your environment, especially when using an hdr background to wrap your scene. Hard surfaces made of metal or glossy enamel coatings start to reflect at oblique angles, even if they don’t have a highly mirrored surface. Airplane wings, automobile hoods, chrome bumpers, stainless steel tools, and ceramic-tile countertops are objects that will show more reflection when viewed edge-on. Adding falloff in the Reflection Channel also creates a better light wrap on hard surfaces when using hdr backgrounds and image-based lighting.
Glass can be one of the most challenging surfaces to render in 3D. Even with extra lights and heavy refraction the edges of glass objects can easily disappear. A thin, bright, edge falloff glow gives glass more “presence”. As above, falloff in the reflection channel can also be added for additional photorealism.
Prolific plugin creator Fenric has released another helpful Carrara addon called MOVE TO CAMERA, and that is exactly what it does: selected items in the Assembly Room hierarchy are moved directly in front of the current rendering camera.
This release raises the total number of plugins offered on Fenric’s web store to eleven, several are free.
In my tests the base of the objects were moved more or less to sit directly in view of the render camera. Interestingly, the objects did not appear to be positioned in relation to their hotpoint, and some items were moved near to, but not directly in front of the camera. Clearly the purpose of the plugin is to make finding and repositioning objects in your scene easier, and should be helpful to anyone who creates large scenes with many objects.
A trial version of MOVE TO CAMERA is available on Fenric’s Downloads page and will work for about 10 minutes before timing out. The plugin license can be purchased for $5 http://fenric.com/wordpress/downloads/
We all love the convenience of Poser content in Carrara but tweaking every shader is a tedious task, especially when it is the same settings over and over: reduce the shiny highlights, remove the extraneous color multiply… . Shader tricks that control settings in Poser often have no equivalent in Carrara, leaving a trail of “junk DNA” in the shader tree. Meanwhile, common settings like the bump and shininess values for a figure’s “skin” are scattered across multiple shaders…. We’ve come to accept that the benefits of content outweigh the inconvenience of manually translating each of Poser’s shaders by hand, one by one.
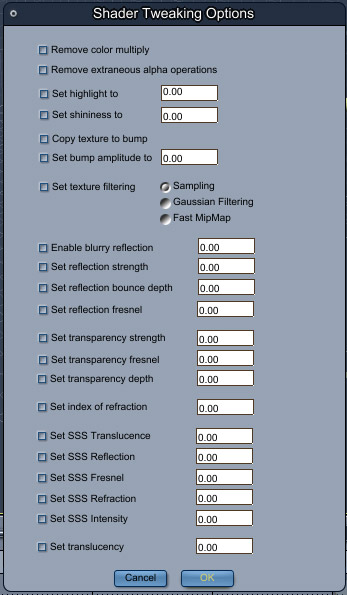
But no more! Fenric has released his ADVANCED SHADER TWEAKER plugin which adjusts many multi-shader values all at once!
remove color multiply
remove extraneous alpha operations
Highlight value
Shininess value
Copy texture to bump
Bump amplitude value
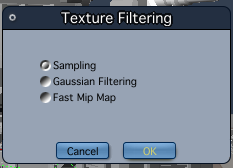
Texture Filtering: Sampling, Gaussian, Fast MipMap
Enable Blurry Reflections
Reflection strength
Reflection bounce depth
Reflection fresnel
Transparency depth
Index of Refraction
SSS Translucence
SSS Reflection
SSS Fresnel
SSS Refraction
SSS Intensity
Translucency Value
The usual suspects are addressed directly in the Assembly Room so you can tackle the most common problems immediately as you load items into your scene.
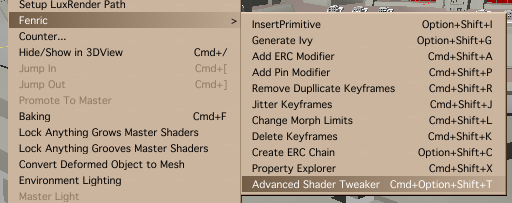
It works by selecting the model (or models) to have the shaders adjusted for, and select the “Advanced Shader Tweaker” option from the “Fenric” menu, located under the main “Edit” menu. All the model’s shaders are adjusted at once.
If you hold down the “shift” key while choosing the menu option, then the tweaker will start in “texture filter” mode, where only the texture filtering options will be displayed. Finally, a fix to Carrara 8.5’s insistence on changing every texture shader to Fast Mip Map!
The plug in is available now and costs only $10. A free trial version is available to download, and will operate for 10 minutes before automatically being disabled. http://fenric.com/wordpress/downloads/
In order to enable full functionality, a license key must be purchased at Fenric’s store. http://www.fenric.com