Digital Actors – Working with the Actors is where I really have a blast. I’ll get ideas for different things for them to do at the strangest times and then I’m anxious to get to my computer and keyframe it in. Heroes and their friends, people that they must deal with but don’t really like, villains, friendly background folk, unfriendly background folk, I like to have a nice library of Actors available in my Carrara browser. This is very handy for making animations because you just grab the character that the animation is intended for. I really enjoy creating custom animations from my own ideas. It also opens up the possibility to add extra gear to the file. For Dartan has a sword on his back and another parented to his hand. The two can have their visibility switched on adjacent frames along the timeline to create the effect of reaching back and unsheathing his sword, for example. Here we can refer to the title image of this article, as Dartan is focusing all of his energy and thought on disarming the cyborg whom threatens his one, True Love. Below I have a brief image compilation demonstrating the act of switching the cyborg’s guns between the one that is parented and the one that is not and the resulting spiritual energy from Dartan’s gesture yanks on the creature’s weapon, pulling his unsuspecting arm back as the weapon slings through the air. The weight of the cyborgs body plays into these motions in my mind, so I put in some well-placed counter moves and adjust in just the right tweener. 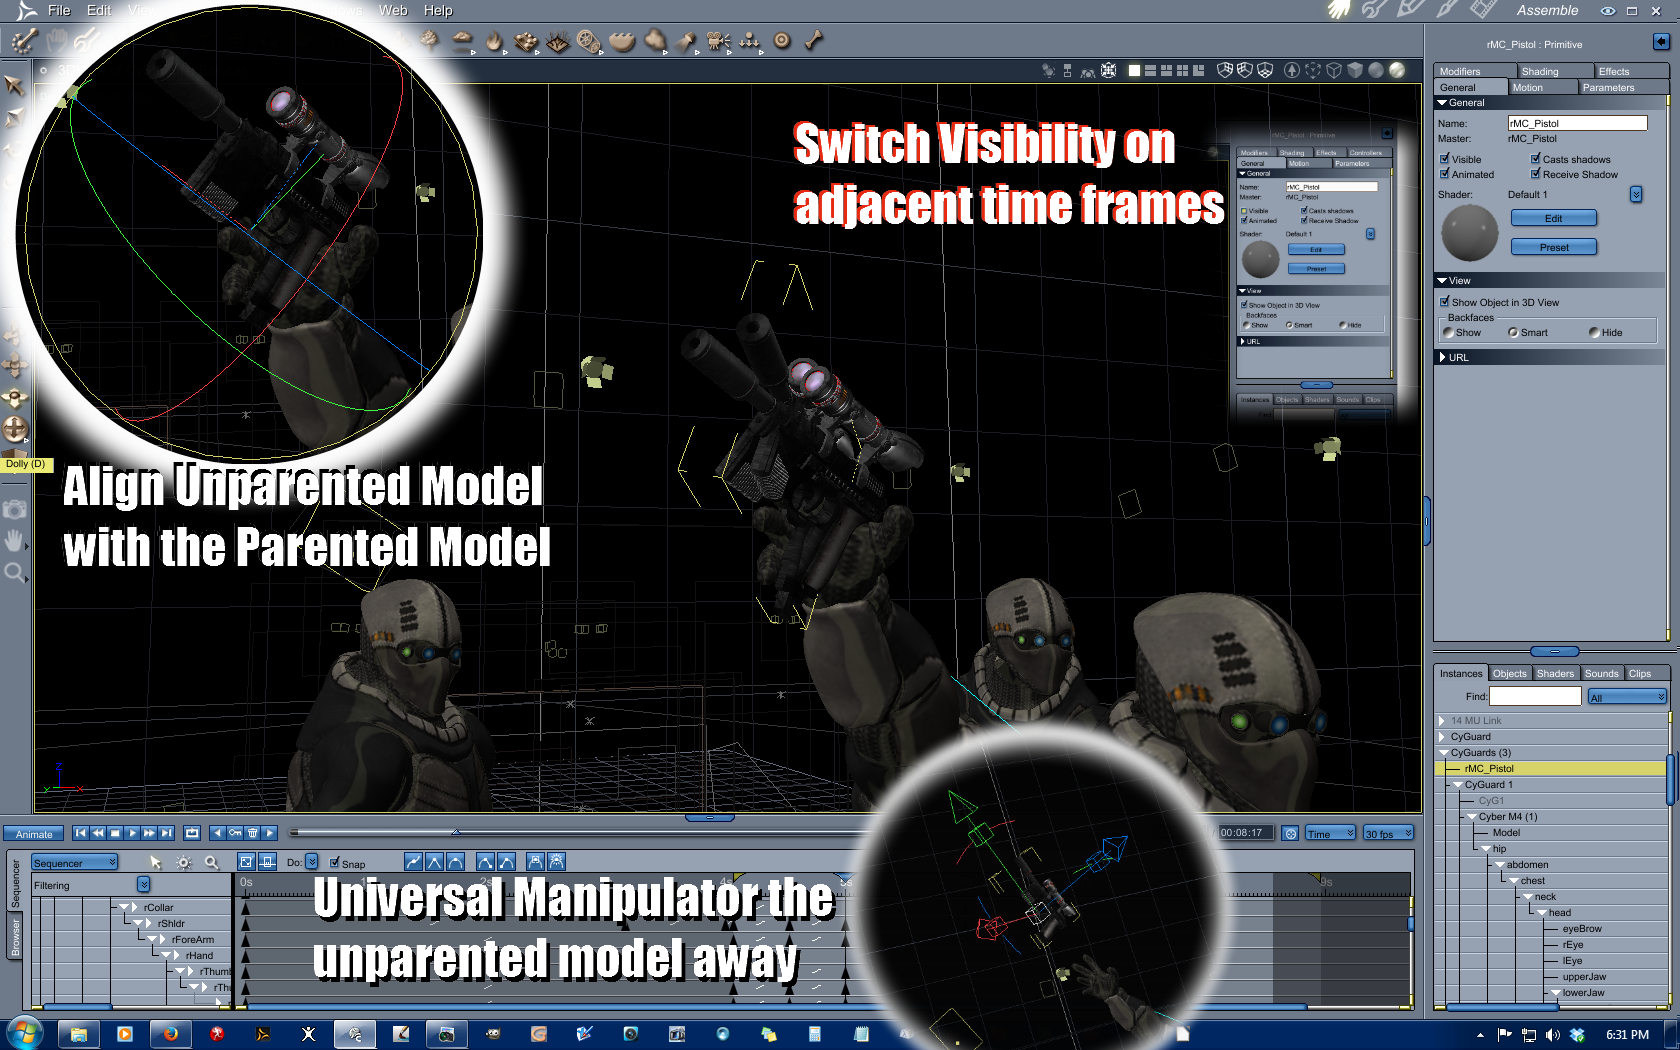
Since the now-visible gun has no relationship at all with the cyborg model, his movements do not affect the weapon so it continues the path I’ve given it. For this I like to use the universal manipulator, as it often lines up and points according to how the prop would best be adjusted in the hand, which also helps us here, as shown in the bottom fade-in circle of the image. The next image shows a test render of the gun as it begins its trajectory. It looks a little off in this still because the still lacks the full act of the weapon finally snapping out of the guys hand. The weapon is being pulled – hard. And this works well in the resulting animation. Also in the image, notice that the animation’s begin time is set just after 4 seconds in the timeline. This is because this particular animation is the second one being added to this file. At the point where I begin the new animation, I save the file under a new name. This makes it handy to reuse elements needed to further a particular film shoot. In this case, the action was continuing on about a minute in the story’s time after the animation that ends at the 4 second mark – so the actors were already nearly posed for this shot. 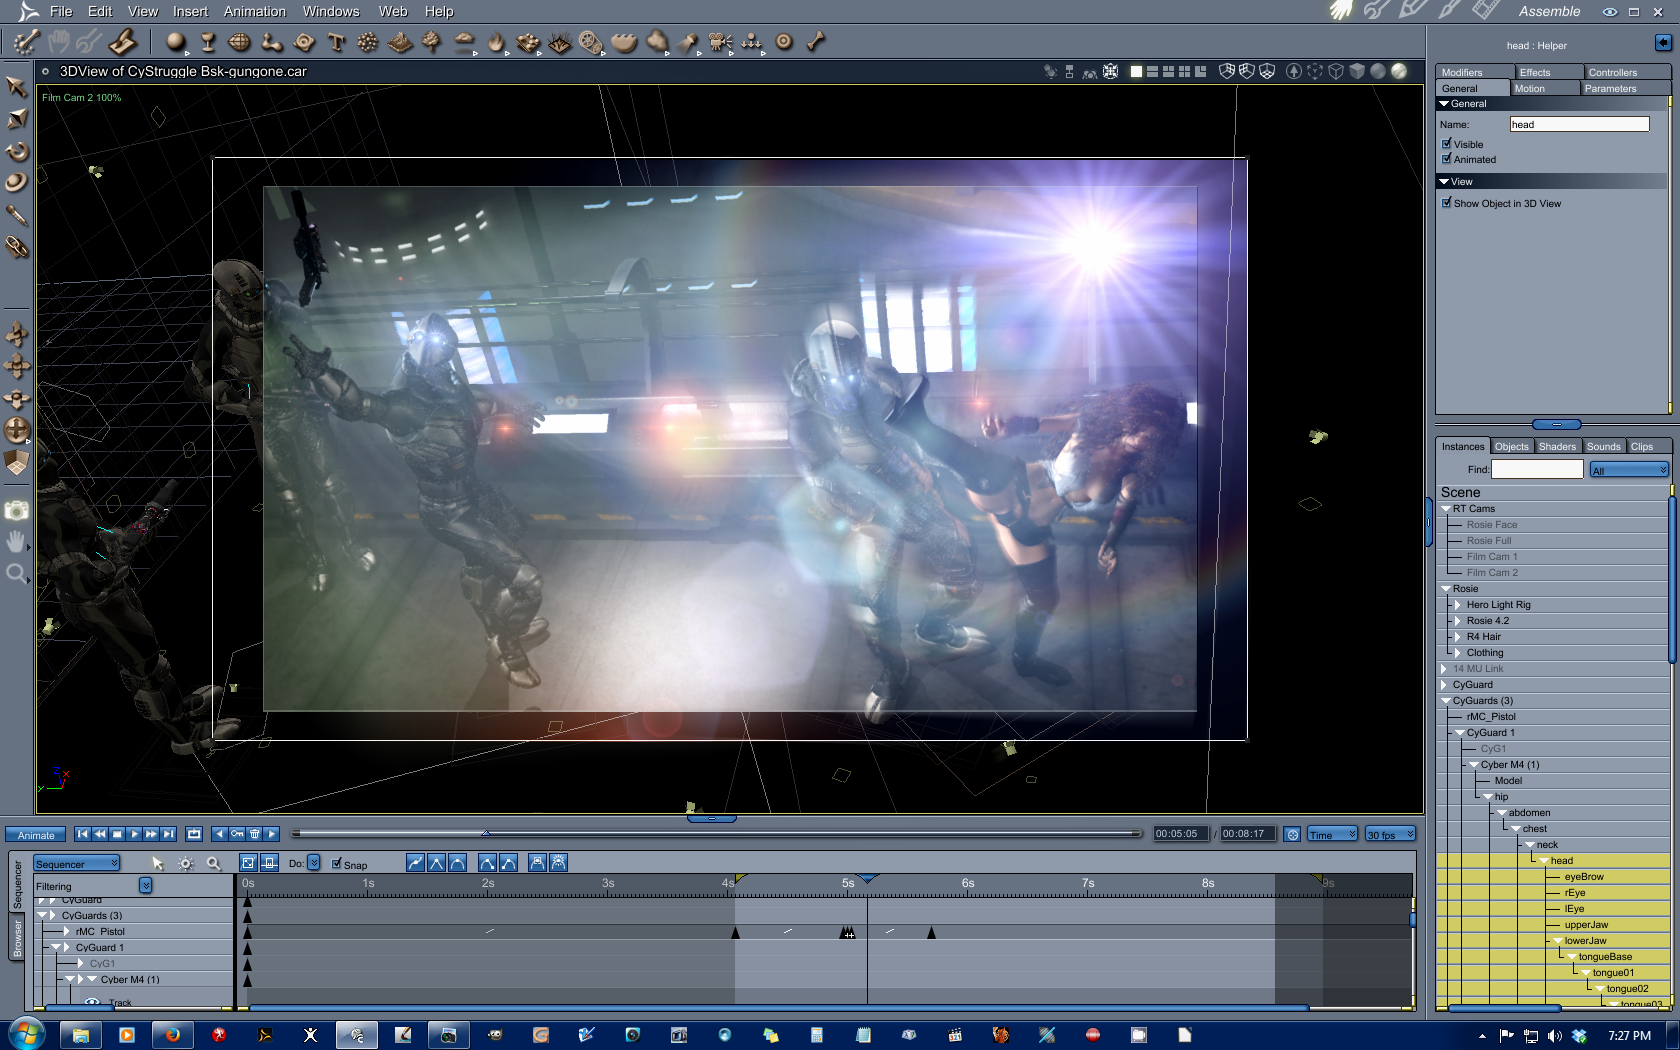
The right side of the image shows the beginnings of yet another thing happening after the first four seconds. The first four shows that Rosie is captured and being held by the cyborg who’s getting his neck bolts loosened in this image by Rosie’s firm and well-placed kick. But that’s not all. You see, that kick is within the first third of an excellent aniBlock from the Martial Arts Combos set, that I have tweaked to fit Rosie’s custom scale and saved as an NLA Clip. I can control how she flips around and where she lands by maneuvering her main group, above and beyond the motions contained within the clip. Fun, eh? It is. Her next swing nails the guy that just lost his gun – just after he finally reacts to the fact that his gun got yanked – something that was entirely unexpected – completely illogical! And yet one more cyborg catches the bite of the super-cool move that Rosie’s performing as Dartan lands sword-first into the remaining baddy. Amazing.
These actors don’t always get it right on the first take. But since they work while I sleep in getting this all filmed, the only time the production loses is the time it took me to set up the animation. And for me, doing so is pretty quick in Carrara. I do understand the dilemma when people remark about pinning feet and hands – a feature not readily accessible with the push of a button in Carrara. But I opt away from relying upon the joint limits – which is what you’re doing when animating that way. It only took a few times for the rotational values (in any animation software) to go into a negative number from the other side of 360 than just going forward, like I would expect it to, for me to start thinking of a different way. So now, when I envision my motions for my actors, I first focus on where the hip is and how is it rotated compared to it’s zeroed default. Mouthful? Well, it is the main part of the concept. I begin by placing the hip where it needs to be along the timeline. I’ll work the next most important limb of the sequence that I have in mind according to the shape that I want the limb to make during that, particular action. Once the limb is in the right shape, and it is rotated properly according to the rotation of the hip, I further tweak where the hip is and its rotation, to match up with where the end of that limb is supposed to be according to my initial vision of the motion. I check back and forth between the various points in time to get these first few parts just right – while entirely ignoring the rest of the joints. Then I work in the rotations of every joint that has to be moved for the sequence. It might sound weird or hard or time-consuming. But since it is entirely predictable to me – not having to rely on limits being obeyed – not having to go in and fix when a limbs suddenly starts to spin out the wrong way (which is actually a quick and simple fix, though) – it gives me full freedom of the shape that my heroes skeletons are making… it turns out to be really fast in the workflow, now that I am used to it. This is part of why you’ll hear me go on and on about how much I love to animate in Carrara. It allows for this type of custom, by-hand keyframing must easier than Poser or DAZ Studio. At least for me.
Personally, I like to go for really fast renders. Not long ago, I also had a thing for trying to do all of my video production except for things like transition effects within Carrara. No post work. I have found that I could use lights and bi-gradient backgrounds, atmospheric effects, volumetric clouds, fog, fire… all manner of Carrara elements to help to keep everything being done within Carrara alone. It’s truly mind-boggling how well that sort of thing can be done because none of those elements that I’ve just mentioned – or any others have to be at all what their names imply. Scale one up or down, apply some modifiers and colors that make the effect you want it to make. In my art room, the box that says “Modeling Clay” on it holds modeling clay. Cool stuff. You can do all manner of things with it. But it’ll always be modeling clay. In Carrara you can let your imagination soar! Cripeman shows us how to make steam using a particle emitter and a bulb light that doesn’t cast light, but uses a visible effect.
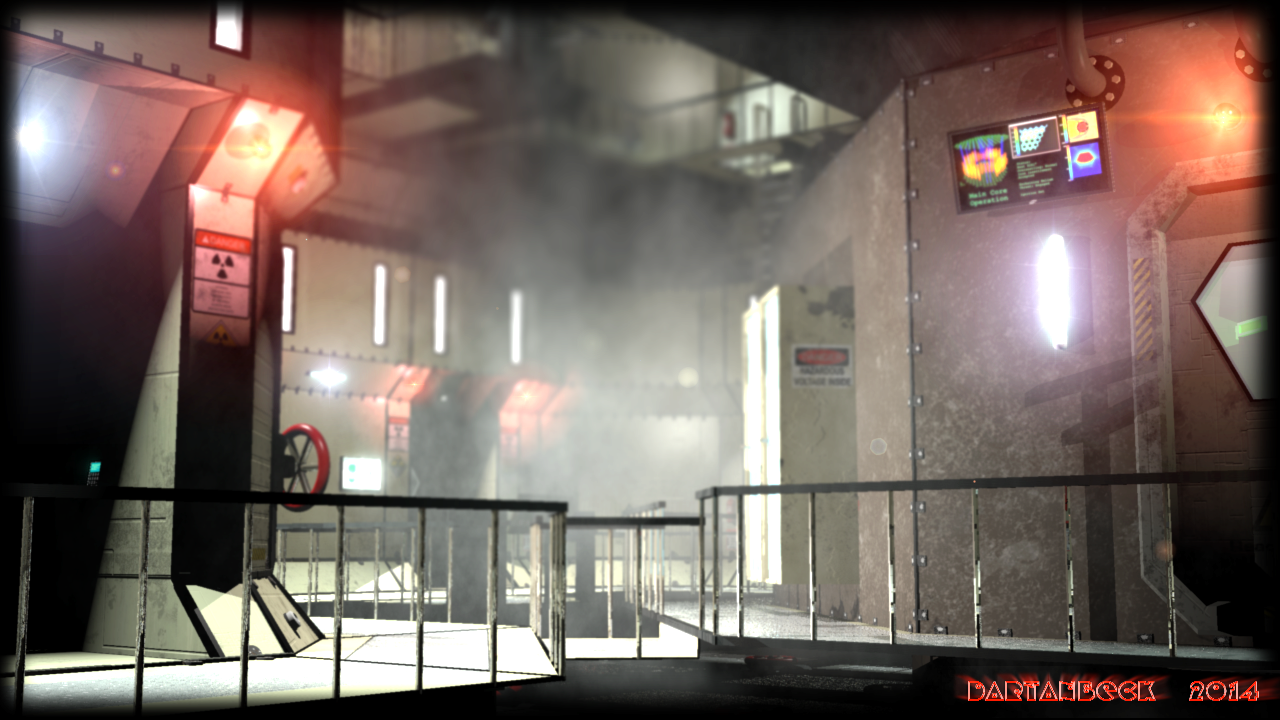
The image below uses light cones to fade the edges to white, amongst other effects created with them – like a mock-style of Depth of Field. I also used Carrara Fog to simulate a ‘painted’ feel to it.
I have already found ways that I enjoy using subtle bits of Aura on my glow channel objects by the time I started seeing posts warning others away from using it at all. One thing that we need to remember in a field as broad as this is that we should never say never. More importantly, we must not keep the word from having us try what we have to work with. Movies wouldn’t be as cool as they are today if we didn’t break the ideals of the norm. Thinking, pushing, and living outside the box is how we need to approach this stuff. Some big production houses might have the ability to have new technologies invented for them. That’s all a part of it, too. There are many other software choices that budget-minded home directors can acquire to help to push the limits beyond our current capabilities. 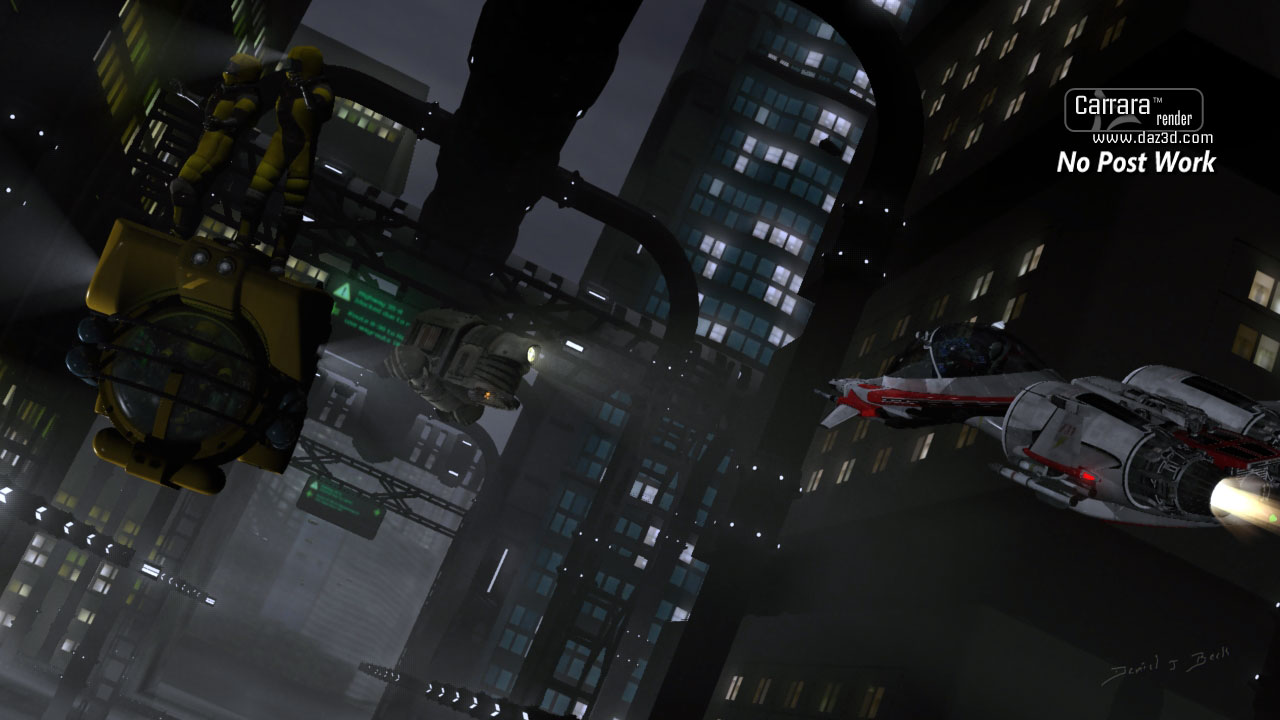 That’s how I found Project Dogwaffle Pro: Howler. I can use that to quickly create animation masks, paint effects, color grading, pro filters and effects, and much, much more, all for one incredibly low price. So what does this have to do with it? Well when “I” need new technologies for “my” production, it falls onto me to find a way. I can either do it with what I have or with something that I can acquire right now, or the whole project might have to get put on hold. Forget that! Being put on Hold means dropped. For now, at least. Learning from a few very optimistic souls at the DAZ forums, like 3dage, MacGuyver and Cripeman, to name but a few, has taught me that if we cannot find a way, it simply means that we haven’t found a way yet… not that it cannot be done. It’s truly amazing what can be done within Carrara. Dogwaffle is constantly being developed to handle the demands of its following of users. Dan Ritchie is amazing at implementing new tech to this wonderful tool, and his marketing partner, Philip Staiger, is truly intense towards testing the new features and putting his findings to narrated video for all of us to see. Very inspiring. Personally, I love how easily I can load in avi or sequenced image files and work with animated effects and edits, powerful rotoscoping, time altering, and professional color grading amongst everything else that the software has to offer. Since I’ve acquired Howler, my production time has been simplified and made much faster overall, which helps to push the whole process forward in a fun and inspirational, creative way. And everything just seems to look nicer!
Animation Help – I do love to create my own keyframe animations by hand. But for a lot of my scenes I find that I can really enhance my workflow by enlisting the help of professional motion artists, like SKA motion, GoFigure, Cliff Bowman, PoserMocap, for a few examples. Either importing aniBlocks or loading PZ2 animation files, I really enjoy using these motions as a starting point and dragging open my sequencer and playing around with the keys and tweaking the movements to fit what I need. There might be a time when I just need some help with the timing of an arm flying about from this side of the body to the other. GoFigure’s “At The Park” aniBlock set has a bunch of great motions to grab. Import in the whole thing, but not at the ‘0’ (zero) time frame, so that I can remove even the first key added if I need to, and then delete keys from all of the body parts I don’t need from this aniBlock. Using Carrara’s NLA features we can make a clip that only affects the collar, shoulder, and forearm on the left side of the figure, leaving the rest to animate however we like to. When I’m piecing various bits together like this, I use the “Scene Range” for making the clip, so I can specifically assign the yellow scene time markers to what I want saved. If I have the ‘delete keys’ option enabled, it will still delete all keys for that character. Then I just bring in another aniBlock that resembles another motion that I need for another part of the body.
Using this mentality towards acquiring bits of information from various motion files really helps to expand the usefulness, and therefore, the value, of having a fine collection to choose from. Kicking a soccer ball or blowing a fit in front of the boss might not be exactly the idea we had in mind. But if we can envision all of the natural movement that such actions contain, we start looking at these files in an entirely new light.


The cover image for this article, Dartanbeck! I love the “softness” of the style with the energy of the pose. It says FANTASY! I’d love to see a walkthrough how you are getting that look…. Is it a lot of postwork? IMO there should be more pride in this kind of “not-bleeding-edge game engine” look (ie: ART). I like photorealism as much as anyone, but there’s so much more to 3D… More illustration and art!!! MORE COWBELL!!!!
Thanks Holly!
The energy is certainly in there – the animation turned out really nice as he slams his blade into the gap in the floor without looking as he leans over the edge and lets out a hellacious scream! 🙂
I am really getting into placing Carrara’s Volumetric Clouds into the camera to help gain this effect, but it takes some time and patience to get it just right. Sometimes it can block too much making it go too much the wrong way – making it look more like a bad render. But in this case, it also helps immensely in selling the animation by having the movement of the mist during the animation. It’s very subtle but that’s what I wanted.
A little post work from Dogwaffle Pro
I’m now totally hooked on Howler, as these sorts of effects can be done very quickly over an entire animation. Tutorials on that to come 😉
TUTORIAL!!! TUTORIAL!!! 😀
Well, since you are teaching me how to use my new DCG shader improvements, I’ll see what I can do! 😉